Understanding Preloading For Web Components

We heard preloading almost every time! But do you really understand what is preloading and how does preloading actually work? In this article, we will talk about preloading and how it should and can be use.

What is Preloading

Most of us will know but there are many that are unclear. Preloading is an action that will load components which are not visible available to the users. This means that any component that are already in the HTML document will be loaded and preloading doesn't help speeding up these components. What we would like to preload are those components that do not resist within the document and components for future pages.

Why Preload component

Why do we want to preload a component if it doesn't help speeding up the existing components on the HTML document?! Simple, let's say we have a gallery which has the following code in our document

<img src='example.jpg'/>

compare to document that has these codes

<img src='example.jpg'/>
<img src='example1.jpg'/>
<img src='example2.jpg'/>
<img src='example3.jpg'/>
<img src='example4.jpg'/>
<img src='example5.jpg'/>
<img src='example6.jpg'/>

Assuming each image in these example are 800kb in size (If you have a script that wait for an onload event to occurs, i wonder when will the script start running). It will be obvious which one will finish first (the first example). So your user gets to see the result like less than 1 minute. The sub sequence images will be preload into the document while the user is still viewing the first one. Thus, clicking the next button will show a loading in progress or immediately displayed the second image depending on how you construct your script to accomplish this.

Although we didn't speed up the image loading time but we manage to speed up the overall waiting time for the whole page to be display completely. Thus, preloading allows us to practice 'load only when needed' concept. This means that those that are not going to display first should be loaded last and allow the page to be fully loaded before their turn is up to run.

If you have very big file size page, it will serve as a notification to the users that the site is loading. On the other hand, preloading allows you to cache them onto the user browser for better responsiveness. (although there are disadvantages of doing this too) This way, sub sequence pages will have better 'speed'.

What component can be preloaded?

Basically you will want these components to be preloaded first since they usually take up the most loading time.

  • Images files
  • Flash files
  • Sound files

There are not much reason to preload other type of document unless they are very big in size. Most document are small enough to load within a few seconds but the one mention above are usually the one we are concern with during web development.

What are the methods for preloading

This depend on which components are you trying to preload. There are all sort of ways to preload certain components such as JavaScript, ActionScript, CSS, Ajax or HTML tag. So depend on which one are you trying to preload and what are you trying to accomplish. Flash files will most likely be ActionScript. For Images, people tend to use CSS, JavaScript for caching and Ajax for preloading with loading image. While sound files will be using embed tag.

How Preloading work

In a way, preloading can be describe as work behind the scene. Basically, the user will not be able to notice. But different way of preloading work differently,

CSS

In CSS, the objective is to hide those component you want to preload. And you might want it to be placed at the last row in your HTML document (means it will load only all relevant component has loaded). Methods used are usually,

  1. Visibility: hidden
  2. display: none
  3. width:0px;height:0px;
  4. top: -99999px; or left: -999999px

The objective is to hide it so that it will store in the cache.

JavaScript

In JavaScript, we used the image object. (this method can also be used to preload flash files into the cache)

var obj = new Image();
obj.src = 'test.jpg';

This way it will preload the images for sub sequence pages as the images are cached. This method can also be used to produce loading image before applying the following code

document.getElementById('container').innerHTML = '<img src='test.jpg/>';

Ajax

Ajax let the server script to load the image page, cached and send it back to the document for display.

function preload(url) {
  // display loading image
  // send the url to be open on the server side. hence, cached.
  document.getElementById('loading').style.visibility = 'visible';
  document.getElementById('container').innerHTML = '';
  var obj =  new XMLHttpRequest();
  obj.open('GET', url, true);

  obj.onreadystatechange = function() {		
    if (obj.readyState == 4 && obj.status == 200) {
      // once cached, we hide the loading image and display the content
      if (obj.responseText) {
        document.getElementById('container').innerHTML = '<img src=''+url+''/>';
        document.getElementById('loading').style.visibility = 'hidden';
      }
    }
  };
  obj.send(null);
}

During the request, we can display a loading in progress image until the new image has loaded. However, this doesn't seems to work on IE 7. (this is shown later on demo section)

HTML tag

This is usually used for sound files.

<EMBED NAME='mySound' SRC='mySound.mid' 
LOOP=FALSE AUTOSTART=FALSE HIDDEN=TRUE MASTERSOUND>

Action Script

If you are interested, here is a video.

The Demonstration

i will demonstrate using Ajax which the code has been written above. Please click the image to see the loading. Here are the files and demo

Tutorial: Cross browser Multiple Uploader With SWFUpload And JavaScript

Most of us will know that performing multiple upload with JavaScript alone that are both dynamic and powerful is complicated and confusing. Let alone having cross browser capability. Furthermore, all browsers will only allow one file to be chosen per dialog box at any one time. This makes multiple upload a tedious job for our users. Moreover, most methods are having a hard time populating the bytes uploaded to the system (progress bar). Therefore, there is a need for a more powerful and easier solution for multiple uploader that can both upload asynchronously and allows users to select multiple files at one go.

Solution

We can use JavaScript, iFrame and PHP library to perform the above task. However, this is more complicated and required to configure the server so that it contains the PHP library. If you are working on Open Source application, requesting users to configure their PHP server in order to use a certain function is not desirable. However, this can be done as follow

  • Using JavaScript to eliminate the need for multiple upload file
  • Using iFrame to store each upload bar to be prepared to upload
  • PHP itself is capable to receive multiple files
  • However, PHP is unable to show the process bar of each upload. This will required < a href="http://pecl.php.net/package/APC" rel="nofollow">Perl library(php_apc.dll) that was built for PHP which is currently unavailable in PHP 5.2 but will be placed into PHP in version 6. (that's is why i didn't write this tutorial)

I personally did the above 2 years ago when i was still working for an Australia based company (which i might write it out in this site later). The other method is to use a flash uploader such as SWFUpload.

What is SWFUpload?

SWFUpload is an open source flash uploader that WordPress is currently using. Although this is not a normal plug and play flash uploader, it is certainly updated and powerful. Moreover, it has cross browser capability and allow users to select multiple files at one time. However, implementing it and understanding it do takes time. But it worth it.

Let's get started

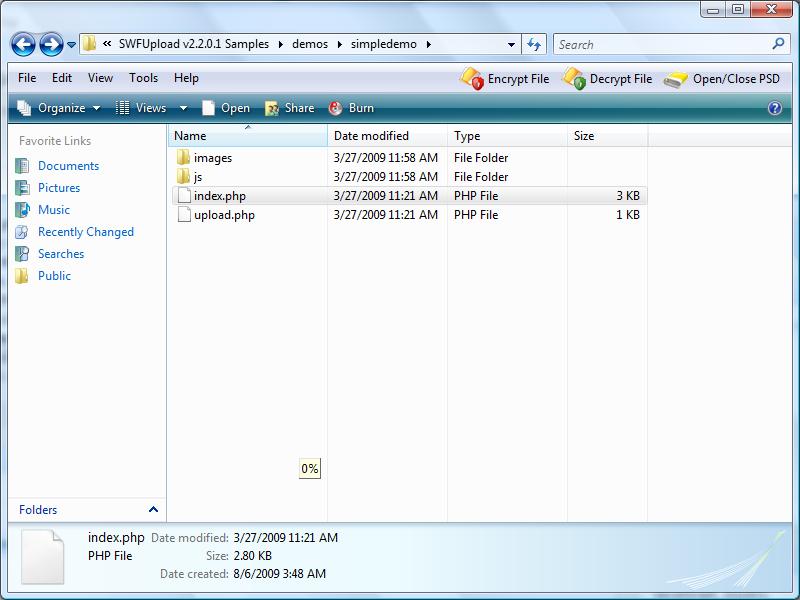
I did this on one of my WordPress plugin. But getting it to work really waste a lot of my time. Therefore, i decided to write them up for some of you out there who are just getting started with this. Enough of chit-chat. Let's get started. The fastest and easiest way is to download their sample files. The sample files will have most of the things you need. The sample files are similar to their demo page. This means that the sample files are the exact same thing as the demo given. Let's just start with the simplest first. Look at Simple Upload Demo and this is what we want to achieve at the end of this article. What you need are the following files in the simpledemo folder that you have downloaded to your local drive.

  • index.php
  • all files in js folder
  • all files in css folder
  • all files in swfupload folder located outside of simpledemo folder

Just in case you don't get it, here's a screenshot.
simpledemo
basically you will only need partial code from index.php which you can figure out them very quickly. The files that you would actually edit are the codes in index.php and handler.js only.

Important Part

Basically, if you throw the sampledemo into your server it should display exactly the same as what you see on their demo page. However, i do not think you want it to be exactly the same. You can try to read the documentation which is quite helpful in some way and in many way it does not. Unlike normal upload, SWFUpload work a little bit different which you will need to know(or suffer).

  • SWFUpload do not use MIME type, so don't try to validate whether it is image in PHP. This is a flash uploader!
  • SWFUpload will required the initialization of the object to work. Invalid of initialization will cause you a headache in just displaying the upload button (quite easy just don't be careless)
  • You need to ensure that your PHP files on the server side is working correctly before using SWFUpload. This means that you must check whether it is uploading correctly using normal file uploader
  • The above part will help u a bit in reducing debugging problem later. The other problem you might face greatly is debugging issues. How do we debug when we are using flash uploader? You will have to look up at the handler.js file with the method 'uploadSuccess' that will return you with the serverData. This 'serverData' variable contains what is happening on your server side. This is the only thing that can assist you in debugging
  • you can write methods to overwrite the handler default in the swfuploader.js by using the handler.js. No modification is needed in swfuploader.js.

The list can just go on, if you face any problem you can just send me an email. For the important initialization part,

		var swfu;

		window.onload = function() {
			var settings = {
				flash_url : "../swfupload/swfupload.swf",//the path of swfupload.swf.eg. http://hungred.com/swfupload.swf
				upload_url: "upload.php",//the path of your upload php file. eg. http://hungred.com/upload.php
				post_params: {"PHPSESSID" : "<?php echo session_id(); ?>"}, // this is additional information for your upload.php file. eg. in upload.php 'echo $_POST['PHPSESSID'];'
				file_size_limit : "100 MB", //the limit impose for your flash uploader which is different from the one in your upload.php (additional validation)
				file_types : "*.*", // allowed file type. eg. '*gif*png*jpg';
				file_types_description : "All Files", //the name of the dialog box
				file_upload_limit : 100,//the number of upload allowed. eg. max is 100 
				file_queue_limit : 0,// the maximum amount of queue upload allowed. eg. 0= unlimited
				custom_settings : {
					progressTarget : "fsUploadProgress",
					cancelButtonId : "btnCancel"
				},
				debug: false,//debugging mode that display all the information of the flash uploader. You can customize them in handler.js

				// Button settings
				button_image_url: "images/TestImageNoText_65x29.png",//button image populated by the flash uploader
				button_width: "65", //width of the button
				button_height: "29",//height of the button
				button_placeholder_id: "spanButtonPlaceHolder", //the id container of the button. eg. <div id="spanButtonPlaceHolder"></div>
				button_text: '<span class="theFont">Hello</span>',//the text in the button
				button_text_style: ".theFont { font-size: 16; }",//the style of the text
				button_text_left_padding: 12,//left padding
				button_text_top_padding: 3,//top padding
				
				// The event handler functions are defined in handlers.js
				file_queued_handler : fileQueued,
				file_queue_error_handler : fileQueueError,
				file_dialog_complete_handler : fileDialogComplete,
				upload_start_handler : uploadStart,
				upload_progress_handler : uploadProgress,
				upload_error_handler : uploadError,
				upload_success_handler : uploadSuccess,
				upload_complete_handler : uploadComplete,
				queue_complete_handler : queueComplete	// Queue plugin event
			};

			swfu = new SWFUpload(settings);
	     };

The code above are so long but there are no comment on it when you look at the demo files provided. I have comment above to explain what it does since it is criteria important you understand them during your development. Handler do not have comment as those are methods exist in handler.js which means you can change how it should be handler. Lastly, you can edit the display by changing their css file, default.css. If you need additional example, please look into your WordPress swfupload folder located in the wp-include folder.

The Demo

I can't really provide with you with the exact same demo given by SWFUpload. You can see the more advance part on WordPress, 'Add new' post section. Or you can view the screen shot that i did with my plugin below.
demo

The Summary

The reason for this article is to make aware some of the points in SWFUpload flash uploader. Although it is powerful, the community for such application is still quite small which might bring some difficulty for some of the people out there who are starting to use this application. Why this and not other alternative uploader? Updated, maintained, acknowledged, no additional configuration required, multiple selection, cross browser, small size, etc. the list can goes on. Enjoy!

Ways to debug your jQuery or JavaScript codes

Debugging your client code is rather a normal procedures for any web developers. Everyone will shout Firebug! yeah, me too. But Firebug is great for syntax detection but how about logic problem? In this article i will share with you some of the ways i used to debug my JavaScript or jQuery codes when I'm developing my web application. I will also share with you a trick that i used on my code to alert me that a bug occurs in a particular script since i don't get many helpful users nowadays.

Alert Them Out

The most simple and basic way of debugging is by using JavaScript alert function. This is old but is quite useful sometimes. Especially when you do not want to remember other debugging methods. It's pretty simple, alert the message you want to see. If the alert doesn't appear, this means that the error is before the alert statement. I usually do this when I'm debugging IE although there are tools available for IE.

alert("The Bug Is Somewhere Before ME!")

Log them up

Well, if you are using WebKit browsers for your development (FireFox, Chrome, Safari) you may want to try this.

if (window.console)
  window.console.log("The Bug is killing me");

What this does is to log the string 'The Bug is killing me' into the console such as Firebug. It's always better than using alert and see this infinity loop that keep popping out until you are force to shut down your browser!

Log them with jQuery

The above two methods work both in jQuery and JavaScript. But this only function well in jQuery. This is definitely not something i came up with but its from Dominic Mitchell

  jQuery.fn.log = function (msg) {
      console.log("%s: %o", msg, this);
      return this;
  };

The above creates a function, 'log'. This function will do exactly similar to the one above but the differences is that it format the string a little bit before displaying out to the console. This is good for debugging your long chaining with jQuery. Although the previous method also can be used to debug chaining but it will required an additional line instead of including it into the chaining process. So you can debug this way,

  $(root).find('li.source > input:checkbox').log("sources to uncheck").removeAttr("checked");

Try and catch

In JavaScript, you can try to catch the error in a particular scope. This way, it won't propagate to other section of the code.

try
  {
  //Run some code here
  }
catch(err)
  {
  //Handle errors here
  }

This is pretty good when you are trying to debug one of the many function in your JavaScript.

Catch them all

The last one i am going to show you is to catch any one of the error into a particular function instead of using multiple try and catch.

function handleError(e)
{
alert(’An error has occurred!\n’+e);
return true;
}
window.onerror = handleError;

This will handle any error occurs in your JavaScript code to the function 'handleError'. You will want to use this at the end of your script. Especially if you want to be informed whether a particular function or script has malfunction and the users are not reporting. Basically, what you can do is to gather all information and placed them into a String or JSON. Using ajax to delivery these information to your email or database. This way, your support team will have an idea which part are having problems and your system will be more reliable. (testing doesn't means 100% bug free) The information that you may want to know are usually located at Navigator Object in JavaScript.

Summary

These are the methods i usually look at when debugging my own client script. It might not be everything but i hope it can be useful to some of you out there. Hope you learn something!

Tutorial: How to make your own simple and nice Slider with jQuery Part 2

In my previous tutorial on how to create a Slider with jQuery, i illustrated the concept to build up an jQuery Slider easily with a few line of jQuery code and an explanation on how it is being done. But in my previous article, it doesn't work as perfectly as this one since our objective is to provide an understanding on how it work. In this article, i will bring out the fully workable version of my previous article. Short to say, this article will contains more information on why the previous one doesn't work as well as what has been found and solved.

Requirement

Before i start this short article (hopefully) there is some requirement that i wish you could follow before proceeding to read further.

  1. Read the previous tutorial on Slider with jQuery because in this article i won't repeat much on the concept and how it is being done!
  2. Have basic knowledge of HTML, jQuery and CSS
  3. Wish to construct a workable jQuery Slider on your own instead of just understanding how it work

The Problem

There are a few things i came across when working on a jQuery Slider from my previous article.

  1. The scroller doesn't stop when the user mouse up sometimes
  2. jQuery doesn't support sequence event trigger: means it cannot prioritize which event should trigger when an element has multiple events
  3. The mouse will always pull to the starting line of the scroller

This is as far as i remember for what happen between the current and the later version differences. Although both work quite well.

The Solution

The CSS and HTML are perfectly the same! The only differences occurred on the jQuery codes and below listed what has been done to eliminate the above issues and the final code in jQuery.

  1. The mouseup event handler was embedded within mousemove event handler. This means that mousemove must first initialize before mouseup will be triggered which is not always the case. Thus, the two event handler were seperated.
  2. Since jQuery doesn't support priority event triggering, i used a boolean variable to stop the movement and wait for mousedown event to complete before it can start the other instruction within the mousemove event. This will solve the problem where mousemove initialize first before the distance between the scroller and starting point being calculated in mousedown event.
  3. The reason why it always pull to the starting line was because it was instructed to do so. I did not calculate the disance between the scroller and starting point which is required to tell the program to start at any point occurs within the scroll bar!

The above explanation might not help you understand a single bit at all! But the below code will definitely assist you in relating the explanation above.

$(function(){
	var myoffset = $('#scroller').offset();
	var myxpos = parseInt(myoffset.left); 
	var width = parseInt($('#scrollbar').css('width')) - 196;
	var action = false;
	var startpos = 0;
	var move = 0;
	var scroller = 0;
	
	$().mousemove(function(e){
		move = parseInt(e.pageX-myxpos);
		$('#scroller').mousedown(function(){	
			action = true;
			scroller = parseInt($('#scroller').offset().left);
			startpos = move - (scroller - myxpos);
		})
		if(action)
		{
			move = move - startpos;
			if(move < = 0)
				move =0;
			if(move >= width)
				move = width;
			if(action)
				$('#scroller').css('left', (move)+'px');
		}
	})
		$('*').mouseup(function(){
			action = false;
		});

});

Let's see how do i explain this. Let's do it in point form similar to the problem we have.

  1. Notice '$('*').mouseup(function(){...' was placed outside instead
  2. Notice 'if(action)......' was there to stop all instruction from initializing before '$('#scroller').mousedown(function(){..' completed'
  3. Notice '$('#scroller').mousedown(function(){ ....' contains variables 'scroller' and 'startpos'

I think this will clear out what my messy explanation has just caused. After these three has placed up, you will have a full and nice version of jQuery Slider from my previous article.

The Demo

It will be pretty confusing whether there is really a full version of jQuery Slider without using a jQuery Plugin. Thus, i have prepare two demo for you. The first one is the understanding demo and the other one is the current full version demo!

Tutorial: Simple grey out screen effect with jQuery

Grey out screen is done previous in JavaScript. But jQuery has became so powerful in reducing the number of codes required that makes me wanted to try how well this can be done using it. Personally, i wanted to check out how easy it is to create a grey out screen with a pop out box at the center of the screen. This is purely for the sake of exploring and experiencing how simple can a grey out screen be done in jQuery.

The Objective

The objective of this article is to produce a simple grey out screen effect in jQuery with the minimum amount of code required. Of course, this is just the goal. But let's see how simple and easy this can be done with minimum amount of codes and maximum completeness.

The Requirement

Here are the following requirement for this simple tutorial

  • Basic CSS, HTML, jQuery Knowledge
  • Read what is written!

Although it is obvious, but usually people tend to skip the second requirement.

The Concept

Let's imagine the body tag (also known as <body>) is the curtain and the box is the person who will appear when the curtain is closed. If the box is in the body when the curtain is closed, we won't be able to see the box!(you will see no person out on the front when the curtain closed). Furthermore, if we grey out the body tag the background of the page will change to black instead of grey which is not what we want. Therefore, the grey out screen should be placed as a standalone curtain just below the body tag (children of <body>). Normally, we will usually assume when the screen is grey out, all the child within the screen will also be grey out and those that are outside are unaffected. Unfortunately, this is not the case. It may surprise you but any element in the screen will be display instead! eg. anchor or hyperlink. Thus, if you want your element to be untouchable after grey out effect, it is best to placed grey out screen as standalone!

The Code

The code will be split into three part, HTML, CSS and jQuery. There will be more explanation than codes since we will want to understand what is going on in the code and the code is suppose to be MINIMUM

HTML

We will need three things in this article. They are 'box', 'screen' and 'button'.

	<input type='button' value='grey out me!' id='button'/>
	
	<div id='box'>
	</div>
	
	<br/><br/><br/><br/><br/><br/><br/><br/><br/><br/><br/><br/><br/><br/><br/><br/><br/><br/><br/><br/><br/><br/><br/><br/><br/><br/><br/><br/><br/><br/><br/><br/><br/><br/><br/><br/><br/><br/><br/><br/><br/><br/><br/><br/><br/><br/><br/><br/><br/><br/><br/><br/><br/><br/><br/><br/><br/><br/><br/><br/><br/><br/><br/><br/>
	
	<div id='screen'>
	</div>

And finally a lot of break to make the page long enough to detect a problem later on. The elements are describe below,

  • box: the pop out box after screen grey out
  • button: the button that will initialize screen grey out
  • screen: the screen that will cover the whole page grey!

CSS

Well, on the CSS part we will style the 'box' and 'screen' only!

#box
{
	width: 150px;
	height: 150px;
	background: #FFF;
	border: red dotted 5px;
	text-align: center;
	position: absolute;
	margin-left: -75px;
	margin-top: -75px;
	left: 50%;
	top: 50%;
	z-index: 20;
	display: none;
}

#screen
{
	position: absolute;
	left: 0;
	top: 0;
	background: #000;
}

These can be placed in jQuery code instead but since we want it to render faster, placing them in CSS will be a much better option(It really depend on you). Let me explain the 'box' CSS first.

  1. Give 'box' a width, height, background color and border so that it is visible on the screen
  2. align 'box' to center
  3. position it as absolute and make it visible(z-index) even when the screen is grey out
  4. margin-left/top,top,left are to align it on the center of the screen (cross browser) but in a fixed way
  5. we hide it (the display)

The 'screen' CSS is fairly easy to understand. We have to position it as absolute and align it at the top left hand corner so that it will cover the entire screen!

jQuery

Above section should be quite clear and simple. But, the jQuery code is even easier to understand.

$(function(){
var pop = function(){
	$('#screen').css({ opacity: 0.7, 'width':$(document).width(),'height':$(document).height()});
	$('body').css({'overflow':'hidden'});
	$('#box').css({'display': 'block'});
}
$('#button').click(pop);
});

The above should be quite basic. But the explanation are listed below,

  1. 'var pop = function(){..' wait until jQuery is ready!
  2. 'var pop = function(){..' create a function name 'pop'
  3. '$('#button').click(pop);..' attach an event handler, click onto the button
  4. '$('#screen').css({ opacity: 0.7, "w....' function activate we grey out the screen by providing the 'html' or 'page' width and height (instead of box size). This will cover the whole screen.
  5. '$('body').css({"overflow":"hidden"});' this is to fix the problem of using a 'fixed' center align CSS declaration
  6. '$('#box').css({"display": "block"});' this is to make the box appear!

It is really that easy! But going into grey out mode is simple, how about returning back to normal? Definitely, an extra event handler is required on the 'box' to reverse back the procedure!

$(function(){
var pop = function(){
	$('#screen').css({'display': 'block', opacity: 0.7, 'width':$(document).width(),'height':$(document).height()});
	$('body').css({'overflow':'hidden'});
	$('#box').css({'display': 'block'}).click(function(){$(this).css('display', 'none');$('#screen').css('display', 'none')});
}
$('#button').click(pop);
});

I have just added two things above, can you identify them?

The Demo

The above demo and files can be viewed from the following link.

Wait!

I'm not done (nagging)! If you notice, i made a cheat on top to simplify the overall complexity. And the cheat is 'overflow: hidden' on the jQuery code. But not all browser support this! How about those that doesn't?! This is where i add in additional component so that we do not have to even rely on 'overflow:hidden'!

The Problem And Solution

The problem with the above grey out screen effect was due to the 'box' (the cheat was for 'box' too). remained at the same position when we are scrolling which is a big NO NO. Therefore, we can either make the box to align fixed at the center or move along while the user scroll (persistence box). We have illustrated the cheat for screen grey out effect using jQuery. Now we will do the second one, the persistence box.

The Persistence Box

The answer to persistence box is located at Align center of the screen while scrolling with css What we have to do here is to change the CSS 'box' position: absolute to position: fixed. Of course, we will have to remove the overflow: hidden on the jQuery statement. This will make it chase after your scroller and urge your users to take action on the 'box'. The final CSS code will look like this,

#box
{
	width: 150px;
	height: 150px;
	background: #FFF;
	border: red dotted 5px;
	text-align: center;
	position: fixed;
	margin-left: -75px;
	margin-top: -75px;
	left: 50%;
	top: 50%;
	z-index: 20;
	display: none;
}

And we will remove overflow: hidden in jQuery and the final code will look like this,

$(function(){
var pop = function(){
	$('#screen').css({ opacity: 0.7, 'width':$(document).width(),'height':$(document).height()});
	$('#box').css({'display': 'block'});
}
$('#button').click(pop);
});

This look even shorter than the previous one! Finally, we get a complete screen grey out effect in it simplest form.

Update 25 September 2009****
Matt asked a very good question below, this method will caused the grey out box stuck due to the css being set to 'fixed'. Hence, minimize to maximum in window browser will caused the grey out to stuck at the minimize size. Here is one of the solution you can live with.

$(function(){
var pop = function(){
	$('#screen').css({	"display": "block", opacity: 0.7, "width":$(document).width(),"height":$(document).height()});
	$('#box').css({"display": "block"}).click(function(){$(this).css("display", "none");$('#screen').css("display", "none")});
}
$('#button').click(pop);
$(window).resize(function(){
	$('#box').css("display") == 'block'?pop.call($('#button')):"";
});
});

I added an event handler during resize, check whether the box is displayed and it was displaying during resize we overwrite the pop out box again. The demo page was also updated for this update.

Demo for persistence box

The demo can be viewed on the following link!