Yii: How to Customize Ajax Call To Controller Without Using Native jQuery Yii Code

This is another interesting article that will definitely help many Yii developers and its community. The situation was that I wanted to use my own jQuery code to send and receives the value returned by Yii controller. However, it seems to always return me with the whole html page text. On the client side, i wasn't using any jQuery Yii code. Instead, i wrote out the logic to fit in my theme properly. The tricky part was to sent in ajax call to Yii controller. In this article, i will try to explain how this can be done without using the native jQuery Yii code. (hopefully things won't get too confusing)

Ensure Ajax Call to Controller

First thing first. We need to enable Ajax between the view and the controller. This can be easily found on google and Yii page did demonstrate a very neat way of doing this. So let's use the example one shown on Yii CActiveform page.

On the view side, we have the following code:

<?php $form = $this->beginWidget('CActiveForm', array(
    'id'=>'user-form',
    'enableAjaxValidation'=>true,
    'focus'=>array($model,'firstName'),
)); ?>

<?php echo $form->errorSummary($model); ?>

<div class="row">
    <?php echo $form->labelEx($model,'firstName'); ?>
    <?php echo $form->textField($model,'firstName'); ?>
    <?php echo $form->error($model,'firstName'); ?>
</div>
<div class="row">
    <?php echo $form->labelEx($model,'lastName'); ?>
    <?php echo $form->textField($model,'lastName'); ?>
    <?php echo $form->error($model,'lastName'); ?>
</div>

<?php $this->endWidget(); ?>

On the view side, we will need to use $this->beginWidget('CActiveForm', array(.... to create our form tag in order for ajax to work properly on your view. The $form->error is needed for the native Yii jQuery library,yiiactiveform, to be included.

On the controller, we have the following code:

public function actionCreate()
{
    $model=new User;
    $this->performAjaxValidation($model);
    if(isset($_POST['User']))
    {
        $model->attributes=$_POST['User'];
        if($model->save())
            $this->redirect('index');
    }
    $this->render('create',array('model'=>$model));
}

protected function performAjaxValidation($model)
{
    if(isset($_POST['ajax']) && $_POST['ajax']==='user-form')
    {
        echo CActiveForm::validate($model);
        Yii::app()->end();
    }
}

Do take note of the protected function called performAjaxValidation. This is needed for you to validate through ajax. The below code is equally important for the controller to start validating through ajax call.

$this->performAjaxValidation($model);

This is all the controller needs to validate ajax calls.

Once you have your Yii ajax setup, you should be able to make ajax call using Yii native jQuery library which doesn't really give you the flexibility you need. In this case, we will have to make our own jQuery code to interact with Yii Controller.

Making Your Own jQuery Code To Send Request To Yii Controller

Now we will need to write our own jQuery code to sent request to Yii controller. From the above Yii view code, we will need to slightly alter some value so that the Yii native jQuery code library, yiiactiveform doesn't get populated. I also added an additional div block with the id 'error' so that our error can be placed in there.

<?php $form = $this->beginWidget('CActiveForm', array(
    'id'=>'user-form',
    'enableAjaxValidation'=>true,
    'focus'=>array($model,'firstName'),
)); ?>

<?php echo $form->errorSummary($model); ?>
<div id='error'></div>
<div class="row">
    <?php echo $form->labelEx($model,'firstName'); ?>
    <?php echo $form->textField($model,'firstName'); ?>
</div>
<div class="row">
    <?php echo $form->labelEx($model,'lastName'); ?>
    <?php echo $form->textField($model,'lastName'); ?>
</div>

<?php $this->endWidget(); ?>

After all the long winded talk, i shall show you how this is being done.

$(document).ready(function()
{
	$('#user-form').submit(function(event)
	{
		event.preventDefault();
		var $form = $(this);
		$.ajax({
			url: $(this).attr('action'),
			dataType: 'json',
			type: 'POST',
			data : $form.serialize()+'&ajax='+$form.attr('id'),
			success: function(data, textStatus, XMLHttpRequest)
			{
				if (data != null && typeof data == 'object'){
					$.each(data, function(key, value){
						$('#error').append(value);
					});
					
				}
			},
			error: function(XMLHttpRequest, textStatus, errorThrown)
			{

			}
		});
		return false;
	}
}

If you study jquery.yiiactiveform.js closely or saw that the controller is looking for a post key to determine an ajax call, you will notice that the reason why you are failing to get a proper json object back from the controller was because you did not append the parameter 'ajax' on to the data section, you will need to append the ajax key into it so that the controller will treat it as an ajax caller and return the appropriate json object to you instead of the return page string. And this is the reason why the below controller method is so important for this to work.

protected function performAjaxValidation($model)
{
    if(isset($_POST['ajax']) && $_POST['ajax']==='user-form')
    {
        echo CActiveForm::validate($model);
        Yii::app()->end();
    }
}

got it? hope it helps 🙂

WordPress: How to check widgets in dynamic sidebar

There are times when you need multiple dynamic sidebar on your WordPress blog. Espeically when you are trying to customized your WordPress into something more powerful. Creating multiple dynamic sidebar is as simple as writing the following code.

$loop = array('SIDEBAR 1', 'SIDEBAR 2', 'SIDEBAR 3', 'SIDEBAR 4','SIDEBAR 5');
foreach($loop as $item){
if ( !function_exists('dynamic_sidebar') || !dynamic_sidebar($item) )
	echo 'no dynamic sidebar';
}

With a sidebar registration logic in your theme functions.php such as below,

$loop = array('SIDEBAR 1', 'SIDEBAR 2', 'SIDEBAR 3', 'SIDEBAR 4','SIDEBAR 5');
foreach($loop as $item){
	register_sidebar( array(
		'name' => __( $item, 'example' ),
		'id' => $item,
		'description' => __( $item, 'example' ),
		'before_widget' => '<li id="%1$s" class="widget-container %2$s">',
		'after_widget' => '</li>',
		'before_title' => '<h3 class="widget-title">',
		'after_title' => '</h3>',
	) );
}

Everything looks good. You could customized the tag and title before your widget and title. Not until you find yourself having to customized your dynamic sidear with a customized before and after tag.

Adding Before and After Tag On Dynamic Sidebar

Well, its not that hard, just add it as follow and you will get your before and after tag for your sidebar!

$loop = array('SIDEBAR 1', 'SIDEBAR 2', 'SIDEBAR 3', 'SIDEBAR 4','SIDEBAR 5');

foreach($loop as $item){
echo '<div class="'.$item.'">';
if ( !function_exists('dynamic_sidebar') || !dynamic_sidebar($item) )
	echo 'no dynamic sidebar';
}
echo '</div>';

There! all our sidebars have its own wrapper! But i only want these wrapper if there are widget on it! erm...i guess i would need to check whether there is widget on it before i append the wrapper for each sidebar. How do i check whether a widget is used on a dynamic sidebar?

How to check widget is in used on a dynamic sidebar

The problem is simple, the solutions, you would have to dig a bit. The solutions that i managed to get my hand on was is_active_sidebar which tells us whether a particular sidebar contains a widget. Hence, we can perform our code as below,

$loop = array('SIDEBAR 1', 'SIDEBAR 2', 'SIDEBAR 3', 'SIDEBAR 4','SIDEBAR 5');
foreach($loop as $item){
if (is_active_sidebar($item) ){
	echo '<div class="'.$item.'">';
	dynamic_sidebar( $item ); 
	echo '</div>';
}

the above code will determine whether a particular sidebar is active (contain a widget), if it does contain a widget, we can add a wrapper before and after the dynamic sidebar and populate out the contain of this dynamic sidebar within the wrapper tag. For those which doesn't have any widget, we will simply ignore it.

is_active_sidebar doesn't work!

Well, it really doesn't work that is why there is an article from me. ha ha ha. It is actually a small bug in this particular function provided by WordPress. (can't bother to report so i write it out instead) If you look closely into the core code of is_active_sidebar, you will notice that if you pass it either lowercase or index number into this method, you will find that it works perfectly fine. However, if you pass in an uppercase as shown on my example, you will face this problem. The reason is that the method will sanitize the text you provide and this cause your string to go lowercase whereas the sidebar that you have registered was an uppercase. Therefore, it fail. What you have to do is either lowercase your sidebar names or create a logic that lowercase it for you.

Hope it helps someone out there 🙂

Boot Ubuntu USB Drive in Virtual Box on Windows Environment

Recently i got my hand on a Ubuntu USB installation drive from my friend. I was excited to get this Ubuntu into my Virtual Box but found out that the virtual box doesn't seems to like USB drive very much and only wants ISO or CD copies! I finally manage to get this thing work after some try and so i decided to write this down in case i want to do such stupid thing again.

Environment

Before is starts let's look at my environment.

  1. Windows 7
  2. Virtual Box v3.2.12
  3. Ubuntu 10.10

I think that's about it.

Physical Disk on Virtual Box

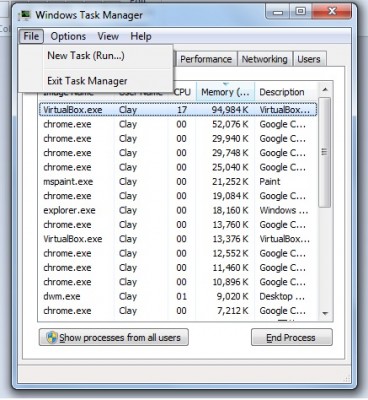
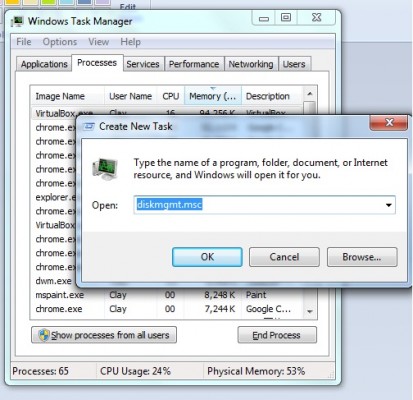
Since virtual box does not know where to look at we have to specifically tell it to look at our hard drive. In order to do this we have to first know where is our current hard drive located (which parking slot). In Windows 7 or any windows environment you can easily find this by typing 'diskmgmt.msc' on the run section when you press Ctrl+Shift+Esc. You should see this below,


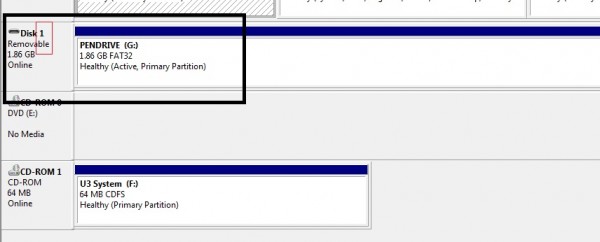
Once you clicked ok, the disk management tool box should appeared and you should take note of your disk location which is highlighted in red for my case.

Once you have done all these, you should have a clear idea where is your parking slot (drive location). Next we will need to create this physical location for our Virtual box to read.

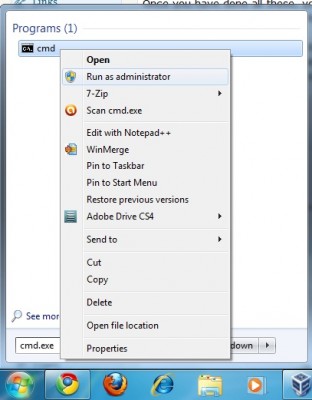
You all might be aware that starting from Window Vista, most of our files are being protected. In order to create a physical drive, we will need to run our command prompt or terminal by pressing cmd.exe on run or through search (advisable since we want to run our command prompt on administration access).

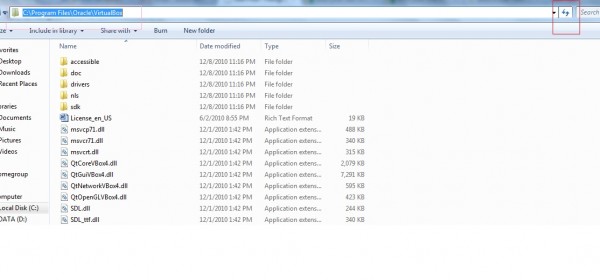
The command prompt should pop out and you should now find the location of your virtualbox installation directory as shown below,

copy the location and paste it into the command prompt with cd infront which will give you this

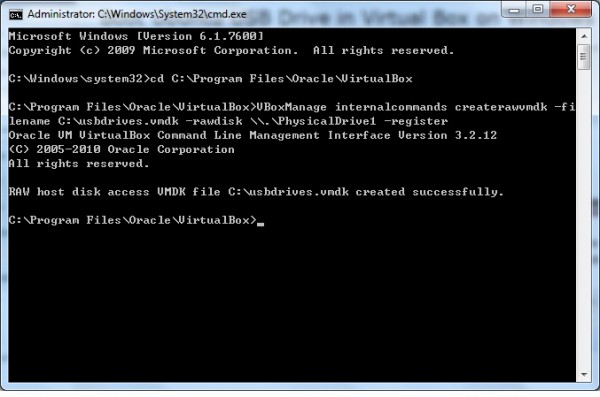
cd C:\Program Files\Oracle\VirtualBox

Next, copy the following instruction into the command prompt as well

VBoxManage internalcommands createrawvmdk -filename C:\usbdrives.vmdk -rawdisk \\.\PhysicalDrive1 -register

In my case, my parking slot (drive location) was at 1. Hence, the above code writes \\.\PhysicalDrive# will be changed to \\.\PhysicalDrive1 instead of any other number. And "C:\usbdrives.vmdk" is the location i want to save my physical drive to. You should see something like this in your command prompt,

If you see any problem with creating a physical drive, it is most likely due to your permission of your command prompt.

Installation Of Ubuntu using USB Drive onto VirtualBox

Now we are ready to tell our VirtualBox our location of our USB drive. Firstly, you would have to open your virtualbox under Administrator access similarly to the way you open up the command prompt.

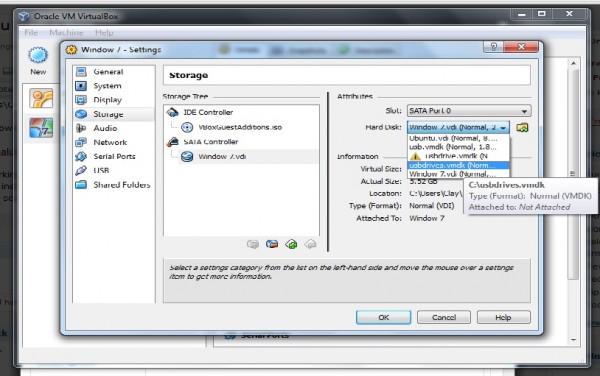
Next you would have to setup a new virtual machine and under its setting choose hard drive and select the newly created physical drive file as its IDE Controller.

Now start your virtual box and it should starts loading off your thumb drive!!

After installation complete

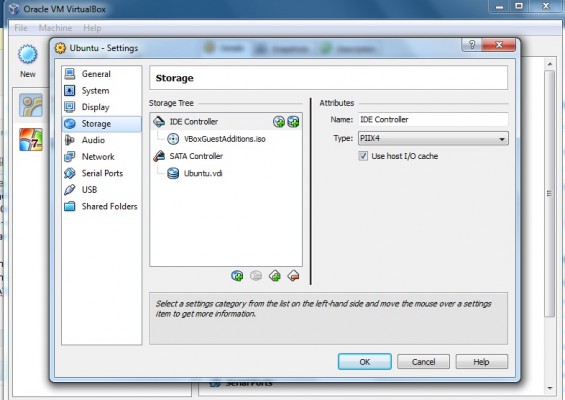
After your installation has complete, do remember to remove your physical drive under setting and select only the Ubuntu.vi on your SATA Controller since your IDE Controller will most likely installed with the VBoxGuestAdditional.iso as shown below,

Tutorial: jQuery Live With ExtJs

For all jQuery user out there. We are all fully aware that there is a function 'LIVE' in jQuery which sole purpose is to attach event handler into any new element entering the page dynamically. This is very clear and obvious in jQuery. However, in ExtJs it will be a little bit more confusing than you think it will be. Hence, i would like to drop this down on this article on the way ExtJS works.

jQuery Live Event

Before i come to the main point, let's look at how jQuery Live event works.

var event = function(){
alert("action clicked")
}
jQuery("p").live("click", event);

Simple and clear. We know what it does so i won't bother to explain.

ExtJs Live Event

How about ExtJs live event? Unfortunately, in Extjs this is not so direct. There are also tricks you should know in order to achieve the same functionality in Extjs. In Extjs, it is as simple as an event attachment as shown below,

var fblike_hide = function(ev, target){
	var item = Ext.get(target).findParent("#facebook_container", 50,true).setDisplayed("none");
}
Ext.getBody().on("click", fblike_hide, this, {delegate: ".fb_cancel"});

The above code shows two things. The method that was triggered upon a click event which is "fblike_hide" and the 'delegate' key used on the 'on' event attachement. The important here is the delegate. Extjs uses delegate to mimic the same behavior as 'LIVE' in jQuery. Of course, jQuery itself also has delegate method but i won't show here since i'm talking about jQuery Live.

In pure english the below sentences means,

Ext.getBody().on("click", fblike_hide, this, {delegate: ".fb_cancel"});

"Attached click event on all .fb_cancel element that can be found within the body tag. Fire 'fblike_hide' when click event is triggered on any element with the class 'fb_cancel'". The trick to use delegate in Extjs is to understand that the event click is attached to all element of .fb_cancel and not the body! The body doesn't get attached with a click event when the delegate key is used! If you are familiar with delegate in jQuery, this should be quite obvious but if you don't, you might get a little bit confuse by Extjs delegate functionality.

Hope it helps!

Tutorial: Remove index.php on localhost in Yii framework

This is another simple tutorial i find it useful for every Yii framework developer to know. Especially people who really want SEO capability on their Yii project. Without further crap from me, i will demonstrate how this can be done.

Setup Apache

The most important thing to get the thing you want in a local environment is to setup your Apache properly. Luckily setting up Apache for this tutorial wasn't that difficult, all you have to do is two step. Firstly, fire up your httpd.conf and look for the following line.

<Directory />
    Options FollowSymLinks
    AllowOverride None
    Order deny,allow
    Deny from all
</Directory>

Change AllowOverride None to Allow as shown below,

<Directory />
    Options FollowSymLinks
    AllowOverride All
    Order deny,allow
    Deny from all
</Directory>

Next we will have to enable mod_rewrite. Look for the following line,

#LoadModule proxy_ftp_module modules/mod_proxy_ftp.so
#LoadModule proxy_http_module modules/mod_proxy_http.so
#LoadModule rewrite_module modules/mod_rewrite.so
LoadModule setenvif_module modules/mod_setenvif.so
#LoadModule speling_module modules/mod_speling.so
#LoadModule ssl_module modules/mod_ssl.so
#LoadModule status_module modules/mod_status.so

And uncomment LoadModule rewrite_module bla bla bla and we should get something like this.

#LoadModule proxy_ftp_module modules/mod_proxy_ftp.so
#LoadModule proxy_http_module modules/mod_proxy_http.so
LoadModule rewrite_module modules/mod_rewrite.so
LoadModule setenvif_module modules/mod_setenvif.so
#LoadModule speling_module modules/mod_speling.so
#LoadModule ssl_module modules/mod_ssl.so
#LoadModule status_module modules/mod_status.so

Now, save this changes and restart your Apache server and we are done here.

Setup .htaccess

Now, the important thing is to tell Apache how to handle things that we are going to setup on our Yii framework. Hence, we will have to write some .htaccess rule to cater this. Firstly, where to place this?! Simple, we will put this just at the level where the "/protected/" folder is located (not inside the protected folder). Next, we should create a new .htaccess file with the following rules.

Options +FollowSymLinks
IndexIgnore */*
RewriteEngine on
RewriteBase /project name/

# if a directory or a file exists, use it directly
RewriteCond %{REQUEST_FILENAME} !-f
RewriteCond %{REQUEST_FILENAME} !-d

# otherwise forward it to index.php
RewriteRule . index.php

The whole world are using this rule so i won't bother to explain but do take note that you will need to rebase your project by changing "project name" to your folder name on this .htaccess file. And we are done here too.

Setup Yii Config

Finally, we can setup our Yii config! Fire up your /config/main.php file and overwrite your UrlManager rules with the following one.

		'urlManager'=>array(
			'urlFormat'=>'path',
			'rules'=>array(
				'<controller:\w+>/<id:\d+>'=>'<controller>/view',
				'<controller:\w+>/<action:\w+>/<id:\d+>'=>'<controller>/<action>',
				'<controller:\w+>/<action:\w+>'=>'<controller>/<action>',
			),
			'showScriptName'=>false,
			'caseSensitive'=>false,
		),

Once you do this, you should be gettting your index.php removed permanently!