This is a tutorial requested by Looli
Firstly, creating a WordPress theme can be difficult but also can be simple. However, in this tutorial I will try to demonstrate the simplest way to create a customize WordPress theme which anyone can do. However, this theme is not fully optimize to be SEO friendly as you will required a certain degree of programming skill to make it SEO friendly. Notice that it is not theme and template, a WordPress can create a theme with many template for each different page. That is the reason why WordPress is quite flexible in term of theme design!
Requirement
There are a few things you need to know about building a WordPress theme. If you need a professional theme, you might need the following set of skill,
- CSS
- Photoshop
- xHTML
- PHP
However, if you required a simple theme, you will only require to know CSS and xHTML alone. But let's understand what we know to know from WordPress API (Dictionary for WordPress).
WordPress File Required
We need the following files to build a WordPress theme,
- style.css - overall design of the theme
- index.php - main structure file of the theme
- header.php - header of the theme
- sidebar.php - side bar of the theme
- footer.php - footer of the theme
- comments.php - comment of the theme
- comments-popup.php -
- 404.php - error display
- single.php - single post display
- screenshot.png - the image display show on WordPress theme section
- archive.php - archive page
- archives.php - archives template
- functions.php - additional function of your theme
- image.php
- links.php - link display template
- page.php - page display
- search.php - search display
There are even more file required than the above 17 files. But let's just stick to here as it will be more than enough to build a simple template. Don't be afraid by these 17 files. They are actually separate boxes which you use to combine them to create a theme. We will use the default theme in WordPress and start from there instead which many WordPress designers did since the files mention above are all in the default theme.
WordPress Methods Required
This will be the trickest part you may need to know in WordPress. There are really a lot of method in WordPress to retrieve data and required certain contact with programming in order to understand what does the overall method does. Unless you know PHP scripting, this part will a bit more challenging than just creating a theme. For people who are interested, you can read up the WordPress Developer guide.
Let's get started!
Firstly, we will be using Mozilla Firefox browser to build our template. For most designer, they will be using webdeveloper plug-in from Mozilla Firefox. Download and install it and we will be ready to go. The plug-in will creates a toolbar for you to edit CSS on the fly so that you do not need to refer back to your CSS code every single time! After you have installed, you will see something like this on your browser.

Once you have installed your plug-in, log in to your WordPress control panel and navigate down to Appearance->themes and select the default theme as shown below,
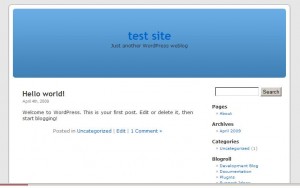
Now, go to your site by clicking on 'Visit site' on top of your WordPress control panel as show below,

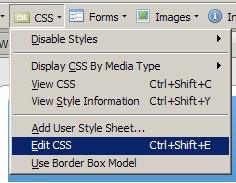
Once you are out, click on the CSS button on your webdeveloper plug in and select 'Edit CSS' as shown below,
There will be a bar pop up somewhere around your browser which will most likely be at the bottom of your screen if you installed it for the first time. You can reposition it by clicking on the button beside the X icon as shown below,
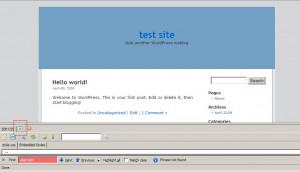
Here, we can see the CSS being applied to the default theme. Now, we will change the theme on real time!
Now we will have to plan how our layout will look like. For example, i will like my layout to look like this,
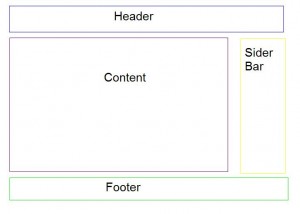
So we will look at the required id or class that controls my header, footer, siderbar and content. We can do this by right click on the default theme and select view page source,
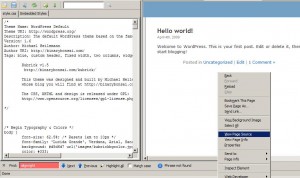
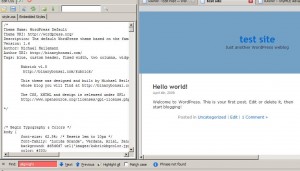
A pop up will display the source of the page. This is where we study the code and find the location id/class of the div tag. But all these unfriendly layout of the html tag won't help us efficiently! Thus, we will look into getting the file out to view in a friendly editor! The editor i am using is notepad++. You can download it and open up the application, copy the source code and paste it into the application. Save it as source.php and you will get something like this.
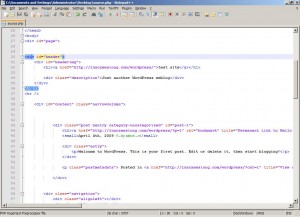
notice that whenever you click on a tag, it will highlight the end tag for you. This makes it easy for us to know whether our main tag is a subset of any other main tag. For example, siderbar is a subset of header. With this tool, i have located the 4 things i want which are,
- id: header
- id:content, class:narrowcolumn
- id:siderbar
- id:footer
The key found are all master tag! This makes life really easy. Once we know the id and class tag we will be dealing with, let's move back to edit css and strip off all the css rule and we get something ugly like this.
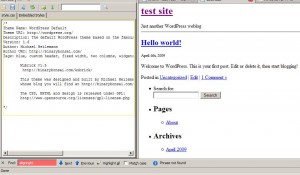
Notice that the header comment is still there. This is necessary if you want your WordPress theme to work! It tells WordPress the things they need to know about your theme. A small tips is to copy the whole style sheet and paste it into notepad++ for editing and then try it on 'edit css'. This way, it is much faster and provides better visibility to your css code. Rememebr to save it as .css extension!
Theme Name: WordPress Default
Theme URI: http://wordpress.org/
Description: The default WordPress theme based on the famous Kubrick
Version: 1.6
Author: Michael Heilemann
Author URI: http://binarybonsai.com/
Tags: blue, custom header, fixed width, two columns, widgets
i believe it is clear what does the above comment means. Just erase them and write your details on it and you can start showing off your skill in CSS! If i want my theme to display exactly like may layout design i will write the following css code in it.
/*
Theme Name: WordPress Default
Theme URI: http://wordpress.org/
Description: The default WordPress theme based on the famous<a href='http://binarybonsai.com/kubrick/'>Kubrick</a>.
Version: 1.6
Author: Michael Heilemann
Author URI: http://binarybonsai.com/
Tags: blue, custom header, fixed width, two columns, widgets

Kubrick v1.5
http://binarybonsai.com/kubrick/

This theme was designed and built by Michael Heilemann,
whose blog you will find at http://binarybonsai.com/

The CSS, XHTML and design is released under GPL:
http://www.opensource.org/licenses/gpl-license.php

*/

/* Begin Typography  Colors */
body {
font-size: 62.5%; /* Resets 1em to 10px */
font-family: 'Lucida Grande', Verdana, Arial, Sans-Serif;
color: #333;
text-align: center;
}

#page {
background-color: white;
border: 1px solid #959596;
text-align: left;
}

#header {
border: blue solid 1px;
}

#content {
font-size: 1.2em
border: pink solid 1px;
}

#footer {
background: #eee url('images/kubrickfooter.jpg') no-repeat top;
border: green solid 1px;
}

small {
font-family: Arial, Helvetica, Sans-Serif;
font-size: 0.9em;
line-height: 1.5em;
}

h1, h2, h3 {
font-family: 'Trebuchet MS', 'Lucida Grande', Verdana, Arial, Sans-Serif;

}

h1 {
font-size: 3em;
text-align: center;
}

#headerimg .description {
font-size: 1.2em;
text-align: center;
}

h2 {
font-size: 1.6em;
}

h2.pagetitle {
font-size: 1.6em;
}

#sidebar h2 {
font-family: 'Lucida Grande', Verdana, Sans-Serif;
font-size: 1.2em;
}

h3 {
font-size: 1.3em;
}

h1, h1 a, h1 a:hover, h1 a:visited, #headerimg .description {
text-decoration: none;
}

h2, h2 a, h2 a:visited, h3, h3 a, h3 a:visited {
color: #333;
}

h2, h2 a, h2 a:hover, h2 a:visited, h3, h3 a, h3 a:hover, h3 a:visited, #sidebar h2, #wp-calendar caption, cite {
text-decoration: none;
}

.entry p a:visited {
color: #b85b5a;
}

.commentlist li, #commentform input, #commentform textarea {
font: 0.9em 'Lucida Grande', Verdana, Arial, Sans-Serif;
}
.commentlist li ul li {
font-size: 1em;
}

.commentlist li {
font-weight: bold;
}

.commentlist li .avatar {
float: right;
border: 1px solid #eee;
padding: 2px;
background: #fff;
}

.commentlist cite, .commentlist cite a {
font-weight: bold;
font-style: normal;
font-size: 1.1em;
}

.commentlist p {
font-weight: normal;
line-height: 1.5em;
text-transform: none;
}

#commentform p {
font-family: 'Lucida Grande', Verdana, Arial, Sans-Serif;
}

.commentmetadata {
font-weight: normal;
}

#sidebar {
font: 1em 'Lucida Grande', Verdana, Arial, Sans-Serif;
border: yellow solid 1px;
}

small, #sidebar ul ul li, #sidebar ul ol li, .nocomments, .postmetadata, blockquote, strike {
color: #777;
}

code {
font: 1.1em 'Courier New', Courier, Fixed;
}

a, h2 a:hover, h3 a:hover {
color: #06c;
text-decoration: none;
}

a:hover {
color: #147;
text-decoration: underline;
}

#wp-calendar #prev a, #wp-calendar #next a {
font-size: 9pt;
}

#wp-calendar a {
text-decoration: none;
}

#wp-calendar caption {
font: bold 1.3em 'Lucida Grande', Verdana, Arial, Sans-Serif;
text-align: center;
}

#wp-calendar th {
font-style: normal;
text-transform: capitalize;
}
/* End Typography & Colors */

/* Begin Structure */
body {
margin: 0 0 20px 0;
padding: 0;
}

#page {
background-color: white;
margin: 20px auto;
padding: 0;
width: 760px;
border: 1px solid #959596;
}

#header {
background-color: #73a0c5;
margin: 20px;
padding: 0;
height: 200px;
width: 100%;
}

#headerimg {
margin: 0;
height: 200px;
width: 100%;
}

.narrowcolumn {
float: left;
padding: 0 0 20px 45px;
height: 500px;
margin: 20px;
width: 450px;
border: grey solid 1px;
}

.widecolumn {
padding: 10px 0 20px 0;
margin: 5px 0 0 150px;
width: 450px;
}

.post {
margin: 0 0 40px;
text-align: justify;
}

.post hr {
display: block;
}

.widecolumn .post {
margin: 0;
}

.narrowcolumn .postmetadata {
padding-top: 5px;
}

.widecolumn .postmetadata {
margin: 30px 0;
}

.widecolumn .smallattachment {
text-align: center;
float: left;
width: 128px;
margin: 5px 5px 5px 0px;
}

.widecolumn .attachment {
text-align: center;
margin: 5px 0px;
}

.postmetadata {
clear: both;
}

.clear {
clear: both;
}

#footer {
padding: 0;
margin: 0 auto;
width: 760px;
clear: both;
}

#footer p {
margin: 0;
padding: 20px 0;
text-align: center;
}
/* End Structure */

/*    Begin Headers */
h1 {
padding-top: 70px;
margin: 0;
}

h2 {
margin: 30px 0 0;
}

h2.pagetitle {
margin-top: 30px;
text-align: center;
}

#sidebar h2 {
margin: 5px 0 0;
padding: 0;
}

h3 {
padding: 0;
margin: 30px 0 0;
}

h3.comments {
padding: 0;
margin: 40px auto 20px ;
}
/* End Headers */

/* Begin Images */
p img {
padding: 0;
max-width: 100%;
}

/*    Using 'class='alignright'' on an image will (who would've
thought?!) align the image to the right. And using 'class='centered',
will of course center the image. This is much better than using
align='center', being much more futureproof (and valid) */

img.centered {
display: block;
margin-left: auto;
margin-right: auto;
}

img.alignright {
padding: 4px;
margin: 0 0 2px 7px;
display: inline;
}

img.alignleft {
padding: 4px;
margin: 0 7px 2px 0;
display: inline;
}

.alignright {
float: right;
}

.alignleft {
float: left
}
/* End Images */

/* Begin Lists

Special stylized non-IE bullets
Do not work in Internet Explorer, which merely default to normal bullets. */

html>body .entry ul {
margin-left: 0px;
padding: 0 0 0 30px;
list-style: none;
padding-left: 10px;
text-indent: -10px;
}

html>body .entry li {
margin: 7px 0 8px 10px;
}

.entry ul li:before, #sidebar ul ul li:before {
content: '?0BB ?020';
}

.entry ol {
padding: 0 0 0 35px;
margin: 0;
}

.entry ol li {
margin: 0;
padding: 0;
}

.postmetadata ul, .postmetadata li {
display: inline;
list-style-type: none;
list-style-image: none;
}

#sidebar ul, #sidebar ul ol {
margin: 0;
padding: 0;
}

#sidebar ul li {
list-style-type: none;
list-style-image: none;
margin-bottom: 15px;
}

#sidebar ul p, #sidebar ul select {
margin: 5px 0 8px;
}

#sidebar ul ul, #sidebar ul ol {
margin: 5px 0 0 10px;
}

#sidebar ul ul ul, #sidebar ul ol {
margin: 0 0 0 10px;
}

ol li, #sidebar ul ol li {
list-style: decimal outside;
}

#sidebar ul ul li, #sidebar ul ol li {
margin: 3px 0 0;
padding: 0;
}
/* End Entry Lists */

/* Begin Form Elements */
#searchform {
margin: 10px auto;
padding: 5px 3px;
text-align: center;
}

#sidebar #searchform #s {
width: 108px;
padding: 2px;
}

#sidebar #searchsubmit {
padding: 1px;
}

.entry form { /* This is mainly for password protected posts, makes them look better. */
text-align:center;
}

select {
width: 130px;
}

#commentform input {
width: 170px;
padding: 2px;
margin: 5px 5px 1px 0;
}

#commentform {
margin: 5px 10px 0 0;
}
#commentform textarea {
width: 100%;
padding: 2px;
}
#respond:after {
content: '.';
display: block;
height: 0;
clear: both;
visibility: hidden;
}
#commentform #submit {
margin: 0 0 5px auto;
float: right;
}
/* End Form Elements */

/* Begin Comments*/
.alt {
margin: 0;
padding: 10px;
}

.commentlist {
padding: 0;
text-align: justify;
}

.commentlist li {
margin: 15px 0 10px;
padding: 5px 5px 10px 10px;
list-style: none;

}
.commentlist li ul li {
margin-right: -5px;
margin-left: 10px;
}

.commentlist p {
margin: 10px 5px 10px 0;
}
.children { padding: 0; }

#commentform p {
margin: 5px 0;
}

.nocomments {
text-align: center;
margin: 0;
padding: 0;
}

.commentmetadata {
margin: 0;
display: block;
}
/* End Comments */

/* Begin Sidebar */
#sidebar
{
padding: 20px 0 10px 0;
margin-left: 545px;
width: 190px;
}

#sidebar form {
margin: 0;
}
/* End Sidebar */

/* Begin Calendar */
#wp-calendar {
empty-cells: show;
margin: 10px auto 0;
width: 155px;
}

#wp-calendar #next a {
padding-right: 10px;
text-align: right;
}

#wp-calendar #prev a {
padding-left: 10px;
text-align: left;
}

#wp-calendar a {
display: block;
}

#wp-calendar caption {
text-align: center;
width: 100%;
}

#wp-calendar td {
padding: 3px 0;
text-align: center;
}

#wp-calendar td.pad:hover { /* Doesn't work in IE */
background-color: #fff; }
/* End Calendar */

/* Begin Various Tags & Classes */
acronym, abbr, span.caps {
cursor: help;
}

acronym, abbr {
border-bottom: 1px dashed #999;
}

blockquote {
margin: 15px 30px 0 10px;
padding-left: 20px;
border-left: 5px solid #ddd;
}

blockquote cite {
margin: 5px 0 0;
display: block;
}

.center {
text-align: center;
}

.hidden {
display: none;
}

hr {
display: none;
}

a img {
border: none;
}

.navigation {
display: block;
text-align: center;
margin-top: 10px;
margin-bottom: 60px;
}
/* End Various Tags & Classes*/

/* Captions */
.aligncenter,
div.aligncenter {
display: block;
margin-left: auto;
margin-right: auto;
}

.wp-caption {
border: 1px solid #ddd;
text-align: center;
background-color: #f3f3f3;
padding-top: 4px;
margin: 10px;
-moz-border-radius: 3px;
-khtml-border-radius: 3px;
-webkit-border-radius: 3px;
border-radius: 3px;
}

.wp-caption img {
margin: 0;
padding: 0;
border: 0 none;
}

.wp-caption p.wp-caption-text {
font-size: 11px;
line-height: 17px;
padding: 0 4px 5px;
margin: 0;
}
/* End captions */

/* 'Daisy, Daisy, give me your answer do. I'm half crazy all for the love of you.
It won't be a stylish marriage, I can't afford a carriage.
But you'll look sweet upon the seat of a bicycle built for two.' */
If you close edit CSS, it will automatically return your original CSS styling. In order, to permanently change the styling you will need to visit your WordPress control panel and paste the code on the file style file in the editor section as shown below,
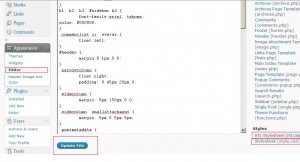
Depend on which style file you have editor to get your result, you will save to the same file to make the changes. Before you do that, please backup the original source file of the style file before proceeding to update. WordPress editor do not allow return function. Once your changes have made, there is no returning. It is best to keep the original source file if there is any unpredicted situation. The above code will give you something like this,
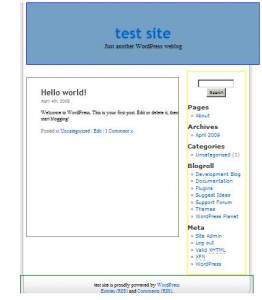
There are awfully a number of image contain in the default theme which you can remove them so that it won't affect your design. In order to create a good design in WordPress, your CSS skill will be required. So brush that skill up and all these WordPress design will be a piece of cake to you. Oh, if you have any images that you would like to insert, you will have to upload them into your theme 'images' folder in your web hosting in order to style with image.
Notice i used back almost every single things in the default theme. This is necessary if you do not know what to cater. There are awful a lot of things you need to cater when designing a WordPress theme such as comment look, sidebar look, template look, etc. I will advice you to edit the default theme and keep the declaration as it is to prevent any unnecessary styling that you might omitted. If you really want to change them, always check every single page/post/comment etc. after you have completed your theme.
Why not start from scratch?
Why you are not taught to work this out from the scratch? It is because there are more things you will need to cater when working on PHP level of theme such as the design and usability of additional plugin into your theme. This tutorial tries to demonstrate the simplest way of getting your own customize theme and not affecting the overall structure of your template. Many free theme do not cater such careful checking for you. They purely change everything and let you find the bug for them to fix. Hope this help!


2 thoughts on “Tutorial: How To Create a Simple Customize WordPress Theme”
Comments are closed.