This is another method for jQuery zoom effect that you can apply. Unlike the previous tutorial on zoom effect which is pretty simple and straight forward, this approach tend to be more complex. The previous method mention has a pretty bad setback which the zoom doesn't focus on the center of the picture. Instead, it tries to push the picture towards the top left hand corner as the previous method push the opposite direction while the animate function slide up and sideward in order to simulate a center zoom which doesn't really work on ALL function. Therefore, i think there is a need to create another tutorial just to solve this issue and bring you another way of solving the previous zoom effect problem.
Concept
The concept here to simulate a zoom effect is different from the previous simple method of just using animate function available in jQuery. This concept will basically use 4 card board each at the different side of the picture and pull in and out together to simulate this zoom function in jQuery.
HTML
The HTML part of the code is a pretty simple way of placing the images onto a div box for good manipulation.
<div class='image' id='box1'></div>
<div class='image' id='box2'></div>
<div class='image' id='box3'></div>
<div class='image' id='box4'></div>
This will gives us 4 boxes of images to manipulate with later on.
CSS
The CSS part of the implementation is pretty simple, we want to attach each pictures to the respective boxes. Thus, we will attached them into each respective id given and align all the layout so that the demo look nicer.
body{
margin: 0 auto;                    /*align the header at the center*/
text-align: center;                /*align the header at the center*/
}

div.image
{
width: 600px;                    /* width of each container*/
height: 350px;                    /* height of each container*/
position: absolute;                /* instructure each container to obey the position absolutely*/
float: left;                    /* float all the container so that they overlapped each other*/
left: 27%;                        /* align them to the center of the screen */
z-index: -1;
}

div#box1
{
background: #66A666 url('../images/blue.png');
}
div#box2
{
background: #E37373 url('../images/green.png');
}
div#box3
{
background: #B2B2B2 url('../images/orange.png');
}
div#box4
{
background: #A51515 url('../images/red.png');
}
jQuery
Here come the jQuery code which i will explain further for your understanding. The above mention part on CSS and HTMl is just to provide a structure of the overall method demonstration. The real thing that make all these work is the jQuery code present here.
$(function(){
//initialization part
var i = -1;
var no = 0;
$('div.image').click(function(){
var Obj = $(this);
no++;
if(no > 4)
no = 1;

// viewport structure
Obj.wrap('<div id='viewport'></div>');
Obj.css({left: 0+'px'});
$('#viewport').css('overflow','hidden');
$('#viewport').width(Obj.width());
$('#viewport').height(Obj.height());
$('#viewport').css('left','27%');
$('#viewport').css('position','absolute');
// left  structure
$('#viewport').append('<div class='GrpEffectDiv' id='Left'/>');
$('#Left').css('position', 'absolute');
$('#Left').css('background', '#FFF');
$('#Left').width(Obj.width()/2);
$('#Left').height(Obj.height());
$('#Left').css('left', '-'+300+'px');

//right  structure
$('#viewport').append('<div class='GrpEffectDiv' id='Right'/>');
$('#Right').css('position', 'absolute');
$('#Right').css('background', '#FFF');
$('#Right').width(Obj.width()/2);
$('#Right').height(Obj.height());
$('#Right').css('left', 600+'px');

//top  structure
$('#viewport').append('<div class='GrpEffectDiv' id='Top'/>');
$('#Top').css('position', 'absolute');
$('#Top').css('background', '#FFF');
$('#Top').width(Obj.width());
$('#Top').height(Obj.height()/2);
$('#Top').css('top','-'+175+'px');

//bottom  structure
$('#viewport').append('<div class='GrpEffectDiv' id='Bottom'/>');
$('#Bottom').css('position', 'absolute');
$('#Bottom').css('background', '#FFF');
$('#Bottom').width(Obj.width());
$('#Bottom').height(Obj.height()/2);
$('#Bottom').css('top', 350+'px');

// left  animation
$('#Left')
.animate({left: 0+'px'},1000,
function(){
Obj.css('z-index', i);

})
.animate({left: '-'+300+'px'},1000,
function(){
$(this).remove();

});
// Top  animation
$('#Top')
.animate({top: 0+'px'},1000,
function(){
Obj.css('z-index', i);

})
.animate({top: '-'+175+'px'},1000,
function(){
$(this).remove();

});
// Bottom  animation
$('#Bottom')
.animate({top: 175+'px'},1000,
function(){
Obj.css('z-index', i);

})
.animate({top: 350+'px'},1000,
function(){
$(this).remove();

});
//right  animation
$('#Right')
.animate({left: 300+'px'},1000,
function(){

}
)
.animate({left: 600+'px'},1000,
function(){
$(this).remove();
Obj.css({left: '27%'});
$('#viewport').replaceWith(Obj);

});
i--;
});
})
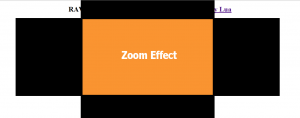
So the above code is quite simple to understand since i have split them accordingly to section. The first part is the initialization part which i don't think i will need to emphasis on it. the 'no' value is to keep track on the current display image and rotate it back to the first one when necessary. The 'i' value is to determine the deepness of the overall stacked images(so that the images can be shown and arrange in order). The top images will have z-index highest value of 'i' among others and in order to pushed it to the bottom of the stack, we decrease the 'i' value. What we do here is we create a viewport which is a place where we can view and things outside this viewport will be screened out by users (we hide it). The key to do this is to use overflow: hidden in CSS to hide everything outside the viewport. Then we create all 4 side boxes ready to enter the boundery of the view port which means they are standby outside the viewport as shown below,
The black boards are the one that will slide inward and be hidden from users while the color part are the view port. The rest of the codes is just commands that allow the boards to slide in and out wards to simulate a jQuery zoom effect. You can view the overall demo here


