OpenVAS 8 503 – Service temporarily down

Ok, this is a nightmare, when you found out you did something unknown and break your OpenVAS and every time you tries to start a task, you get a 503 - Service temporarily down message. And whatever you do, its not recovering. Most likely you would go reinstall the whole OpenVAS 8. The real issue is that it takes too long to get everything setup, especially if you want EVERYTHING to be ready and good to go. I know, i have been there.

503 - Service temporarily down

The issue started when i trying to figure out why scan result isn't working for me. I accidentally updated the cert and everything just go down hill from there. Hence, the only way is to figure out what happen. And the following solution seems to work for me.

openvas-mkcert-client -n om -i
openvas-nvt-sync --wget
/etc/init.d/openvas-scanner stop; /etc/init.d/openvas-manager stop;
openvassd
rm /var/lib/openvas/mgr/tasks.db
openvasmd --progress --rebuild -v

What this does is to remove ALL your task. And rebuild it again. It seems that somehow when we refresh the cert, all the task that bind with the old cert can't seems to perform a handshake with the new cert that i have generated. Hence, removing everything and redo it again seems to solve this problem.

**** UPDATES 20/12/2015 ****
Apparently, Michael Meyer saw this article and somehow added and correctly provided alternative as show below,

"Updating Scanner Certificates

If you have changed the CA certificate used to sign the server and client
certificates or the client certificate itself you will need to update the
certificates in Manager database as well.

The database can be updated using the following command:

$ openvasmd --modify-scanner <uuid> \
--scanner-ca-pub <cacert> \
--scanner-key-pub <clientcert> \
--scanner-key-priv <clientkey>

Where:
<uuid> refers to the UUID used by OpenVAS Manager to identify the scanner; the UUID can be retrieved with "openvasmd --get-scanners"
<cacert> refers to the certificate of the CA used to sign the scanner certificate
<clientcert> refers to the certificate Manager uses to authenticate when connecting to the scanner
<clientkey> refers to the private key Manager uses to authenticate when connecting to the scanner"

For more information and other options do go to https://wald.intevation.org/svn/openvas/trunk/openvas-manager/INSTALL where you would find more options and may be helps to resolve your issue.

All credits goes to Michael Meyer and thanks for the update!

Gitlab 500/502 Error After Upgrade

Here is what happen, i got either a 500 or 502 error after an upgrade using Omnibus method. And got the error message "Gitlab is not responding"

40TPT

The first thing i did was to look for what could have happen. And the first place to see that is on the log file located at

/var/log/gitlab/gitlab-rails/production.log

And the log basically just give me an error as shown below,

Started GET "/users/sign_in" for 175.144.6.68 at 2015-12-12 23:48:54 +0800
Processing by SessionsController#new as HTML
Completed 500 Internal Server Error in 98ms (ActiveRecord: 10.8ms)

NoMethodError (undefined method `push_events=' for #<GitlabCiService:0x0000000463dba8>):
  app/models/project.rb:809:in `builds_enabled='
  app/controllers/application_controller.rb:194:in `add_gon_variables'

But when i do a status check, it gives me this

[root@git gitlab-rails]# gitlab-ctl status
run: gitlab-workhorse: (pid 4934) 1009s; run: log: (pid 4147) 1227s
run: logrotate: (pid 4942) 1008s; run: log: (pid 296) 3434s
run: nginx: (pid 4948) 1008s; run: log: (pid 299) 3434s
run: postgresql: (pid 4957) 1007s; run: log: (pid 301) 3434s
run: redis: (pid 4965) 1007s; run: log: (pid 294) 3434s
run: sidekiq: (pid 4972) 1005s; run: log: (pid 302) 3434s
run: unicorn: (pid 4990) 1004s; run: log: (pid 305) 3434s

I have pretty much no idea what is going on. But after trying out different ways, it seems to boil down to the following,

1. Check what is going on

Firing the following command should give you an idea what is going on with your configure.

sudo gitlab-rake gitlab:check

After that you could try see what is causing it.

2. Forget to turn on postgres before upgrade

Well, because gitlab said to shutdown gitlab before upgrading, hence i did this,

gitlab-ctl stop

which stops everything including postgres. Hence, database migration wasn't possible. Therefore, i fire the following command and see whether that helps

gitlab-rake db:migrate

Now, after this i still got a 502 error but at least i'm not stuck with 500 error!

3. Forget to reconfigure after an upgrade

Well, if its not database migration, then every time you did a migration, remember to do a reconfigure!

gitlab-ctl reconfigure

Once i did this. Wait a while, and puff! The screen is back up!

Screen Shot 2015-12-13 at 12.00.47 AM

I'm just grateful everything is ok! Just remember to back up your VM image before doing all these upgrades!

Few Tweat to MailScanner Config

If you are looking for some configuration on Mailscanner, try to look at the following criteria, on /usr/mailscanner/etc/MailScanner.conf

> MailScanner Config
> Run As User = postfix
> Run As Group = postfix
> Incoming Queue Dir = /var/spool/postfix/hold
> Outgoing Queue Dir = /var/spool/postfix/incoming
> Incoming Work Dir = /var/spool/MailScanner/incoming
> MTA = postfix
> Sendmail = /usr/sbin/sendmail.postfix
> Incoming Work Group = clamav
> Incoming Work Permissions = 0644
> Quarantine User = postfix
> Quarantine Group = apache
> Quarantine Permissions = 0660
> Virus Scanners = clamd
> Quarantine Infections = no
> Quarantine Whole Message = yes
> Quarantine Whole Messages As Queue Files = no
> Keep Spam And MCP Archive Clean = yes
> Spam Checks = yes
> Is Definitely Not Spam = %rules-dir%/spam.whitelist.rules
> Is Definitely Spam = %rules-dir%/spam.blacklist.rules
> Definite Spam Is High Scoring = yes
> Use SpamAssassin = yes
> Required SpamAssassin Score = 4.75
> High SpamAssassin Score = 6
> Spam Score = yes
> Spam Actions = deliver
> High Scoring Spam Actions = store notify

But do remember to alter the config to what you need rather than using everything above. If you guys have more things to share, feel free to comment below!

Optimizing MySQL InnoDB

This is something pretty short and useful for many mysql InnoDB users. Pretty much you will come across optimizing MySQL InnoDB due to performance issues or MySQL is causing a lot of 'slow' sql queries throwing in your way. Of course, there are pros and cons in doing every type of optimisation such as sacrificing reliability and etc.

MySQL InnoDB Configuration

Before i began explaining what the heck did i do, if you are lazy and just wish to try out whether my configuration works, just head over to your MySQL my.cnf file in /etc/my.cnf and place this on [mysqld]

P.S: this is a linux configuration

[mysqld]
innodb_flush_method=O_DIRECT
innodb_lock_wait_timeout=1
innodb_autoextend_increment=512
innodb_io_capacity = 100
innodb_thread_concurrency = 32
innodb_flush_log_at_trx_commit=2
innodb_read_io_threads = 32
innodb_write_io_threads = 32
innodb_buffer_pool_size=400M
innodb_file_per_table=1
innodb_stats_on_metadata=0

The above configuration will most likely helps to smoothed out most of your InnoDB problens. Especially if you are getting a 10-50 seconds for MySQL slow log.

MySQL InnoDB Configuration Explanation

Now let's go through one by one and explain what each does.

innodb_flush_method

Screen Shot 2015-09-15 at 7.34.14 PM

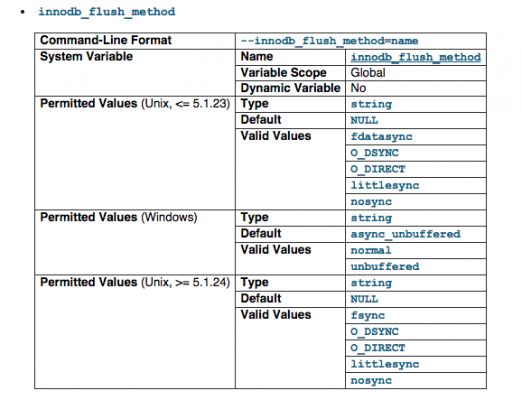
innodb_flush_method defines the method used to flush data to the InnoDB data files and log files, which can affect I/O throughput. If you look at the image, the default value is NULL, and we have changed it to O_DIRECT to better control I/O throughput. We basicall still using fsync but only for write. read we will use a O_DIRECT instead of fsync. If you are interested to more head over to stackoverflow

For more information visit http://dev.mysql.com/doc/refman/5.1/en/innodb-parameters.html#sysvar_innodb_flush_method

innodb_lock_wait_timeout

Screen Shot 2015-09-15 at 7.43.52 PM
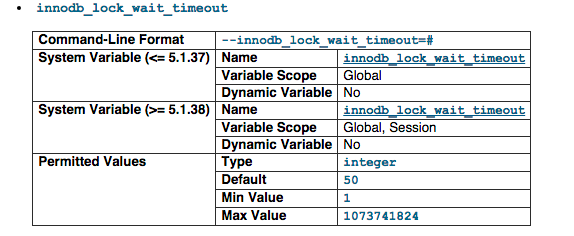
The timeout in seconds an InnoDB transaction waits for a row lock before giving up. The default value is 50 seconds. A transaction that tries to access a row that is locked by another InnoDB transaction waits at most this many seconds for write access to the row before issuing an error. We have set it 1 seconds as this is the only time we can wait for a row being lock or we will just fail the transaction if not we will have a pile of long queue in a busy server.

For more information visit http://dev.mysql.com/doc/refman/5.1/en/innodb-parameters.html#sysvar_innodb_lock_wait_timeout

innodb_autoextend_increment

Screen Shot 2015-09-15 at 8.12.07 PM
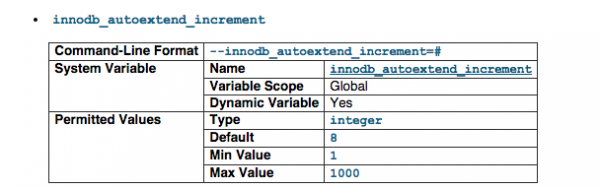
The increment size (in MB) for extending the size of an auto-extending shared tablespace file when it becomes full. Mainly for sharding setting

For more information visit http://dev.mysql.com/doc/refman/5.1/en/innodb-parameters.html#sysvar_innodb_autoextend_increment

innodb_io_capacity

Screen Shot 2015-09-15 at 8.14.53 PM
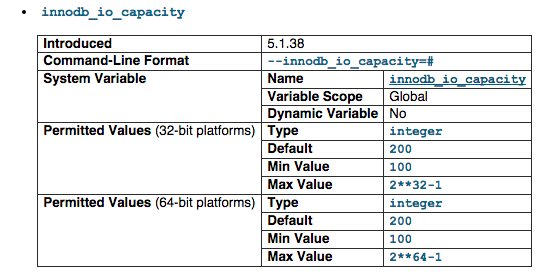
An upper limit on the I/O activity performed by the InnoDB background tasks, such as flushing pages from the buffer pool and merging data from the insert buffer. The default value is 200. For busy systems capable of higher I/O rates, you can set a higher value at server startup, to help the server handle the background maintenance work associated with a high rate of row changes. For systems with individual 5400 RPM or 7200 RPM drives, you might lower the value to the former default of 100.

For more information visit http://dev.mysql.com/doc/refman/5.1/en/innodb-parameters.html#sysvar_innodb_io_capacity

innodb_thread_concurrency

Screen Shot 2015-09-15 at 8.17.16 PM
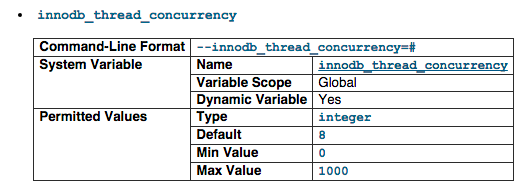
InnoDB tries to keep the number of operating system threads concurrently inside InnoDB less than or equal to the limit given by this variable (InnoDB uses operating system threads to process user transactions). Once the number of threads reaches this limit, additional threads are placed into a wait state within a “First In, First Out” (FIFO) queue for execution. Threads waiting for locks are not counted in the number of concurrently executing threads.

We have 32 CPU, hence, the 32 value. But you can lower this to ensure that it doesn't suck up all the resources.

For more information visit http://dev.mysql.com/doc/refman/5.1/en/innodb-parameters.html#sysvar_innodb_thread_concurrency

innodb_flush_log_at_trx_commit

Screen Shot 2015-09-15 at 8.20.07 PM
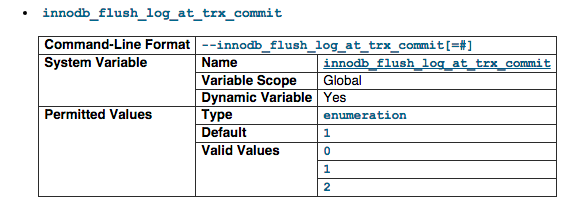
If the value of innodb_flush_log_at_trx_commit is 0, the log buffer is written out to the log file once per second and the flush to disk operation is performed on the log file, but nothing is done at a transaction commit. When the value is 1 (the default), the log buffer is written out to the log file at each transaction commit and the flush to disk operation is performed on the log file. When the value is 2, the log buffer is written out to the file at each commit, but the flush to disk operation is not performed on it.

Basically we are trying to tell InnoDB to not work too hard by setting it to '2'.

For more information visit http://dev.mysql.com/doc/refman/5.1/en/innodb-parameters.html#sysvar_innodb_flush_log_at_trx_commit

innodb_read_io_threads

Screen Shot 2015-09-15 at 8.24.21 PM
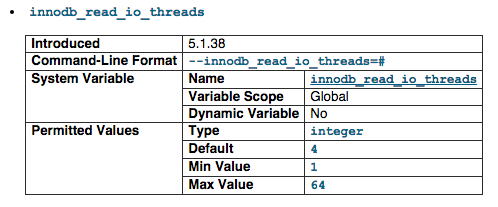
The number of I/O threads for read operations in InnoDB. The default value is 4. We set it to 32.

For more information visit http://dev.mysql.com/doc/refman/5.1/en/innodb-parameters.html#sysvar_innodb_read_io_threads

innodb_write_io_threads

Screen Shot 2015-09-15 at 8.22.32 PM
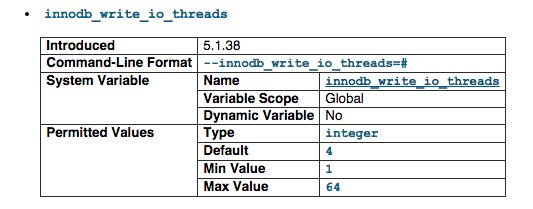
The number of I/O threads for write operations in InnoDB. The default value is 4. We set it to 32.

For more information visit http://dev.mysql.com/doc/refman/5.1/en/innodb-parameters.html#sysvar_innodb_write_io_threads

innodb_buffer_pool_size

Screen Shot 2015-09-15 at 8.26.44 PM
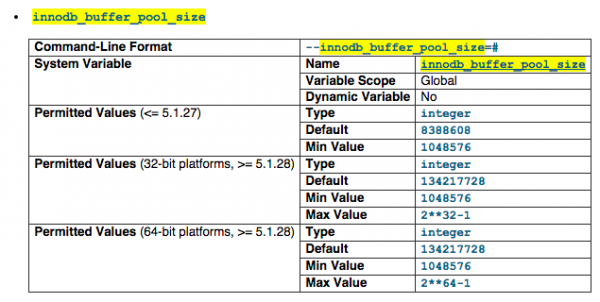
The size in bytes of the memory buffer InnoDB uses to cache data and indexes of its tables. The larger you set this value, the less disk I/O is needed to access data in tables. On a dedicated database server, you may set this to up to 80% of the machine physical memory size. But you most likely won't be able to set to 80%, in our case, we just set it to 400M. (it can goes up to few GB but that depends on your mysqltuner advises would be better)

For more information visit http://dev.mysql.com/doc/refman/5.1/en/innodb-parameters.html#sysvar_innodb_buffer_pool_size

innodb_file_per_table

Screen Shot 2015-09-15 at 8.28.56 PM
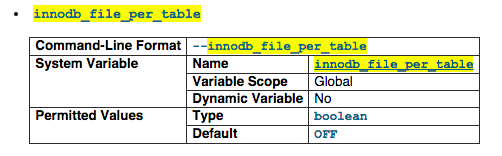
If innodb_file_per_table is disabled (the default), InnoDB creates tables in the system tablespace. If innodb_file_per_table is enabled, InnoDB creates each new table using its own .ibd file for storing data and indexes, rather than in the system tablespace. This is to prevet shits from happening.

For more information visit http://dev.mysql.com/doc/refman/5.1/en/innodb-parameters.html#sysvar_innodb_file_per_table

innodb_stats_on_metadata

Screen Shot 2015-09-15 at 8.31.59 PM
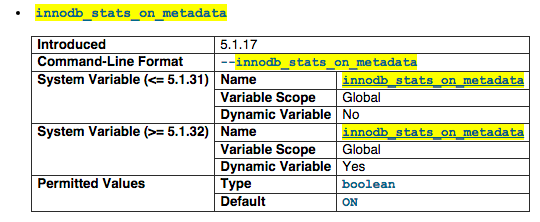
When this variable is enabled (which is the default, as before the variable was created), InnoDB updates statistics during metadata statements such as SHOW TABLE STATUS or SHOW INDEX, or when accessing the INFORMATION_SCHEMA tables TABLES or STATISTICS. This is a bitch when you have a lot of InnoDB which will keep updating the statics and may cause your simple SQL to runs for more than 10-50 seconds.

For more information visit http://dev.mysql.com/doc/refman/5.1/en/innodb-parameters.html#sysvar_innodb_stats_on_metadata

Proxmox NoVNC not working

Well, if you are having problem with NoVNC not working on your proxmox and has been ignoring it up until now, its time to make it work. NoVNC basically uses web socket and html5 to allow you to remote access your virtual machine. So make sure you use a browser such as Chrome instead of Safari which has a full compatibility of web socket implementation on the browser. If not, you will most likely get yourself an error such as this,

TASK ERROR: command '/bin/nc -l -p 5900 -w 10 -c '/usr/sbin/qm vncproxy 100 2>/dev/null'' failed: exit code 1

Due to compatibility issue, Proxmox NoVNC might not work with the default install. All you need to do is to find out which NoVNC works for your current Proxmox installation and down/upgrade it! And for me, the version NoVNC 0.47 works for me so i downgraded it from 0.53 by doing the following,

wget http://download1.proxmox.com/debian/dists/wheezy/pvetest/binary-amd64/novnc-pve_0.4-7_amd64.deb
dpkg -i novnc-pve_0.4-7_amd64.deb

And it will do the rest, and if you would like try other version, just head down to the following link

http://download1.proxmox.com/debian/dists/wheezy/pvetest/binary-amd64/

to get all the binary you need.