Woocommerce hook custom button on admin order page

Another Woocommerce hook that i search high and low for it but in the end dig it out from the source code itself. What happen if you would like to create a custom button on Woocommerce admin order page? Something like the image below?

Screen Shot 2015-09-16 at 7.42.19 PM

Looks like something you need? It's pretty easy by using a hook call 'woocommerce_order_item_add_action_buttons'.

woocommerce_order_item_add_action_buttons woocommerce button hook

Basically this hook allows you to add custom button similar to the one woocommerce has and ensuring that you don't hack or edit the core code to get what you want. Here is a snippet of what i did.

// add new button for woocommerce
add_action( 'woocommerce_order_item_add_action_buttons', 'action_woocommerce_order_item_add_action_buttons', 10, 1);
// define the woocommerce_order_item_add_action_buttons callback
function action_woocommerce_order_item_add_action_buttons( $order )
{
    echo '<button type="button" onclick="document.post.submit();" class="button generate-items">' . __( 'Magic Button Appear!', 'hungred' ) . '</button>';
    // indicate its taopix order generator button
    echo '<input type="hidden" value="1" name="renew_order" />';
};
// resubmit renew order handler
add_action('save_post', 'renew_save_again', 10, 3);
function renew_save_again($post_id, $post, $update){
    $slug = 'shop_order';
    if(is_admin()){
            // If this isn't a 'woocommercer order' post, don't update it.
            if ( $slug != $post->post_type ) {
                    return;
            }
            if(isset($_POST['renew_order']) && $_POST['renew_order']){
                    // do your stuff here after you hit submit
                }
    }
}

dump the above snippet to your function.php file and you should see the "magic button appear!" button on your woocommerce admin order page.

A little bit of explanation here, what the above code does it create a button which the woocommerce_order_item_add_action_buttons hook does the trick

// add new button for woocommerce
add_action( 'woocommerce_order_item_add_action_buttons', 'action_woocommerce_order_item_add_action_buttons', 10, 1);
// define the woocommerce_order_item_add_action_buttons callback
function action_woocommerce_order_item_add_action_buttons( $order )
{
    echo '<button type="button" onclick="document.post.submit();" class="button generate-items">' . __( 'Magic Button Appear!', 'hungred' ) . '</button>';
    // indicate its taopix order generator button
    echo '<input type="hidden" value="1" name="renew_order" />';
};

I've place a hidden button to identify the submit is hit from this button. Next, since woocommerce admin order page is also a post page, all i have to do is to attached it with a post handler hook.

// resubmit renew order handler
add_action('save_post', 'renew_save_again', 10, 3);
function renew_save_again($post_id, $post, $update){
    $slug = 'shop_order';
    if(is_admin()){
            // If this isn't a 'woocommercer order' post, don't update it.
            if ( $slug != $post->post_type ) {
                    return;
            }
            if(isset($_POST['renew_order']) && $_POST['renew_order']){
                    // do your stuff here after you hit submit
                }
    }
}

and make sure that this handle only runs if its a shop_order type and we are good to go! That's all! Enjoy!

How to find next date removing weekend and public holiday starting from today in PHP

Ok, so here is a snippets of finding out the next business or working day excluding public holiday that i used in a project. Its pretty neat, but holidays date changes every year and each country holiday is different from each other. Therefore, the holidays are being placed in an array instead. Without further ado, here's the snippets.

// get today date
$tmpDate = date('Y-m-d');
// all the holidays
$holidays = array('2015-01-01', '2015-01-02', '2015-02-04', '2015-02-18', '2015-02-19', '2015-02-20', '2015-02-21', '2015-02-22', '2015-02-23', '2015-02-27',
    '2015-02-28', '2015-03-05', '2015-03-08', '2015-03-12', '2015-03-20', '2015-03-21', '2015-03-29', '2015-04-03', '2015-04-04', '2015-04-05',
    '2015-04-06', '2015-04-07', '2015-05-01', '2015-05-03', '2015-05-04', '2015-05-10', '2015-05-11', '2015-05-25', '2015-06-03', '2015-06-19',
    '2015-06-20', '2015-06-21', '2015-06-28', '2015-08-08', '2015-08-20', '2015-08-28', '2015-09-03', '2015-09-23', '2015-09-26', '2015-09-27',
    '2015-09-28', '2015-10-09', '2015-10-10', '2015-10-21', '2015-10-25', '2015-11-12', '2015-11-26', '2015-12-22', '2015-12-25');
// 1 day
$i = 1;
// for the next business day from today
$nextBusinessDay = date('Y-m-d', strtotime($tmpDate.
    ' +'.$i.
    ' Weekday'));
// check whether the date of the business day is in public holiday
while (in_array($nextBusinessDay, $holidays)) {
    $i++;
    // move the business date forward since its a public holiday
    $nextBusinessDay = date('Y-m-d', strtotime($tmpDate.
        ' +'.$i.
        ' Weekday'));
}

Now, the code above will find the next working day. How about telling me how to find 10 days after the working day? Pretty much the same just repeat the same logic and place it below it,

    // get today date
    $tmpDate = date('Y-m-d');
    // all the holidays
    $holidays = array('2015-01-01', '2015-01-02', '2015-02-04', '2015-02-18', '2015-02-19', '2015-02-20', '2015-02-21', '2015-02-22', '2015-02-23',
        '2015-02-27', '2015-02-28', '2015-03-05', '2015-03-08', '2015-03-12', '2015-03-20', '2015-03-21', '2015-03-29', '2015-04-03', '2015-04-04',
        '2015-04-05', '2015-04-06', '2015-04-07', '2015-05-01', '2015-05-03', '2015-05-04', '2015-05-10', '2015-05-11', '2015-05-25', '2015-06-03',
        '2015-06-19', '2015-06-20', '2015-06-21', '2015-06-28', '2015-08-08', '2015-08-20', '2015-08-28', '2015-09-03', '2015-09-23', '2015-09-26',
        '2015-09-27', '2015-09-28', '2015-10-09', '2015-10-10', '2015-10-21', '2015-10-25', '2015-11-12', '2015-11-26', '2015-12-22', '2015-12-25');
    // 1 day
    $i = 1;
    // for the next business day from today
    $nextBusinessDay = date('Y-m-d', strtotime($tmpDate.
        ' +'.$i.
        ' Weekday'));
    // check whether the date of the business day is in public holiday
    while (in_array($nextBusinessDay, $holidays)) {
        $i++;
        // move the business date forward since its a public holiday
        $nextBusinessDay = date('Y-m-d', strtotime($tmpDate.
            ' +'.$i.
            ' Weekday'));
    }
    // working day + 10 working day excluding holidays
    $tmpDate = $nextBusinessDay;
    // 1 day
    $i = 1;
    // next business day excluding weekdays after 10 days
    $nextBusinessDay = date('Y-m-d', strtotime($tmpDate.
        ' +10 weekdays'));
    // this is the format we want it to look like
    $date = date("m月d日", strtotime($tmpDate.
        " +10 weekdays"));
    // is the next business day after 10 day a public holiday?
    while (in_array($nextBusinessDay, $holidays)) {
        // if it is, move the day by 1 
        $nextBusinessDay = date('Y-m-d', strtotime($nextBusinessDay.
            ' +'.$i.
            ' weekdays'));
        // get the format we want, actually this can be thrown outside of the loop
        $date = date('m月d日', strtotime($nextBusinessDay));
        $i++;
    }

And as you can see, i DID NOT OPTIMIZE the code. i'm sorry. don't hate me, but i do share it, so, forgive me. Anyway, the code above can be reduce by half if you dump it into a function and just reuse the logic. i kinda lazy without doing that. IM SO SORRY! but if you did optimize it and dump it into a neat function, do share it out in the comment and i'll dump it right here!

*** UPDATE ****

Ok basically the above code doesn't remove the issue when there are days when the holidays fall between 2 dates. Anyhow, the more appropriate code that takes care of ALL holidays are

// find latest working day
$tmpDate = date('Y-m-d');
$holidays = array('2016-02-06','2016-02-07','2016-02-08','2016-02-09','2016-02-10','2016-02-11','2016-02-12','2016-02-13','2016-02-14','2016-02-27','2016-02-28','2016-02-29','2016-04-02','2016-04-03','2016-04-04','2016-04-05','2016-06-09','2016-06-10','2016-06-11','2016-06-12','2016-09-15','2016-09-16','2016-09-17','2016-09-18','2016-10-09','2016-10-10','2016-10-11');
$i = 1;
$nextBusinessDay = date('Y-m-d', strtotime($tmpDate . ' +' . $i . ' Weekday'));

while (in_array($nextBusinessDay, $holidays)) {
  $i++;
  $nextBusinessDay = date('Y-m-d', strtotime($tmpDate . ' +' . $i . ' Weekday'));
}
// working day + 10 working day excluding holidays
$tmpDate = $nextBusinessDay;
$startDate = new DateTime( $tmpDate );    //intialize start date
$endDate = new DateTime( '2016-12-31' );    //initialize end date
$holiday = array('2016-02-06','2016-02-07','2016-02-08','2016-02-09','2016-02-10','2016-02-11','2016-02-12','2016-02-13','2016-02-14','2016-02-27','2016-02-28','2016-02-29','2016-04-02','2016-04-03','2016-04-04','2016-04-05','2016-06-09','2016-06-10','2016-06-11','2016-06-12','2016-09-15','2016-09-16','2016-09-17','2016-09-18','2016-10-09','2016-10-10','2016-10-11');
$interval = new DateInterval('P1D');    // set the interval as 1 day
$daterange = new DatePeriod($startDate, $interval ,$endDate);
// find all the dates that are working days
foreach($daterange as $date){
        if($date->format("N") <6 AND !in_array($date->format("Y-m-d"),$holiday))
                $result[] = $date->format("Y-m-d");
}
// now we want 10 working days starting from 0 (hence the 9 )
echo $result[9];

Basically, we first find the next business day as the 'starting' date and also initial the 'end' date which is the end of 2016 in this case, the 'results' will gives me a list of working dates. From the list of work date, i need 10 working days, and since its an array, something like 10th working day can be simply print out like the one show in the code

WooCommerce Email Verification WordPress Code

Ok, i though this will be available since Woocommerce is pretty popular but HOW COME NO ONE ACTUALLY MAKE THIS CODE AND OPEN SOURCE IT?! Holy cow! I search it everywhere and couldn't find WooCommerce verifying user email before allowing the user to access WordPress without verifying whether their email is authentic. In the end i wrote it myself and i'm gonna throw it out for people to use.

Basically the code has to be placed within function.php in your theme, you can also make this into a WordPress plugin and fine tune it if you like. However, please share the code out cause mine isn't the most perfect out there. I am just gonna throw it out and see what other improvement can others suggest or create. Cheers!

// this is just to prevent the user log in automatically after register
function wc_registration_redirect( $redirect_to ) {
        wp_logout();
        wp_redirect( '/sign-in/?q=');
        exit;
}
// when user login, we will check whether this guy email is verify
function wp_authenticate_user( $userdata ) {
        $isActivated = get_user_meta($userdata->ID, 'is_activated', true);
        if ( !$isActivated ) {
                $userdata = new WP_Error(
                                'inkfool_confirmation_error',
                                __( '<strong>ERROR:</strong> Your account has to be activated before you can login. You can resend by clicking <a href="/sign-in/?u='.$userdata->ID.'">here</a>', 'inkfool' )
                                );
        }
        return $userdata;
}
// when a user register we need to send them an email to verify their account
function my_user_register($user_id) {
        // get user data
        $user_info = get_userdata($user_id);
        // create md5 code to verify later
        $code = md5(time());
        // make it into a code to send it to user via email
        $string = array('id'=>$user_id, 'code'=>$code);
        // create the activation code and activation status
        update_user_meta($user_id, 'is_activated', 0);
        update_user_meta($user_id, 'activationcode', $code);
        // create the url
        $url = get_site_url(). '/sign-in/?p=' .base64_encode( serialize($string));
        // basically we will edit here to make this nicer
        $html = 'Please click the following links <br/><br/> <a href="'.$url.'">'.$url.'</a>';
        // send an email out to user
        wc_mail($user_info->user_email, __('Please activate your account'), $html);
}
// we need this to handle all the getty hacks i made
function my_init(){
        // check whether we get the activation message
        if(isset($_GET['p'])){
                $data = unserialize(base64_decode($_GET['p']));
                $code = get_user_meta($data['id'], 'activationcode', true);
                // check whether the code given is the same as ours
                if($code == $data['code']){
                        // update the db on the activation process
                        update_user_meta($data['id'], 'is_activated', 1);
                        wc_add_notice( __( '<strong>Success:</strong> Your account has been activated! ', 'inkfool' )  );
                }else{
                        wc_add_notice( __( '<strong>Error:</strong> Activation fails, please contact our administrator. ', 'inkfool' )  );
                }
        }
        if(isset($_GET['q'])){
                wc_add_notice( __( '<strong>Error:</strong> Your account has to be activated before you can login. Please check your email.', 'inkfool' ) );
        }
        if(isset($_GET['u'])){
                my_user_register($_GET['u']);
                wc_add_notice( __( '<strong>Succes:</strong> Your activation email has been resend. Please check your email.', 'inkfool' ) );
        }
}
// hooks handler
add_action( 'init', 'my_init' );
add_filter('woocommerce_registration_redirect', 'wc_registration_redirect');
add_filter('wp_authenticate_user', 'wp_authenticate_user',10,2);
add_action('user_register', 'my_user_register',10,2);

Ok, i have tested this code with the latest Woocommerce and WordPress 4.2.2. Now, just modify this to suit your needs. It's not perfect yet but i'll leave the perfect version for you guys. Enjoy!

Lesson 1:How to create a theme using cherry framework

Introduce cherry framework

Cherry is a new framework for WordPress that make it easier for users to build WorldPress themes and WordPress websites. It is a new software framework with most current and sensible approaches to produce a consistent and well-crafted website. Cherry Framework is used in WordPress to build a theme which able to call Cherry WordPress themes.

Why use cherry framework

It is a framework created by developers for developers, but it’s also a perfect solution for anyone who wants to build WordPress sites minimum time. The reason to use Cherry Framework is because themes are easy to install and all changes can be done in the WordPress admin area. There's no need to switch between WordPress, FTP or PhpMyAdmin and you can get thing done simply in WordPress admin also. Other than that, it also allows an easy way to install WordPress plugin.

In the WordPress dashboard is only have one personal dashboard experiences, but in the Cherry Framework contain an additional category called as Cherry Options. The new category has a stylized interface and brings much better overview on WordPress themes. It is contains 100+ handy options integrated into a framework with including easy adjust theme appearance, change typography, logo and navigation so on. Intuitively fine-tune slider, blog pages, portfolio and page footer so that everything appears in the style you prefer.

Installing cherry framework

Framework Installation

There are several steps to teach users how to install the Cherry Framework into WordPress:

Step 1: Go to Dashboard and select the Appearance > Themes > Install Themes. Here you should upload the file named [CherryFramework.zip] that you have download into your computer.

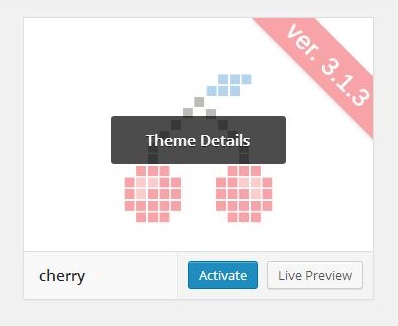
Step 2: After upload is finished, we are able to see the cherry icon in the Appearance > Themes page. Click Activate button to proceed.

Step 3: After the activation of cherry themes, select the Home logo and click Visit Site.

Step 4: The cherry original themes will appear in the current site. At the top you are able to see the Cherry Framework Logo.

Creating a Cherry Framework theme

To create a Cherry Framework theme, usually it will separate into two parts. Cherry Framework can define as a “base/starter” theme framework. It is a stand-alone theme designed to be a flexible foundation for quicker WordPress development, usually serving as a robust Parent theme for Child themes.

Child themes allow user to modify, or add to the functionality of that parent themes. A child theme is the safest and easiest way to modify an existing theme. If we use and modify existing themes (Cherry Framework), your changes will be lost since Cherry Framework updated. Therefore, we are suggesting creating a child theme and overriding within. When the Cherry Framework makes a few tiny changes or updates, the child theme was still keep your changes.

There are several steps to teach users how to create a Child theme and install into the WordPress:

How to create a Child Themes

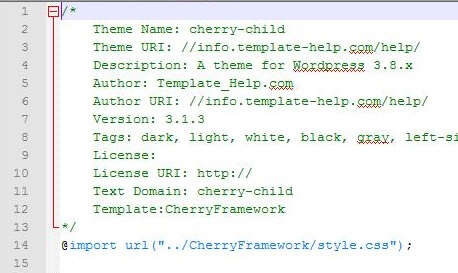
Step 1: To create a child themes,we would recommend that you use a descriptive name such as “parenttheme-child” (where “parenttheme” is the name of your active theme). Inside the “parenttheme-child” folder >create a style.css, then we wrote the code on below:

You can change each of these lines to suit your theme name. The only required lines are the Theme Name, the Template, and (if the stylesheet of your child theme is being built off of the parent theme -- with a few modifications) the '@import url' line.

Child Themes Installation

Step 2: Again go to Appearance > Themes > Add new > Upload Themes and upload your “parenttheme-child” folder that you have created as a child theme;

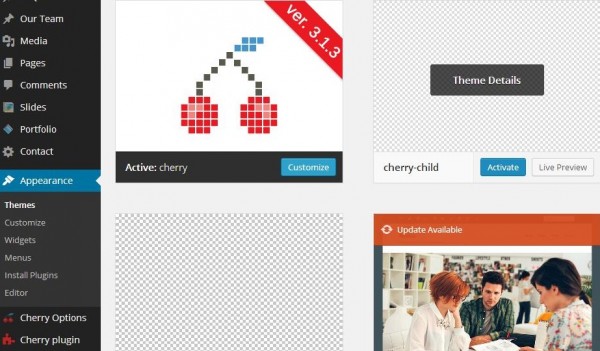
Step 3: After upload is finished, go again Appearance > Themes. It will show the Cherry Framework and Child theme you have uploaded just now.

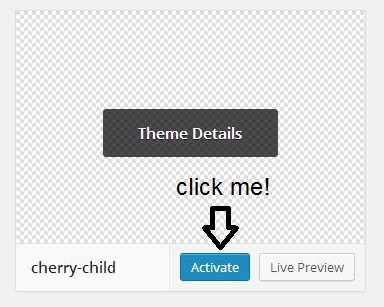
Step 4: Click to active the Child themes, select the Home logo and click Visit Site. (Please refer to Framework Installation step 3 methods). Then you are able to see your site.

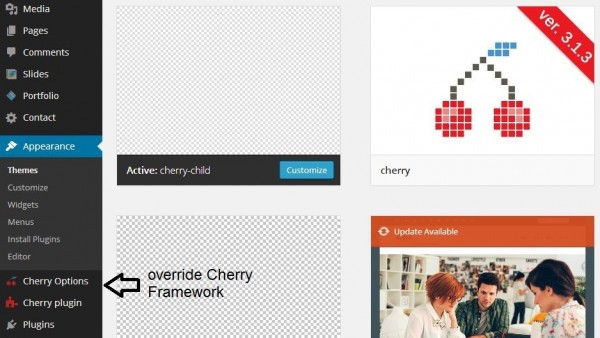
Step 5: After the activation of cherry-child, the example output is show like below.

testtest

Step 6: In the Appearance > Themes, once you active the child theme you are able to see and use the cherry option function which is provided by Cherry Framework (Parent theme).

A child theme is a “drop-in” code library framework which is not a stand-alone Theme. Such frameworks cannot be installed or used as a stand-alone theme. Figure 1 below show if the WordPress have no any Parent Theme (Cherry Framework), the Child Theme (cherry-child) is unable to read also.

Figure 1: broken theme

Install the themes into WordPress via Server

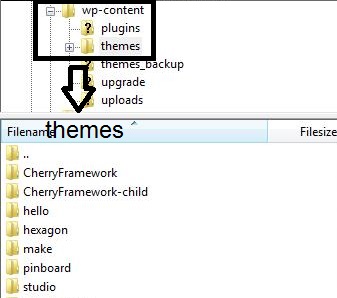
You need access to your website via either FTP or your hosting provider’s file manager application (such as Filezilla), as it is easier to add and edit files and folders that way. Once you have logged into your website via your chosen FTP client, navigate to “/wp-content/themes/”.

This directory will contain one or more folders, each of which represents a theme installed on your site. Figure 2 show the example of using Filezilla:


Figure 2: File ascending order in FileZilla

Conclusion

This article is to introduce, analyzing and teach how to install the Cherry Framework into the WordPress. It also includes several steps of creating a child theme with override by Cherry Frameworks. Lastly, we have include how to install the child themes into WordPress. The installation method just like the method how to install a Cherry Framework.

The WordPress is a great Platform that uses to build blogs and sites. It also provides the infrastructure to create plugin frameworks or theme frameworks on top of it. The benefits of building theme frameworks are to provide a stable, good quality themes quick and short time. This helps in faster development time and lower costs.

Using Regular Expression to find position instead of strpos or stripos in PHP

I really can't believe that there isn't any article explaining using regular expression to find a position of a given string. It is very command to use strpos or stripos to find the first occurrences of a given string in PHP. However, problem comes if strpos or stripos gives you the wrong result. Assuming you are looking for the symbol "RM" (Ringgit) on a given text. However, on the given text there exist a word called "RMX9182 is the code for this item selling at RM2000". It is obvious that you want your program to retrieve the symbol on "RM2000" instead of "RMX9182". Using the following strpos or stripos will definitely give you a wrong result.

$text = "RMX9182 is the code for this item selling at RM2000";
$position = stripos($text, "RM"); // return 0

Using the following regular expression, we can use regex to pinpoint the correct symbol pattern we want. In this case,

$text = "RMX9182 is the code for this item selling at RM2000";
$pattern = "/RM\\d/i";
preg_match($pattern, $text, $matches, PREG_OFFSET_CAPTURE);
print_r($matches);

It will print out the following array

Array
(
    [0] => Array
        (
            [0] => RM2
            [1] => 45
        )

)

Notice that the second index, 45, is the index of the found text. Assuming we have more than one matches in our text,

$text = "RMX9182 RM90 is the code for this item selling at RM2000";
$pattern = "/RM\\d/i";
preg_match($pattern, $text, $matches, PREG_OFFSET_CAPTURE);
print_r($matches);

It will still retrieve the first found text as shown below

Array
(
    [0] => Array
        (
            [0] => RM9
            [1] => 8
        )

)

However, if you would like to find all the position on a string, just use preg_match_all instead as shown below,

$text = "RMX9182 RM90 is the code for this item selling at RM2000";
$pattern = "/RM\\d/i";
preg_match_all($pattern, $text, $matches, PREG_OFFSET_CAPTURE);
print_r($matches);

It will gives you a result similar to the one shown below,

Array
(
    [0] => Array
        (
            [0] => Array
                (
                    [0] => RM9
                    [1] => 8
                )

            [1] => Array
                (
                    [0] => RM2
                    [1] => 50
                )

        )

)

This may seems very simple and direct but developer often find it easier to just stick to stripos or strpos until things get a bit off. If it's pure string. native methods might be just the right tool for you but if patterns is require, nothing beats regular expression