How to move all cPanel accounts to new server via command line

This is a short how-to tutorial to migrate or transfer all cPanel accounts from my old 1.5TB server to another new SSD server through command line.

Backup all cPanel accounts

i am assuming, you know what you want, so we have to first backup all the cPanel accounts in our old system using the following command

ls /var/cpanel/users | while read a; do
/scripts/pkgacct $a
done

remember to screen first before doing the above, as this might take a while if there is a lot of accounts in your machine.

Transfer all cPanel accounts

now, we need to transfer all the cPanel accounts from our old server to the new ones. Notice the pkgacct script generate all the cpmove file on /home directory, use the command below,

bash-4.1# rsync -av --progress /home/*.tar.gz [email protected]:/home

where 192.168.0.2 is your new server. Now, all the files are transferring to our new server!

Restore all cPanel accounts

Finally, in our new server, fire the following command,

ls /home/ | awk -F'[-.]' '{print $2}' | while read a; do
/scripts/killacct --user=$a
/scripts/restorepkg $a
done

similarly, remmeber to screen first before doing the above.

Change new server ip address

You might want to change the ip address of your new server to the old ones. Do the following,

To change the server's main IP address, perform the following steps:
Open the /etc/sysconfig/network-scripts/ifcfg-eth0 file with a text editor.
Edit the IPADDR and GATEWAY lines to use the IP address and gateway of your old server.
Open the /etc/ips file with a text editor.
Add your old server's primary IP address, net mask, and gateway to the file.
Note:
Remove the new server’s primary IP address from this file if it is present.
Restart the network service with the following commands:
For CentOS, CloudLinux™, and Red Hat® Enterprise Linux (RHEL) 6 and earlier, and Amazon Linux, run the service network restart command.
Note:
Amazon Linux always runs in a NAT configuration. 
 
For CentOS, CloudLinux, and RHEL 7 and later, run the systemctl restart network command.
Run the /scripts/mainipcheck command to add the IP address to the /var/cpanel/mainip file.
Run the /scripts/fixetchosts command to add the IP address and hostname of your server to the /etc/hosts file.

and you should be good to go. Test it out and enjoy your new environment!

corosync died: Could not read cluster configuration Check cluster logs for details

Well, if you see this and you did nothing to your cluster other than freeing up some space, you may just find yourself seeing the error below,

Stopping cluster:
   Stopping dlm_controld... [  OK  ]
   Stopping fenced... [  OK  ]
   Stopping cman... [  OK  ]
   Unloading kernel modules... [  OK  ]
   Unmounting configfs... [  OK  ]
Starting cluster:
   Checking if cluster has been disabled at boot... [  OK  ]
   Checking Network Manager... [  OK  ]
   Global setup... [  OK  ]
   Loading kernel modules... [  OK  ]
   Mounting configfs... [  OK  ]
   Starting cman... corosync died: Could not read cluster configuration Check cluster logs for details

Google around and you get scary stuff like reinstalling the cluster and stuff like that. But what really works for me without jumping off the building was that the cluster logs in /var/log/cluster was deleted and causes the corosync to die. Hence, you might want to check your log is there before doing some fanciful work of redoing everything.

Repair Window Server 2012r2 in KVM – 0xc000000f

This is more like my issue which i give myself today. Hence, i better write out how to save my ass later on. Basically i have a Window Server 2012r2 in KVM and after i adjust the hard drive by expanding it, something bad happen and i get the following error

0xc000000f – The Boot Selection Failed Because A Required Device Is Inaccessible

Yeah, I can't restart my server. Hence, i downloaded Window Server 2012r2 iso and boot from it hoping that my server is able to repair and reboot again. I was wrong. It wasn't that easy. Lucky i manage to do it somehow, hence, here, i will be writing how i did it.

Repairing Window Server 2012r2 in KVM

The first thing you need to do is to attach the Window Server 2012r2 setup disc under the DVD drive,

Next head over to fedoraproject and download the virtio driver and also attach it to kvm.

Screen Shot 2016-06-04 at 3.02.05 AM

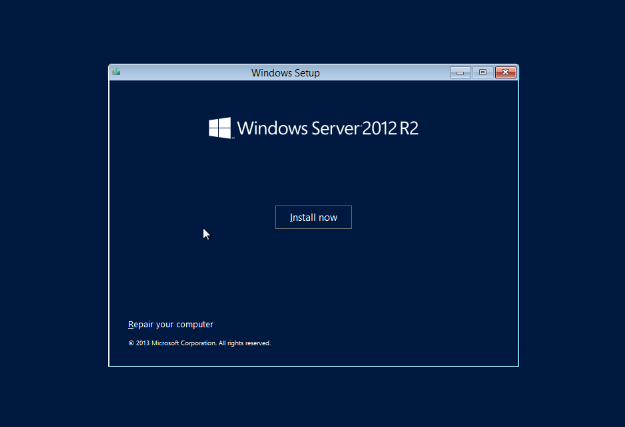
You should have something like the one shown above. Now boot from Windows Server 2012r2 as show below,

Screen Shot 2016-06-04 at 3.06.12 AM

Click on Repair Your Computer and you will see this

Screen Shot 2016-06-04 at 3.06.20 AM

Click on Troubleshoot and you will see this

Screen Shot 2016-06-04 at 3.06.26 AM

Click on System Recovery Image

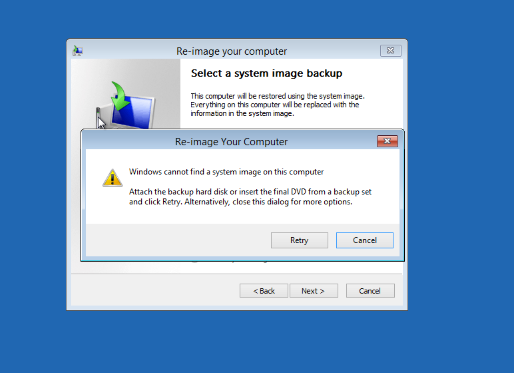
Screen Shot 2016-06-04 at 3.06.52 AM

You will see a warning, ignore it and click Next

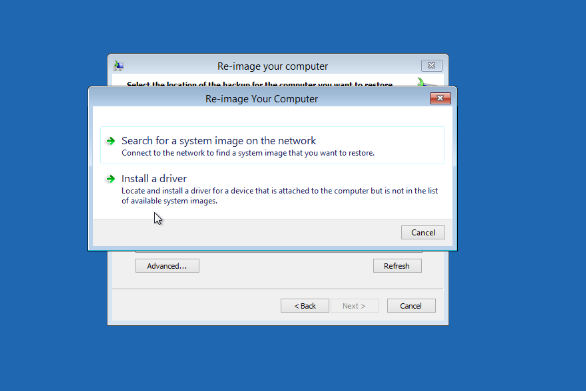
Screen Shot 2016-06-04 at 3.07.01 AM

Click on Install a driver

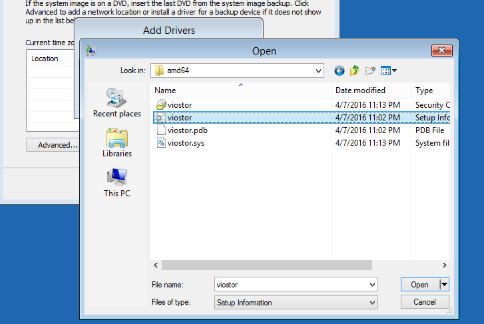
Screen Shot 2016-06-04 at 3.07.22 AM

Now, select the drive that has virtio driver on it and find a folder call viostor and select the file u see above. Then exit this and go to command prompt,

then key in the following command

diskpart

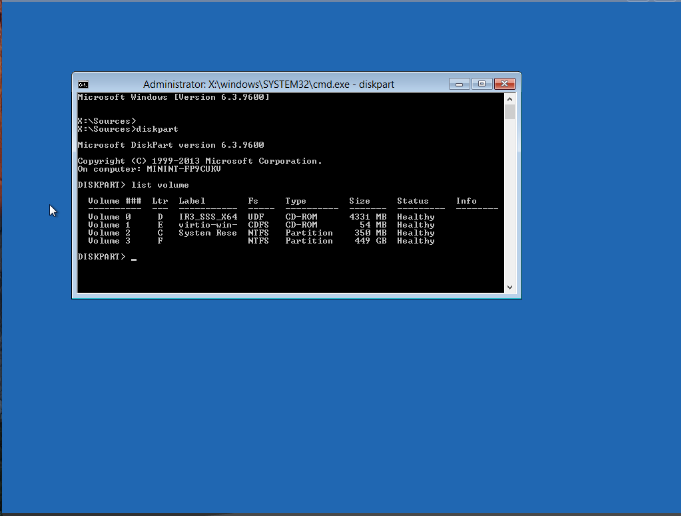
and list out the volume and make sure you can see your hard disk here.

list volume

It will indicate the RAW volume, which is actually the NTFS partition and is responsible for the generation of boot error.

Screen Shot 2016-06-04 at 3.09.52 AM

Now our main target is to convert this RAW volume into NTFS partition. To do so, type the following command:

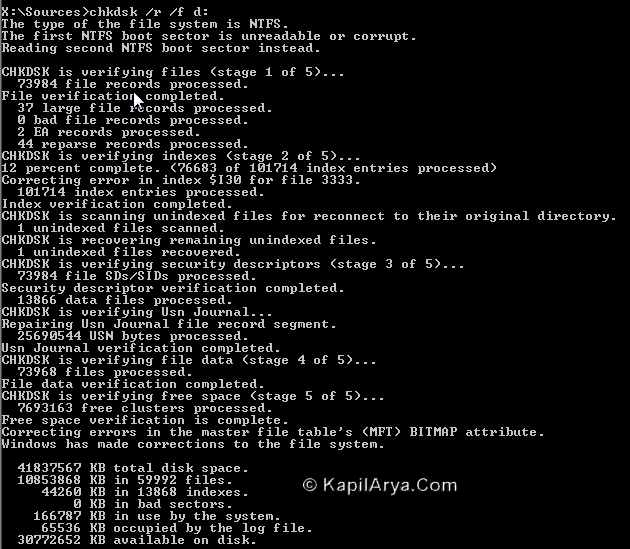
chkdsk /r /f f:

Once this command used, the main partition now generates the error “The first NTFS boot sector is unreadable or corrupt.” But the good thing is that it actually repairs the second partition.
The-boot-selection-failed-because-a-required-device-is-inaccessible-4

In this way RAW volume is converted into NTFS partition and the other errors involving indexes, master file table etc. are identified and repaired automatically. Reboot the machine and you should be able to access normally now. All fix!

Credit goes to the following,

  • http://www.kapilarya.com/how-to-fix-error-0xc000000f-the-boot-selection-failed-because-a-required-device-is-inaccessible
  • http://serverfault.com/questions/423103/how-can-i-run-startup-repair-on-a-kvm-virtualized-windows-server
  • https://neosmart.net/wiki/the-drive-where-windows-is-installed-is-locked/
  • http://beta.itprotoday.com/management-mobility/fix-unbootable-systems-bootsect?
  • http://www.hackaapl.com/repairing-windows-2012-r2-startup/
  • https://www.lifewire.com/how-to-rebuild-the-bcd-in-windows-2624508

and good luck guys!

Setup MongoDB 3.2 Geographical Replica Set in Ubuntu 15.10

Interestingly, i needed to setup a Replica Set on Ubuntu 15.10 for MongoDB 3.2 which is the latest Ubuntu and MongoDB version. This also serve as a tutorial for anyone who is interested in setting up a MongoDB Replica Set as well.

Import the public key used by the package management system.

Login to your server as root, we will need to import the public key use by the package manager for mongodb, just fire the following command,

sudo apt-key adv --keyserver hkp://keyserver.ubuntu.com:80 --recv 7F0CEB10

And we are good here.

Create a Source list file for MongoDB and Installation

Next, we need to add the source list for MongoDB. However, since MongoDB did not support 15.10 at this time, we will use debian ones

echo "deb http://repo.mongodb.org/apt/debian wheezy/mongodb-org/3.0 main" | sudo tee /etc/apt/sources.list.d/mongodb-org-3.0.list

Now, we will need to update the server and install mongodb

sudo apt-get update
sudo apt-get install -y mongodb-org

And after everything finished running, you should have your mongodb running.

sudo service mongod start

if no error is given, meaning your MongoDB has successfully installed.

Setup Replica Set

Now, assuming you did the above on 3 machines, you will need to setup each replica with the following steps,

head over to /etc/mongod.conf and replace your config with the one show below,

# mongod.conf

# for documentation of all options, see:
#   http://docs.mongodb.org/manual/reference/configuration-options/

storage:
    dbPath: "/data/mongo"
    directoryPerDB: false
    journal:
        enabled: true
    engine: "wiredTiger"
    wiredTiger:
        engineConfig:
            cacheSizeGB: 1
        collectionConfig:
            blockCompressor: snappy
systemLog:
    destination: file
    path: "/var/log/mongodb.log"
    logAppend: true
    logRotate: reopen
    timeStampFormat: iso8601-utc
net:
  port: 27017
  bindIp: 0.0.0.0

replication:
   oplogSizeMB: 500
   replSetName: dstTest

Next, create the folder for MongoDB data,

mkdir -p /data/mongo
chown -R mongodb:mongodb /data

Once you have done that, restart MongoDB and make sure there is no error.

sudo service mongod restart

Next we need to setup each replica in MongoDB.

Configure the servers to include in replica set

Assuming you have 3 machines, with the following hostname

sg.db.hungred.com
us.db.hungred.com
tw.db.hungred.com

Now, head over to the primary MongoDB server that you would like it to be primary (in my case, us.db.hungred.com) and enter to mongodb using the command below,

mongo
rs.initiate

then paste the following

rs.reconfig({ _id : "testDB", members : [ {_id : 0, host : "sg.db.hungred.com:27017", priority: 5}, {_id : 1, host : "us.db.hungred.com:27017", priority: 4}, {_id : 2, host : "tw.db.hungred.com:27017", priority: 3 } ] })

take note of the priority i have given it and make sure this is one liner (yeah its messy but that's how i copy and paste it in one piece), then check your conf

rs.conf()

and status at

rs.status()

and you got yourself a 3 location replica set of MongoDB!

***** UPDATE *****

Adding Security Authentication

If you want to add authentication into your setup, you will need to visit /etc/mongod.conf and add the following

security:
  keyFile: /data/mongodb-keyfile

on all of your primary and secondary Mongodb server. The file will need to generate this way,

openssl rand -base64 741 > /data/mongodb-keyfile
chmod 600 mongodb-keyfile

This is to ensure all replica set can communicate with each other. Once you have generated the file above on the primary MongoDB server, copy the same file to other secondary server and update the /etc/mongod.conf on each secondary server along with it.

How To Install Aide Intrusion Detection System on Ubuntu

Aide stands for Advanced Intrusion Detection Environment which is one of the most popular tools for monitoring changes to a Unix or Linux system. Here i will list out how i am going to set this baby up on some of my server to secure on system.

Updating and Installing Aide

sudo apt-get update -y

Once you have update your repo, simply install Aide using the following command

sudo apt-get install aide

And aide is installed in your machine!

Configuring and Test out Aide

Next we are going to configure this baby. Initial the database with the command below,

sudo aideinit

It will take a while and once you have initial the database, Verify that the new aide database has been created

cd /var/lib/aide
ls -lt

And you should see something like this

AIDE 0.16a2-19-g16ed855 initialized AIDE database at /var/lib/aide/aide.db.new
Start timestamp: 2016-05-12 10:17:20 -0400
Verbose level: 6

Number of entries:	66800

---------------------------------------------------
The attributes of the (uncompressed) database(s):
---------------------------------------------------

/var/lib/aide/aide.db.new
  RMD160   : BOdplDoXDH0ws73WkoYe11+WIhM=
  TIGER    : tJ8xmXCDo9N9e8cJZBuqQSW/yl/ArSnJ
  SHA256   : E+Pc3ae0PDDxfRV9PcZZ8Fq+NsJZBLbo
             SQQ+i6xQ2I0=
  SHA512   : WHHce2bdDPzP1NgMSr9afReWcIvGbW+p
             D09ShUO3kT6EJpFWhqTR0RI60LmYW/sR
             76QTqqOOnIK+Cknc8mKXRA==
  CRC32    : OqKLPA==
  HAVAL    : zT+SY0Ee5SuFaXb7Kjo3gU7NpnH+QIyA
             buxyjH8AedM=
  GOST     : 4cW9q/3KpRawsNsRc2HtdjGgF70fsaI5
             8eRaLnsDlmo=


End timestamp: 2016-05-12 10:24:58 -0400 (run time: 7m 38s)

Move the new file to the new database using the following command,

mv /var/lib/aide/aide.db.new /var/lib/aide/aide.db

Now, let's test this baby out with the following command,

aide.wrapper --check

and you will get something like this

root@mongodb-pk:~# aide.wrapper --check
AIDE 0.16a2-19-g16ed855 found differences between database and filesystem!!
Start timestamp: 2016-05-12 10:29:51 -0400
Verbose level: 6

Summary:
  Total number of entries:	66801
  Added entries:		1
  Removed entries:		1
  Changed entries:		3

---------------------------------------------------
Added entries:
---------------------------------------------------

f++++++++++++++++: /var/lib/aide/aide.db

---------------------------------------------------
Removed entries:
---------------------------------------------------

f----------------: /var/lib/aide/aide.db.new

---------------------------------------------------
Changed entries:
---------------------------------------------------

d =.... mc.. .. .: /var/lib/mongodb/diagnostic.data
f >b... mc..C.. .: /var/lib/mongodb/diagnostic.data/metrics.2016-05-12T08-52-09Z-00000
f >.... mci.C.. .: /var/lib/mongodb/diagnostic.data/metrics.interim

---------------------------------------------------
Detailed information about changes:
---------------------------------------------------

Directory: /var/lib/mongodb/diagnostic.data
  Mtime    : 2016-05-12 10:24:39 -0400        | 2016-05-12 10:36:39 -0400
  Ctime    : 2016-05-12 10:24:39 -0400        | 2016-05-12 10:36:39 -0400

File: /var/lib/mongodb/diagnostic.data/metrics.2016-05-12T08-52-09Z-00000
  Size     : 361980                           | 372957
  Bcount   : 720                              | 744
  Mtime    : 2016-05-12 10:22:08 -0400        | 2016-05-12 10:32:08 -0400
  Ctime    : 2016-05-12 10:22:08 -0400        | 2016-05-12 10:32:08 -0400
  RMD160   : czpo/fk+iRIEKUBjlc2+wELg/Wo=     | wEQV9cj/KyiGQmfGSLbzo9B44Gs=
  TIGER    : 2wLpFPWq3lxfxXyHpAMkVXUjDtZ08W8z | x8IbKbindr6NVwNbaUt0J5jWq9Y1cWmv
  SHA256   : lVRtuDTLDD7DYajbBEYoMSPpdrtxdJNA | 3J4B2ToLfGmBbHOQas/hKGj8HXe4zihW
             rxL5xH8A0kA=                     | 0OLKtXC4fqo=
  SHA512   : axlztAMc56xIGz7JnsOq8dAgZfCLmT83 | 49Fex6rPE24SnoOaLc+T/hIiTLEEyOmk
             gFZS6MB2zmT5aPxK4FmOSnEC9W5mtUNJ | YGeLF1W/fxZuRYk3FuwgpFlKA2qrmi2f
             AIaoa5bK736BAXwMcsA+NA==         | xNij3UG21mAiX+Tx2pRw+A==
  CRC32    : drkWXw==                         | rtCgKQ==
  HAVAL    : SR2yfai80zpN2Xw+8sUFSM/kTQBGAHsl | xIk6ByhAZN5C2eU2bTJzZ0oZcJeqsIiz
             71FSIVFT4qA=                     | AMbC0DPcNhg=
  GOST     : bE/NiblzIQRPzFx8jVymvvkEA+NO6on0 | txFhbK566EUxlQk6c36TfqgvYBttntcm
             k3XlP3vO2LA=                     | qyMIxjG3zK8=

File: /var/lib/mongodb/diagnostic.data/metrics.interim
  Size     : 5279                             | 5397
  Mtime    : 2016-05-12 10:24:39 -0400        | 2016-05-12 10:36:39 -0400
  Ctime    : 2016-05-12 10:24:39 -0400        | 2016-05-12 10:36:39 -0400
  Inode    : 1180042                          | 1179903
  RMD160   : Uch+G7OlOobiM/VjjdNHYSdCZUY=     | OnSReGX+lqQuCQURBBxkfHC9U5o=
  TIGER    : bB0QmZYYNl2SKSfz4MlNrpwYKwCS3Evf | ktNDR+97gTAK7catLGoOhEFJu6IfQZwi
  SHA256   : h0s1leYNb7/RxTi86z+nHhe7DChFJtSo | KIlG5ePVgwG/+DopSTPHo6VqnGzdnQMj
             TUZXyOwKKYw=                     | m97NR3Gifhk=
  SHA512   : 8PrN5C6RJgYHIuM7DjL3vjx9/5fRbnsr | QLXQngP8ouoc8bvs580De+Vh7bGR0Lq8
             MDpk+PcTAxLV3AUbkWP9Xq0hTzro7mlM | +2tXCfVed02e1DVRgxeG3LbKxqhofP76
             nT96+O95DnPZRmuD5OAPZA==         | 6Mz99D/w7u9eabdbsYmmOw==
  CRC32    : sTX43A==                         | Ta6Udw==
  HAVAL    : ZDpLBirCqbUqz/jym+FFjv2IvY9T4k+g | qTpVXVypYnzMGQZF4SMw7Wjg/jKkptpw
             hhcWR0kK/ZE=                     | PEqS+lI8g84=
  GOST     : 7yJZnGdeAM8slovcFTD0Ftcec5KT8weQ | gVW46Bk3upRekyxDI5sPP6N1xk7b6gX5
             yPYlQqSMkf4=                     | CJTybT2VVKQ=


---------------------------------------------------
The attributes of the (uncompressed) database(s):
---------------------------------------------------

/var/lib/aide/aide.db
  RMD160   : BOdplDoXDH0ws73WkoYe11+WIhM=
  TIGER    : tJ8xmXCDo9N9e8cJZBuqQSW/yl/ArSnJ
  SHA256   : E+Pc3ae0PDDxfRV9PcZZ8Fq+NsJZBLbo
             SQQ+i6xQ2I0=
  SHA512   : WHHce2bdDPzP1NgMSr9afReWcIvGbW+p
             D09ShUO3kT6EJpFWhqTR0RI60LmYW/sR
             76QTqqOOnIK+Cknc8mKXRA==
  CRC32    : OqKLPA==
  HAVAL    : zT+SY0Ee5SuFaXb7Kjo3gU7NpnH+QIyA
             buxyjH8AedM=
  GOST     : 4cW9q/3KpRawsNsRc2HtdjGgF70fsaI5
             8eRaLnsDlmo=


End timestamp: 2016-05-12 10:37:13 -0400 (run time: 7m 22s)

see the file that we just added and updated? Yeah, that's the one that its reporting.

Crontab Aide

Now we dont want to do this every single day manually, so let's setup a crontab.

vi aide.sh

with the following code

#! /bin/sh
MYDATE=`date +%Y-%m-%d`
MYFILENAME="Aide-"$MYDATE.txt
/bin/echo "Aide check !! `date`" > /tmp/$MYFILENAME
/usr/bin/aide.wrapper --check > /tmp/myAide.txt
/bin/cat /tmp/myAide.txt|/bin/grep -v failed >> /tmp/$MYFILENAME
/bin/echo "**************************************" >> /tmp/$MYFILENAME
/usr/bin/tail -20 /tmp/myAide.txt >> /tmp/$MYFILENAME
/bin/echo "****************DONE******************" >> /tmp/$MYFILENAME
/usr/bin/mail -s"$MYFILENAME `date`" [email protected] < /tmp/$MYFILENAME

now make it executable

chmod +x aide.sh

open up crontab

crontab -e

add the following crontab into it

06 01 * * 0-6 /root/aide.sh

And we are good to go! Simple as that!