IE6 solution for position absolute with height 100% dynamically

I was working on a rounded corner solution that required to supports IE 6 and other major browsers with the number of sprites images given to me. Everything works perfectly until i test the css rule with IE 6. The look very nice layout was literally destroy by IE6. So i have to redesign it slightly so that it works nicely across all browser. Well, supporting IE6 is definitely not one of my favorite things to do for css design as there are many problems one will encounter due to the inconsistency ways of how each browser is being implemented. One of the problem that i encountered doing this was to get my left and right shadow border image to repeat itself on the y axis. The problem was it doesn't even repeat itself! 🙁

Problem with IE 6 Absolute Position with Height 100%

Soon, i found out that it was due to how IE 6 sees the current div block height. I was trying to set the div block of the left and right side shadow to fix into the content of my rounder corner solution as shown below,
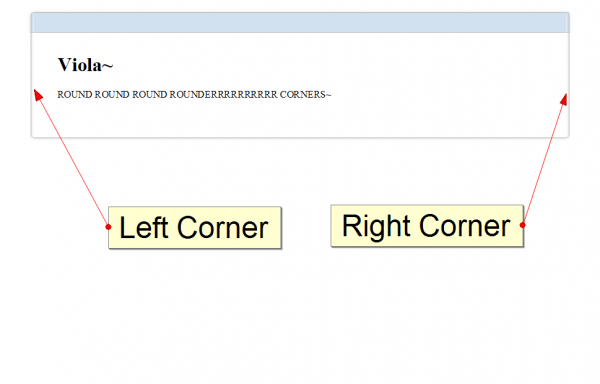
This is something that i took with Firefox, let's look at IE 6 display!

Well.. this is not the actual messed up code that i initially saw but the one that i have completed with a bit of code taken off.  Notice that the side sprite images did not repeat itself. This is not due to IE 6 incompatible with css, background-repeat rule. This is purely how IE 6 behave when your div block has absolute position rule intact with it. Let's look at the code of both my CSS and HTML code.

<div id="box-container">
	<div id="box">
		<div class="tlc"></div>
		<div class="trc"></div>
		<div class="blc"></div>
		<div class="brc"></div>
		<div class="t"></div>
		<div class="b"></div>
		<div class="l"></div> <!-- Left shadow -->
		<div class="r"></div> <!-- Right shadow -->

		<div id="content">
			<h1>Viola~</h1>

			<p>
				ROUND ROUND ROUND ROUNDERRRRRRRRRR CORNERS~
			</p>
		</div>
	</div>
</div>

The above are the structure i used to construct my rounder corner solution where the tag for left and right shadow is displayed above. Now, let's look at the two shadow CSS declaration.

#box
{
	margin: 15px auto;
	text-align: left;
	width: 55em;
	word-wrap:break-word;
	overflow: hidden;
	position: relative;
}
.l, .r
{
	height: 100%;
	position: absolute;
	width: 10px;
	z-index: -1;
}

.r
{
	background: #FFF url(images/pnl-sides.png) repeat-y 9% 0%; /*set the right border image*/
	right: 0;
}

.l
{
	background: #FFF url(images/pnl-sides.png) repeat-y 90% 0%; /*set the right border image*/
	left: 0;
}

The above left and right shadow works perfectly as shown on Firefox/Chrome/Safari but fail on IE 6. This is where the problem comes, Height:100% on a position absolute div do not work on IE 6? Well, it does work since i solved this. The trick is to provide its parent a height value as the child does not know how long its height was so it will keep looking for its parent to determine the div block height. In this case, my left and right shadow div block parent was "box". Here, i set my box div block css as follow,

#box
{
	margin: 15px auto;
	text-align: left;
	width: 55em;
	word-wrap:break-word;
	overflow: hidden;
	position: relative;
	height: 100%; /* this is added for ie6 */
}

Notice the differences between the first box declaration and this. We have just added height 100%. Below shows the result of our modification.
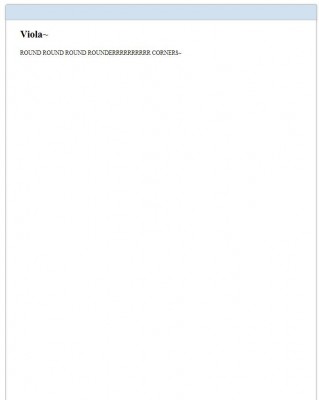
There! I fixed it in IE 6. But wait! We have another problem. Now, all browser are rendering similar view with height 100% but i want it to fixed dynamically according to the content not the whole height of the browser. We can fix other browsers by adding the following sentence as shown below,

#box
{
	margin: 15px auto;
	text-align: left;
	width: 55em;
	word-wrap:break-word;
	overflow: hidden;
	position: relative;
	height: auto !important; /* this is added to fixed all other browser dynamic height problem */
	height: 100%; /* this is added for ie6 */
}

After we added this css rule, all other browser should work correctly. It seems like IE 6 doesn't recognized !important for height attribute and only takes the latest declared height for its css height in this case, height: 100%. Other browser which worked correct will utilized the !important rule instead. This way we can assure that all other browser render our height dynamically according to the content of our text! Wait! How about IE 6? Oh yes, we still have this trouble maker that we need to take care of. The trick to solve the problem of IE 6 being dumb by taking height 100% as the whole document height is to create another parent above our "box" container which i have already created which is called "box-container". Now, for our "box-container" css, we will place the following rules:

#box-container{
	height: 100% !important;
	height: 1px;
	min-height: 1px ;
}

This will give "box" a given height to follow and cause IE 6 to resize dynamically according to the amount of text you have given in your content block. Now, i finally have a cross browser working solution for my work 🙂

Customize Authentication On Yii Framework Using MySQL Database

Just managed to find some time to play around with Yii. Yii is powerful but there is still a long way to go if we are talking about documentation for Yii framework. In Yii framework, we can see that it is very different from CodeIgniter where documentation is really structured and well understood. Nonetheless, i still feel that Yii framework is worth to explore. I managed to get my own customized authentication on Yii by adding some secure feature such as hashing, salt, key and etc. So here i am writing this tutorial to share with you more about Yii framework using MySQL database.

Requirement

Since this is more like a follow up tutorial, there are a few requirements before you start reading this tutorial.

  1. Installed Yii with a MySQL database.
  2. Setup Gii and get the user CRUD completed.

Customize Authentication - Database

Now here comes the tricky part. We need a database that stored our hashed password which is 128 bits since i am using sha512. Our data schema should looks like this,

CREATE TABLE tbl_user (
    id INTEGER NOT NULL PRIMARY KEY AUTOINCREMENT,
    username VARCHAR(128) NOT NULL,
    password VARCHAR(128) NOT NULL,
    email VARCHAR(128) NOT NULL
);

Well, it looks the same as the demo one so just ignore me lol. Create this table and we are ready to do some MVC. If you are following the tutorial you would most likely get a CRUD user setup. But we only have 'admin' and 'demo' login account. We would definitely want something better.

Customize Authentication - Model

In order to validate a user, we need to create a few methods in the model folder in order to authenticate and store user password. We will need to create these functions on our User.php file on our model folder.

	/**
	 * @return boolean validate user
	 */
	public function validatePassword($password, $username){
		return $this->hashPassword($password, $username) === $this->password;
	}
	/**
	 * @return hashed value
	 */
	DEFINE('SALT_LENGTH', 10);
	public function hashPassword($phrase, $salt = null){
		$key = 'Gf;B&yXL|beJUf-K*PPiU{wf|@9K9j5?d+YW}?VAZOS%e2c -:11ii<}ZM?PO!96';
		if($salt == '')
			$salt = substr(hash('sha512', $key), 0, SALT_LENGTH);
		else
			$salt = substr($salt, 0, SALT_LENGTH);
		return hash('sha512', $salt . $key . $phrase);
	}

the two methods above is used to validate the user password during login and the other method returns a hashed password given the original plain password value. Once these two methods are pasted into the user.php file. We are done with our modal!

Customize Authentication - Controller

In controller, we need to modify the create and update handler but i will just demonstrate the create user handler. Go to your controller folder and look for UserController.php. Change the method actionCreate to the following

	/**
	 * Creates a new model.
	 * If creation is successful, the browser will be redirected to the 'view' page.
	 */
	public function actionCreate()
	{
		$model=new User;

		// Uncomment the following line if AJAX validation is needed
		// $this->performAjaxValidation($model);

		if(isset($_POST['User']))
		{
			$model->attributes=$_POST['User'];
			$model->password = $model->hashPassword($_POST['User']['password'], $_POST['User']['email']);
			if($model->save())
				$this->redirect(array('view','id'=>$model->ID));
			else
				$model->password = $_POST['User']['password'];
		}

		$this->render('create',array(
			'model'=>$model,
		));
	}

This way, we can create user with hashed password instead of plain password stored in our database.

Customize Authentication - Component

Next we need to authenticate our users. The original one just defined 'demo' and 'admin' as the only users that we are able to login. But now we have a database and a list of user and password. We should really secure our login. Here we modify our original authentication method to the following one.

	public function authenticate()
	{
		$username = $this->username;
		$user = User::model()->find('username=?', array($username));
		if($user === NULL)
			$this->errorCode=self::ERROR_USERNAME_INVALID;
		else if(!$user->validatePassword($this->password, $this->username))
			$this->errorCode=self::ERROR_PASSWORD_INVALID;
		else{
			$this->username = $user->username;
			$this->errorCode=self::ERROR_NONE;

		}
		return !$this->errorCode;
	}

this allowed us to go through the users in our database table instead of the hardcoded one by using the method we wrote previously on the modal folder.

Now, our user will be authenticate using our customized authentication process rather than using the default one!

Image Tutorial: How to setup Yii Framework on WAMP using MySQL database

I decides to move to Yii finally after comparing between different framework. At this point, although Yii documentation wasn't as good as CI, it is not something that will restrict me from entering Yii framework. Like most people i started with the tutorial given on Yii website. Here is something i tried out today through the instruction given on the cookbook section. In this article, i will extend what is present in the article in a more visual form.

Requirement

Here are some of the basic requirement for this tutorial.

  1. Window XP (Vista and Win 7 will also work)
  2. Yii Framework 1.1.3
  3. WAMP 2.0i (Apache 2.2.11, PHP 5.3.0, MySQL 5.1.36, Phpmyadmin)
  4. Basic installation of WAMP (C:\\wamp\...)

Setting up yiic on WAMP

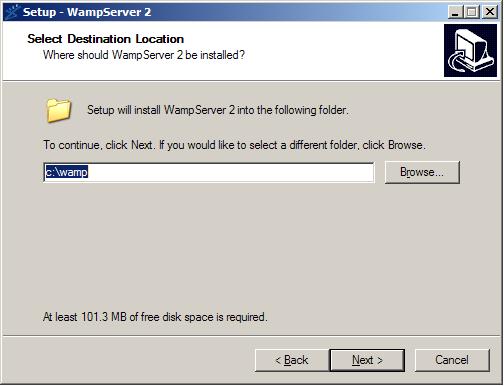
Firstly install your WAMP with the default installation.

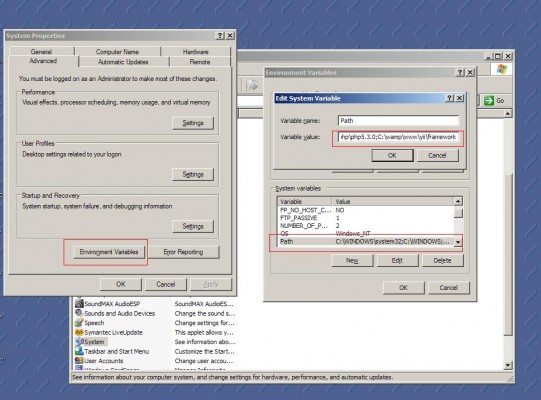
Once you have installed this, you should be ready to setup your computer local environment to use Yiic from Yii framework. Firstly, go to your environment variables located at Control Panel->System->Advance->Environment Variables->Path as shown below,

Once you reached the path textbox, entered the following location to tell your windows that they are the environment variables.

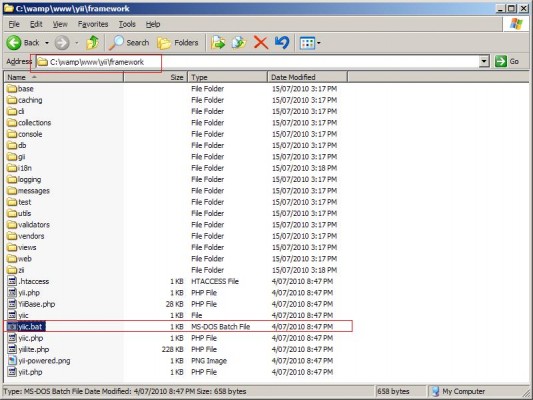
  1. C:\wamp\www\yii\framework
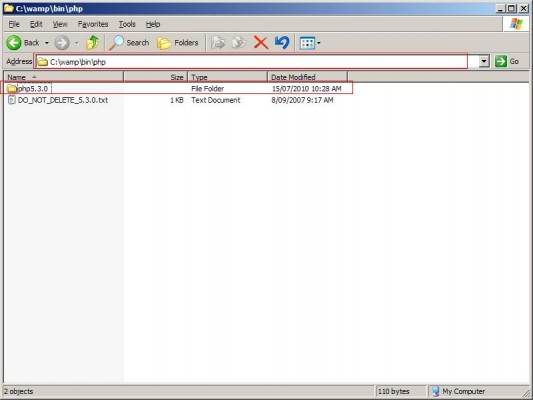
  2. C:\wamp\bin\php\php5.3.0

In this case, we are telling our window where is our yii framework yiic.bat and where is our php.exe as shown below,

since my WAMP is using php5.3.0, the folder shows the current version my WAMP is using. This might differ. Hence, change the directory path according to the php version you use. On the other hand, my yiic.bat is located at C:\wamp\www\yii\framework as shown below, hence, i pass this to the environment variable instead.

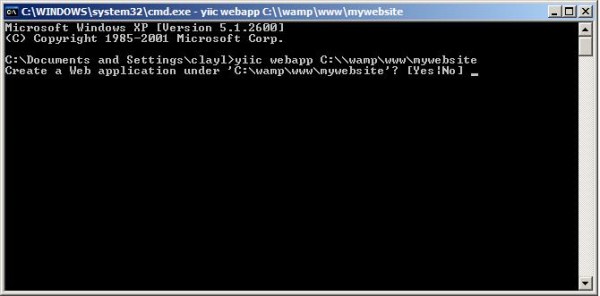
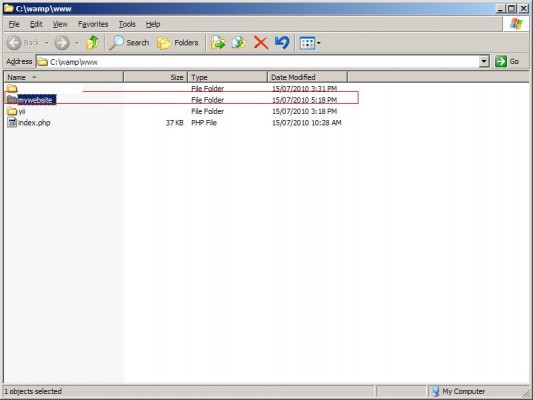
Click 'OK' for all the settings you have made and restart you PC. Once your windows has rebooted, click start->run.. and type 'cmd'. On the screen type "yiic webapp C:\\wamp\www\mywebsite" andtype 'yes". The folder should show up on your localhost.

Now you need to change your setting from sqllite3 to MySQL. This is located at C:\wamp\www\mywebsite\protected\config\main.php, open this file and replace the codes with the following.

<?php

// uncomment the following to define a path alias
// Yii::setPathOfAlias('local','path/to/local-folder');

// This is the main Web application configuration. Any writable
// CWebApplication properties can be configured here.
return array(
	'basePath'=>dirname(__FILE__).DIRECTORY_SEPARATOR.'..',
	'name'=>'My Web Application',

	// preloading 'log' component
	'preload'=>array('log'),

	// autoloading model and component classes
	'import'=>array(
		'application.models.*',
		'application.components.*',
	),

	// application components
	'components'=>array(
		'user'=>array(
			// enable cookie-based authentication
			'allowAutoLogin'=>true,
		),
		// uncomment the following to enable URLs in path-format
		/*
		'urlManager'=>array(
			'urlFormat'=>'path',
			'rules'=>array(
				'<controller:\w+>/<id:\d+>'=>'<controller>/view',
				'<controller:\w+>/<action:\w+>/<id:\d+>'=>'<controller>/<action>',
				'<controller:\w+>/<action:\w+>'=>'<controller>/<action>',
			),
		),
		*/
		'db'=>array(
			'connectionString' => 'mysql',
		),
		// uncomment the following to use a MySQL database

		'db'=>array(
			'connectionString' => 'mysql:host=localhost;dbname=yourdatabasename',
			'emulatePrepare' => true,
			'username' => 'root',
			'password' => '',
			'charset' => 'utf8',
		),

		'errorHandler'=>array(
			// use 'site/error' action to display errors
            'errorAction'=>'site/error',
        ),
		'log'=>array(
			'class'=>'CLogRouter',
			'routes'=>array(
				array(
					'class'=>'CFileLogRoute',
					'levels'=>'error, warning',
				),
				// uncomment the following to show log messages on web pages
				/*
				array(
					'class'=>'CWebLogRoute',
				),
				*/
			),
		),
	),

	// application-level parameters that can be accessed
	// using Yii::app()->params['paramName']
	'params'=>array(
		// this is used in contact page
		'adminEmail'=>'[email protected]',
	),
);

Change 'yourdatabasename' in the text above to your database name and you'r done!

How to make animated GIFs extension file using Photoshop

Ever wonder how to make an animated GIFs extension image file using Photoshop? Animated GIFs image is useful in many different occasions. Especially when you wish to create a banner on the web and didn't know what to do. Normally, what all of us will do is to search for any program that can assist us with this task. But usually it is quite difficult to find something free and powerful enough to make an animated GIFs image without watermark or restrictions. Luckily, Photoshop is able to do this for you without any extension plugin or difficult procedure. In this article, we will look at how animated GIFs image can be achieved using Photoshop.

Scrolling Animated GIFs with Photoshop

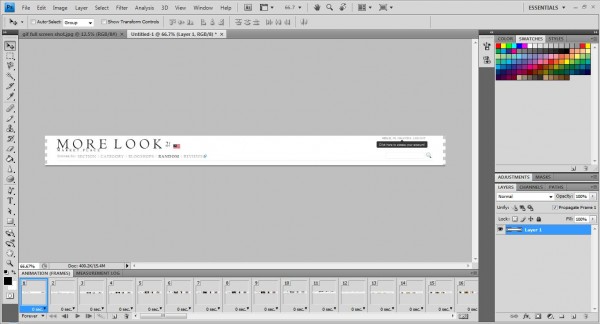
Let's start with something really simple. All you need is something like a full screen shot of your website such as this.

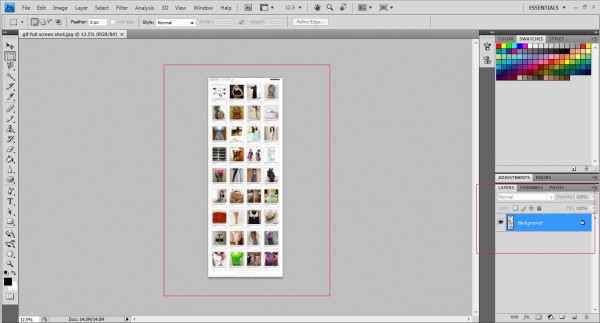
Open this image with your Photoshop apps and it will appear as a new layer as shown below,

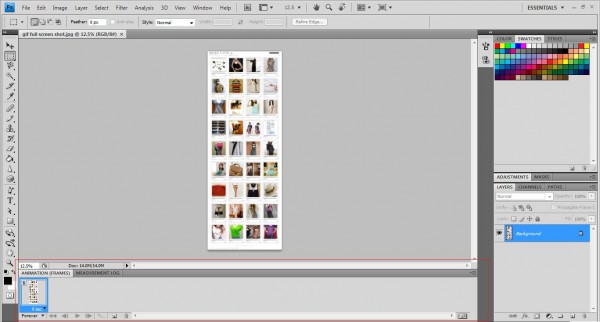
Now clicked on window->animation on the top menu bar and the animation bar will appear below.

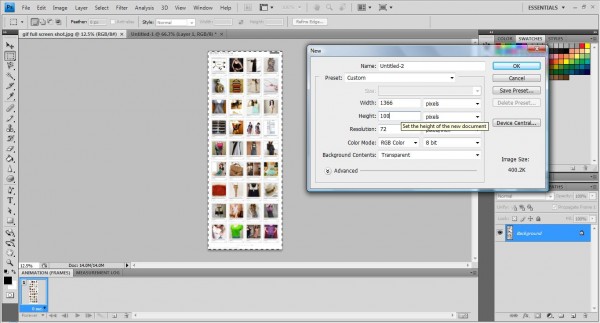
Now create a new photoshop file with the height differ from the image as shown below,

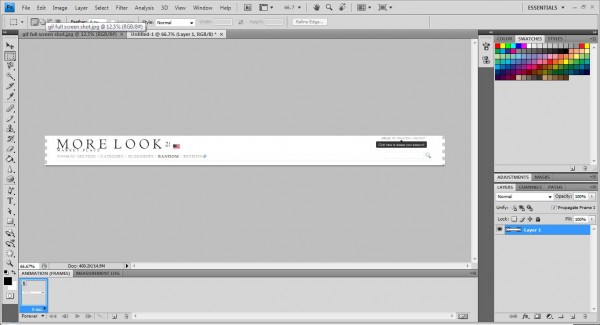
Now, copy the image shown above to the new file and you should get something like this.

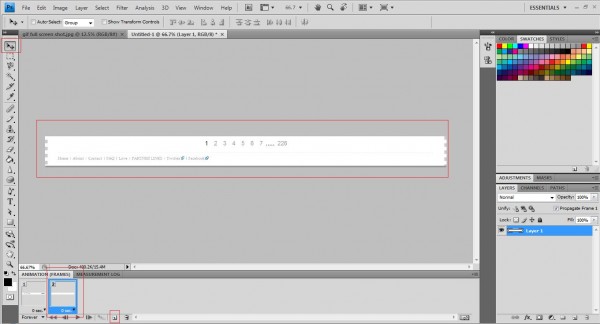
Next, create a new animation frame on the animation window as shown below,

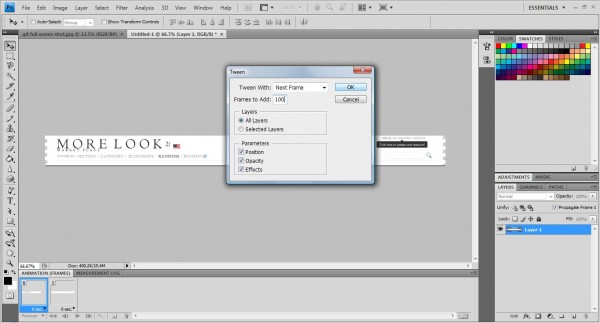
Now, use the Move Tool to move the image right down to the bottom as shown above. Clicked on the first frame and press on  "Tweens animation frames" and you will see the pop up as shown below.

Once you pressed "Ok" button, a list of frames will be added between the first and second frame. This means that it will animate from the first frame to the last frame by putting in additional frame to initialize the movement from the first to the last frame.

Now all you need to do is to clicked on the play button to see the animation from the first frame all the way to last last one.  You can change the animation to forever, just once or 3 times by clicking on the below line. There are a few options to choose, just play around with it and you should have a good idea what each icon does.

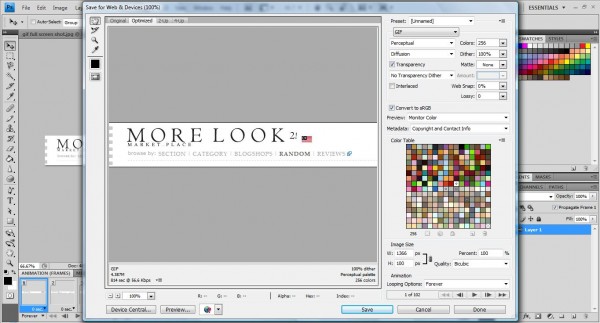
Now its time to save the gif file. Clicked on File->Save on Web & Devices as shown below,

Clicked save and you will have something like this.

Normal Animated GIFs Image With Photoshop

CreativeTechs has an excellent tutorial on basic animated GIFs tutorial. Do read it up and you should get a very clear idea on how animated GIFs on Photoshop works 🙂

“You do not have sufficient permissions to access this page.” on plugin admin page after update to WordPress 3.0

Well, if you are having problem with your WordPress plugins after an upgrade to WordPress 3.0, this article might just help you. The error you will being seeing on your WordPress plugins will most likely be located on the admin side of WordPress. You will most likely see the message "You do not have sufficient permissions to access this page." and starts debugging and looking for clues on what is happened suddenly with the new upgrade of WordPress 3.0. (that what happens to me) You will most likely find yourself looking at the function user_can_access_admin_page() which return false and cause you debugging all these in the first place. Then, you will find yourself stuck at line 1407 of wp-admin/includes/plugins.php with the following code.

	if ( isset( $plugin_page ) ) {
		if ( isset( $_wp_submenu_nopriv[$parent][$plugin_page] ) )
			return false;

		$hookname = get_plugin_page_hookname($plugin_page, $parent);
		if ( !isset($_registered_pages[$hookname]) )
			return false;
	}

Now, the culprit is definitely caused by $_registered_pages[$hookname] array variable not being set. Hence, this keep you wonder, "why there wasn't any problem until now until WordPress 3.0?". How do we solve this?

Solutions for plugin "You do not have sufficient permissions to access this page." error

There is an obvious solution for this that is to set the global array varaible of $hookname into it so that it always return a true.

	GLOBAL $_registered_pages;
	$hookname = get_plugin_page_hookname( $plugin_file , '' );
	$_registered_pages[$hookname] = true;

This way, you will bypass the validation easily. This is easy but who want hack when there is a properly way of doing it?

My problem solution

Well, my plugins problems can be solved this way but i believe there is an easier way out. Hence, after some try and reading i suspect there is a stricter rules implemented on WordPress when creating your WordPress plugin. Finally, i get a hold on what is wrong with my plugins that is causing "You do not have sufficient permissions to access this page." on all my plugins admin page. Here's the culprit.

	#Before 3.0
	$plugin_page = add_options_page("Hungred Feature Post List", "Hungred Feature Post List", 10, "Hungred Feature Post List", "hfpl_admin");

	#After 3.0 onwards
	$plugin_page = add_options_page("Hungred Feature Post List", "Hungred Feature Post List", 10, "Hungred-Feature-Post-List", "hfpl_admin");

Take note that the slug parameter is being changed from spaces to dashes. WordPress get_plugin_page_hookname will remove all spaces on your slug parameter instead of leaving it which will give "Hungred Feature Post List" instead of "HungredFeaturePostList". Since there is only "Hungred Feature Post List" exist within the $_registered_pages global array and "HungredFeaturePostList" wasn't being registered. The validation fail and throw me an error page.