Lesson 1:How to create a theme using cherry framework

Introduce cherry framework

Cherry is a new framework for WordPress that make it easier for users to build WorldPress themes and WordPress websites. It is a new software framework with most current and sensible approaches to produce a consistent and well-crafted website. Cherry Framework is used in WordPress to build a theme which able to call Cherry WordPress themes.

Why use cherry framework

It is a framework created by developers for developers, but it’s also a perfect solution for anyone who wants to build WordPress sites minimum time. The reason to use Cherry Framework is because themes are easy to install and all changes can be done in the WordPress admin area. There's no need to switch between WordPress, FTP or PhpMyAdmin and you can get thing done simply in WordPress admin also. Other than that, it also allows an easy way to install WordPress plugin.

In the WordPress dashboard is only have one personal dashboard experiences, but in the Cherry Framework contain an additional category called as Cherry Options. The new category has a stylized interface and brings much better overview on WordPress themes. It is contains 100+ handy options integrated into a framework with including easy adjust theme appearance, change typography, logo and navigation so on. Intuitively fine-tune slider, blog pages, portfolio and page footer so that everything appears in the style you prefer.

Installing cherry framework

Framework Installation

There are several steps to teach users how to install the Cherry Framework into WordPress:

Step 1: Go to Dashboard and select the Appearance > Themes > Install Themes. Here you should upload the file named [CherryFramework.zip] that you have download into your computer.

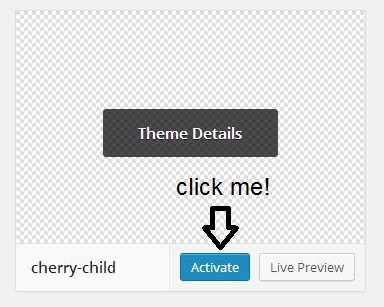
Step 2: After upload is finished, we are able to see the cherry icon in the Appearance > Themes page. Click Activate button to proceed.

Step 3: After the activation of cherry themes, select the Home logo and click Visit Site.

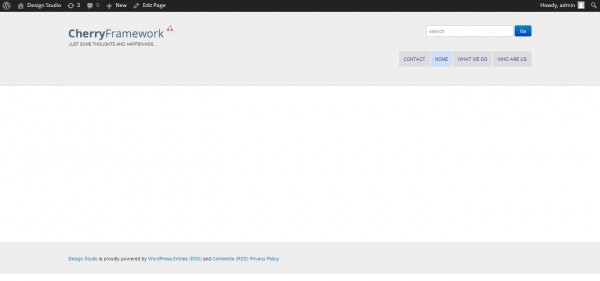
Step 4: The cherry original themes will appear in the current site. At the top you are able to see the Cherry Framework Logo.

Creating a Cherry Framework theme

To create a Cherry Framework theme, usually it will separate into two parts. Cherry Framework can define as a “base/starter” theme framework. It is a stand-alone theme designed to be a flexible foundation for quicker WordPress development, usually serving as a robust Parent theme for Child themes.

Child themes allow user to modify, or add to the functionality of that parent themes. A child theme is the safest and easiest way to modify an existing theme. If we use and modify existing themes (Cherry Framework), your changes will be lost since Cherry Framework updated. Therefore, we are suggesting creating a child theme and overriding within. When the Cherry Framework makes a few tiny changes or updates, the child theme was still keep your changes.

There are several steps to teach users how to create a Child theme and install into the WordPress:

How to create a Child Themes

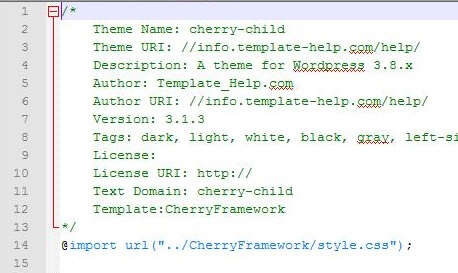
Step 1: To create a child themes,we would recommend that you use a descriptive name such as “parenttheme-child” (where “parenttheme” is the name of your active theme). Inside the “parenttheme-child” folder >create a style.css, then we wrote the code on below:

You can change each of these lines to suit your theme name. The only required lines are the Theme Name, the Template, and (if the stylesheet of your child theme is being built off of the parent theme -- with a few modifications) the '@import url' line.

Child Themes Installation

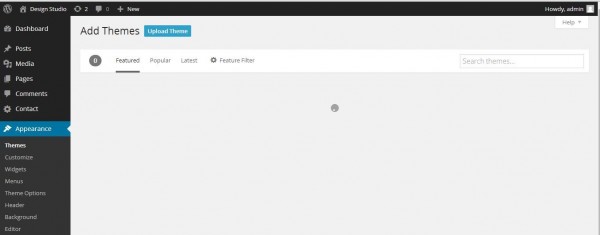
Step 2: Again go to Appearance > Themes > Add new > Upload Themes and upload your “parenttheme-child” folder that you have created as a child theme;

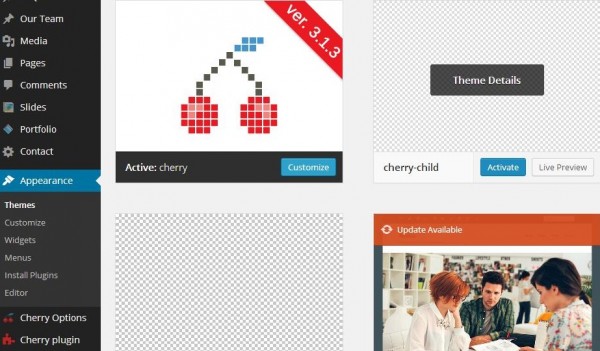
Step 3: After upload is finished, go again Appearance > Themes. It will show the Cherry Framework and Child theme you have uploaded just now.

Step 4: Click to active the Child themes, select the Home logo and click Visit Site. (Please refer to Framework Installation step 3 methods). Then you are able to see your site.

Step 5: After the activation of cherry-child, the example output is show like below.

testtest

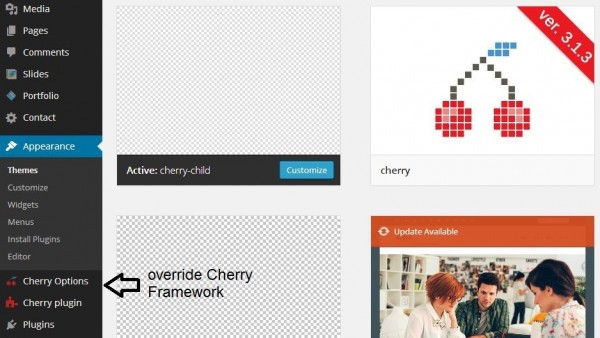
Step 6: In the Appearance > Themes, once you active the child theme you are able to see and use the cherry option function which is provided by Cherry Framework (Parent theme).

A child theme is a “drop-in” code library framework which is not a stand-alone Theme. Such frameworks cannot be installed or used as a stand-alone theme. Figure 1 below show if the WordPress have no any Parent Theme (Cherry Framework), the Child Theme (cherry-child) is unable to read also.

Figure 1: broken theme

Install the themes into WordPress via Server

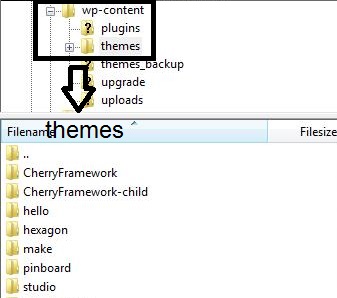
You need access to your website via either FTP or your hosting provider’s file manager application (such as Filezilla), as it is easier to add and edit files and folders that way. Once you have logged into your website via your chosen FTP client, navigate to “/wp-content/themes/”.

This directory will contain one or more folders, each of which represents a theme installed on your site. Figure 2 show the example of using Filezilla:


Figure 2: File ascending order in FileZilla

Conclusion

This article is to introduce, analyzing and teach how to install the Cherry Framework into the WordPress. It also includes several steps of creating a child theme with override by Cherry Frameworks. Lastly, we have include how to install the child themes into WordPress. The installation method just like the method how to install a Cherry Framework.

The WordPress is a great Platform that uses to build blogs and sites. It also provides the infrastructure to create plugin frameworks or theme frameworks on top of it. The benefits of building theme frameworks are to provide a stable, good quality themes quick and short time. This helps in faster development time and lower costs.

Creating Virtual Host on Nginx Web Server with Example in Centos

Actually this is a the continue part of my previous post which explains how to setup a LEMP server but the tutorial never actually teaches the user how to setup a virtual host for each of their website but this should be pretty straight forward and i am going to show you how this can be done.

Setup Virtual Host Directory

Before we go into nginx configuration, we will need to setup the location where we want our website files to be located. In this case, i have decided to just throw them into /var/www (you can do ln -s /var/www /home/www if you want it to be in /home in a later stage) but the folder isn't available so i will have to setup these virtual host folder myself.

sudo mkdir -p /var/www/monitorboard.com/html

You will need to designate an actual DNS approved domain, or an IP address, to test that a virtual host is working. In this tutorial we will use example.com as a placeholder for a correct domain name.

However, should you want to use an unapproved domain name to test the process i'll explain it later too.

Granting Permission to our Virtual Host Directory

Since we created our directory using a root account, we will have to change it to its rightful owner and in this case, it will be 'nginx' as shown below

sudo chown -R nginx:nginx /var/www/monitorboard.com/html

Additionally, it is important to make sure that everyone is able to read our new files so we have to correct its permission to 755

sudo chmod 755 /var/www

And we are done with permission!

Nginx Virtual Host

To setup your nginx virtual host, you will need to open up nginx virtual file located at /etc/nginx/conf.d/virtual.conf and you will need to update it with the following configuration

server {
    listen       8080;
    server_name  monitorboard.com www.monitorboard.com;
    root   /var/www/monitorboard.com/html;
    index  index.php;

    location / {
        try_files $uri $uri/ /index.php?$query_string;

    }
# Logging --
    access_log  /var/www/monitorboard.com/access.log;
    error_log  /var/www/monitorboard.com/error.log;

# serve static files directly
    location ~* ^.+.(jpg|jpeg|gif|css|png|js|ico|html|xml|txt)$ {
            access_log        off;
            expires           max;
    }

    include /etc/nginx/conf.d/global/security.conf;
    include /etc/nginx/conf.d/global/cache.conf;
    include /etc/nginx/conf.d/global/php-fpm.conf;
    include /etc/nginx/conf.d/global/status.conf;
    include /etc/nginx/conf.d/global/wordpress-w3-total-cache.conf;
}

As you can see, i've setup my domain to the folder /var/www/ instead of the default placement of /usr/share/nginx/html which means that this domain will read from the folder /var/www/monitorboard/html instead of anywhere else! Port 8080 is being used because we have varnish installed in our server as shown on our previous tutorial of how to setup a LEMP server.

Lastly all the include file can be get from nicolargo github. This will ensure that all our PHP files can be run off our nginx server but before anything can be run, we will need to restart our nginx server and php-fpm service.

service nginx restart
service php-fpm restart

This will ensure our setup is being updated on our machine.

Fake domain testing

In the case monitorboard.com isn't own by you, you will need to setup your hosts file to reflect your machine to redirect all request to your web server. Assuming your webserver ip is 1.1.1.1, you will need to update your hosts file in your computer/machine located in /etc/hosts and add in the following config

# Host Database
#
# localhost is used to configure the loopback interface
# when the system is booting.  Do not change this entry.
##
127.0.0.1       localhost

#Virtual Hosts 
1.1.1.1    www.monitorboard.com 

Now, if you open up your browser and hit 'www.monitoboard.com', you should be able to test your nginx configuration that you have done on your web server at 1.1.1.1 🙂

Setup Linux MySQL, PHP, nginx, php-fpm, varnish and APC on Centos (LEMP)

LEMP stack is a group of open source software to get web servers up and running. The acronym stands for Linux, nginx, MySQL, and PHP. In short, people who are looking into nginx is really looking for better web server as compare to apache which nginx perform better in many aspect although apache is still the most usage web server around due to its stability!

Requirement

Before we can start with all the installation for our fresh installed Centos server, we will need to download and install 2 extra repositories to our server. Below is a 32 bits Centos 6 installation

sudo rpm -Uvh http://download.fedoraproject.org/pub/epel/6/i386/epel-release-6-8.noarch.rpm
sudo rpm -Uvh http://rpms.famillecollet.com/enterprise/remi-release-6.rpm

64 bits Centos 6 installation you will need to fire the below command,

sudo rpm -Uvh http://download.fedoraproject.org/pub/epel/6/x86_64/epel-release-6-8.noarch.rpm
sudo rpm -Uvh http://rpms.famillecollet.com/enterprise/remi-release-6.rpm

We will need to do this in order to get nginx and php-fpm off our centos machine since its not available on our fresh Centos installation.

Install Nginx on Centos

Firstly we will need to install our Nginx web server by firing the below command,

sudo yum install nginx -y

now we will need to update our nginx configuration at /etc/nginx/nginx.conf to the following

# For more information on configuration, see:
#   * Official English Documentation: http://nginx.org/en/docs/
#   * Official Russian Documentation: http://nginx.org/ru/docs/

user              nginx;
worker_processes  4;
worker_rlimit_nofile 8192;

error_log  /var/log/nginx/error.log;
#error_log  /var/log/nginx/error.log  notice;
#error_log  /var/log/nginx/error.log  info;

pid        /var/run/nginx.pid;


events {
    worker_connections  1024;
        # Only for Linux 2.6 or >
        use epoll;
        # Accept as many connections as possible
        multi_accept on;
}

http {
    include       /etc/nginx/mime.types;
    default_type  application/octet-stream;

    log_format  main  '$remote_addr - $remote_user [$time_local] "$request" '
                      '$status $body_bytes_sent "$http_referer" '
                      '"$http_user_agent" "$http_x_forwarded_for"';

    access_log  /var/log/nginx/access.log  main;

    sendfile        on;
        tcp_nodelay                     on;

    #tcp_nopush     on;

    #keepalive_timeout  0;
    keepalive_timeout  65;
        client_body_timeout             30;
        client_header_timeout           30;
        send_timeout                    30;
        client_max_body_size            8M;
        reset_timedout_connection       on;

        # Gzip module configuration
        gzip                    on;
        gzip_disable            "MSIE [1-6].(?!.*SV1)";
        gzip_vary               on;
        gzip_comp_level         3;
        gzip_proxied            any;
        gzip_buffers            16 8k;

    #gzip  on;

    # Load config files from the /etc/nginx/conf.d directory
    # The default server is in conf.d/default.conf
    include /etc/nginx/conf.d/*.conf;

}

The Above configuration allows nginx web server configuration to be setup properly with gzip enabled. Next we need to edit /etc/nginx/conf.d/default.conf to the following

server {
        listen       80 default_server;
        server_name  server.hungred.com;
        root /usr/share/nginx/html; 
        error_log /var/log/nginx/error.log;
        access_log /var/log/nginx/access.log;

        location / {
                root   /usr/share/nginx/html;
                index  index.html index.htm index.php;
        }

        error_page  404              /404.html;
        location = /404.html {
                root   /usr/share/nginx/html;
        }

        error_page   500 502 503 504  /50x.html;
        location = /50x.html {
                root   /usr/share/nginx/html;
        }

        location ~ \.php$ {
                root           /usr/share/nginx/html;
                try_files $uri =404;
                fastcgi_pass   127.0.0.1:9000;
                fastcgi_intercept_errors on;
                fastcgi_index  index.php;
                fastcgi_param  SCRIPT_FILENAME  $document_root$fastcgi_script_name;
                include        fastcgi_params;
        }

}

The above setup our default directory for this server so if you fire up your server hostname, you will reach the directory as written on the default conf file. Now, we will need to test our nginx configuration before starting it,

nginx -t
nginx: the configuration file /etc/nginx/nginx.conf syntax is ok
nginx: configuration file /etc/nginx/nginx.conf test is successful

Once this is done, our nginx web server has been setup and we will need to make sure that it will starts itself every times when it restart by setting up on chkconfig

sudo chkconfig --levels 235 nginx on

All done, we'll need to start up nginx

service nginx start

and we are good to go, you should be able to test whether this is working by firing up your ip address. And you can know your ip address by doing this

ifconfig eth0 | grep inet | awk '{ print $2 }'

But you should know 😉

Install PHP on Centos

Next, we will need to install php by firing

sudo yum install php-cli php-gd php-imap php-ldap php-odbc php-pear php-xml php-xmlrpc php-magickwand php-magpierss php-mbstring php-mcrypt php-mssql php-shout php-snmp php-soap php-tidy

Now edit php.ini file and find "cgi.fix_pathinfo" section then set it to 0 and save it.

Install APC on Centos

Next, we will need to install php-apc by firing

sudo yum install php-apc -y

We will need to update our php.ini file so that apc.so is enabled and is working fine. Edit the file at /etc/php.d/apc.ini and make sure that apc.so is enabled

; Enable apc extension module
extension = apc.so

Now we will need to install php-fpm

Install PHP-FPM on Centos

In order for php-fpm to work, we'll need to install it by running

yum install php-fpm -y

Once php-fpm is installed, we will need to configure it. Open up the file at /etc/php-fpm.d/www.conf and look for the following lines

; RPM: apache Choosed to be able to access some dir as httpd
user = apache
; RPM: Keep a group allowed to write in log dir.
group = apache

and change it to

; RPM: apache Choosed to be able to access some dir as httpd
user = nginx
; RPM: Keep a group allowed to write in log dir.
group = nginx

we are doing this because we are running nginx instead of apache. Next we will need to setup chkconfig so that it will starts itself when our server restart

sudo chkconfig --levels 235 php-fpm on

Lastly we need to start php-fpm

service php-fpm restart

And we are good to go!

Install MySQL on Centos

We will begin installing MySQL server into our machine,

sudo yum install mysql mysql-server 

Once the installation is completed, we will need to secure it!

sudo /usr/bin/mysql_secure_installation

It will prompt and ask you for your current root password.

Since you just installed MySQL, you most likely won’t have one, so leave it blank by pressing enter.

Enter current password for root (enter for none): 
OK, successfully used password, moving on...

Then the prompt will ask you if you want to set a root password. Go ahead and choose Y and follow the instructions.

At the end, MySQL will reload and implement the changes.

By default, a MySQL installation has an anonymous user, allowing anyone
to log into MySQL without having to have a user account created for
them.  This is intended only for testing, and to make the installation
go a bit smoother.  You should remove them before moving into a
production environment.

Remove anonymous users? [Y/n] y                                            
 ... Success!

Normally, root should only be allowed to connect from 'localhost'.  This
ensures that someone cannot guess at the root password from the network.

Disallow root login remotely? [Y/n] y
... Success!

By default, MySQL comes with a database named 'test' that anyone can
access.  This is also intended only for testing, and should be removed
before moving into a production environment.

Remove test database and access to it? [Y/n] y
 - Dropping test database...
 ... Success!
 - Removing privileges on test database...
 ... Success!

Reloading the privilege tables will ensure that all changes made so far
will take effect immediately.

Reload privilege tables now? [Y/n] y
 ... Success!

Cleaning up...

All done!  If you've completed all of the above steps, your MySQL
installation should now be secure.

Thanks for using MySQL!

we need to setup chkconfig so that mysql will start itself upon reboot,

sudo chkconfig --levels 235 mysqld on

Next we start our database!

service mysqld restart

And we are good here.

Install Varnish on Centos

First off, install varnish!

sudo yum install varnish

Then we will configure varnish to act as the middle man between our visitors and our web server! Open up varnish configure file at /etc/sysconfig/varnish and change the port from

# # Default address and port to bind to
# # Blank address means all IPv4 and IPv6 interfaces, otherwise specify
# # a host name, an IPv4 dotted quad, or an IPv6 address in brackets.
# VARNISH_LISTEN_ADDRESS=
VARNISH_LISTEN_PORT=8080

to

# # Default address and port to bind to
# # Blank address means all IPv4 and IPv6 interfaces, otherwise specify
# # a host name, an IPv4 dotted quad, or an IPv6 address in brackets.
# VARNISH_LISTEN_ADDRESS=
VARNISH_LISTEN_PORT=80

this is to ensure that our varnish will be listening to port 80 which is what our nginx server is currently doing! So we will need to update our nginx configuration so that it will listen to other port. This is my blog nginx virtual host which is listening to port 8080 instead of 80, you'll need to change that from the original 80 to 8080 so that it won't crash with varnish!

server {
    listen       8080;
    server_name  hungred.com www.hungred.com;
    root   /var/www;
    index  index.php;

    location / {
        try_files $uri $uri/ /index.php?$query_string;

    }

}

P.S: i have alter a bit on the configuration to avoid unnecessary headache lol. Once this is done you will still have to configure varnish! Open up the file at /etc/varnish/default.vcl and make sure that your server ip and port is correctly updated.

backend default {
.host = "127.0.0.1";
.port = "80";
}

to

backend default {
  .host = "12.23.18.1";
  .port = "8080";
}

The above means that all request from varnish that it doesn't have cache on will redirect to port 8080 which is where our nginx server lies! Ok, so same stuff here, we will need to make sure varnish starts itself or else all our web sites on this web server will die if it got rebooted!

chkconfig varnish on

Finally, reboot both nginx and varnish in this sequence!

service nginx restart

this will change nginx listening port from 80 to 8080 and varnish from 8080 to 80! And we are done!

Summary

Ok to be honest, this tutorial was setup using the same exact same steps as how i've setup for this website and also prove whatever is written here works pretty well! So try it out and let me know if you faced any issue with your installation!

Facebook Graph api delete group or page post

Here is something interesting that i recently found out when i was working on my social media site, toolbox.my. I was trying to delete post that was sent out from this app but there wasn't any documentation written on it and after some investigation and testing i finally got it right!

Deleting User Post

Before i go into how group post is being deleted, if we look at facebook graph api, it stated under "Deleting" that

An app can delete a post if it published it

Which means that a post can only delete by the person who creates it. Therefore, if this is a post created by an app, only the app can deleted it although the user created it using the app. On the other hand, if the user create a post in app and tries to use the app to delete, it won't work.

Now, if we look at the php sample code from the graph api, its pretty straight forward.

/* make the API call */
$request = new FacebookRequest(
  $session,
  'DELETE',
  '/{post-id}'
);
$response = $request->execute();
$graphObject = $response->getGraphObject();
/* handle the result */

but but but, if it said there isn't such method (which usually will), this is most likely because you will also need to indicated who's post this is by doing this,

/* make the API call */
$request = new FacebookRequest(
  $session,
  'DELETE',
  '/{user-id}_{post-id}'
);
$response = $request->execute();
$graphObject = $response->getGraphObject();
/* handle the result */

and it should delete it properly

Deleting Group or Page Post

If you did read what i wrote on deleting user post, you might have guessed how this could apply to all other post created from other section. All you really need to do to delete group post is to do this

/* make the API call */
$request = new FacebookRequest(
  $session,
  'DELETE',
  '/{group-id}_{post-id}'
);
$response = $request->execute();
$graphObject = $response->getGraphObject();
/* handle the result */

while page post you would do this

/* make the API call */
$request = new FacebookRequest(
  $session,
  'DELETE',
  '/{page-id}_{post-id}'
);
$response = $request->execute();
$graphObject = $response->getGraphObject();
/* handle the result */

Basically its the same and the trick here is to tell the delete restful api that you are going to delete a particular object post and these object can be either user, page or groups.

Deleting Post Using Facebook api

In Summary, i would say if you are deleting using facebook api, make sure that the post that you are deleting is created by the app itself and not by the user and since you are using facebook graph api, it is most likely you are using an app to delete a post that was created by your facebook api. Just take note that you can only delete anything created by your app and you won't be able to delete any post by the user although the user is logged into your app (but the app is deleting the user post so it wont work).

Completely removing Node.js and Npm

Apparently i needed to completely remove my node.js and npm installation in my mac mavericks because i have installed various version of node.js from brew and nodejs.org website. After removing node from Brew, i am still able to access my node on my terminal and decides to write this to help anyone who is looking into removing and reinstalling node altogether (either from source or brew)

Removing Node.js

Credit goes to Dominic Tancredi
To recap, the best way (I've found) to completely uninstall node + npm is to do the following:

  • go to /usr/local/lib and delete any node and node_modules
  • go to /usr/local/include and delete any node and node_modules directory
  • if you installed with brew install node, then run brew uninstall node in your terminal
  • check your Home directory for any "local" or "lib" or "include" folders, and delete any "node" or "node_modules" from there
  • go to /usr/local/bin and delete any node executable

You may need to do the additional instructions as well:

  • remove: /usr/local/bin/npm
  • remove: /usr/local/share/man/man1/node.1
  • remove: /usr/local/lib/dtrace/node.d
  • execute: rm -rf /Users/[homedir]/.npm

Then download nvm and follow the instructions to install node. The latest versions of node come with npm, I believe, but you can also reinstall that as wel

Node still isn't uninstalled!

If you have done the above and you can still execute node on your terminate by firing

node

then you might need to do the following. Download the source code from nodejs.org exactly like how you have installed your nodejs from source


git clone git://github.com/ry/node.git
cd node
./configure
make
sudo make install

Inside the source code, instead of hitting 'make' and 'make install', do the following

sudo make uninstall

This instruction will uninstall whatever the source has installed into your machine.

Node and Npm still not uninstalled

Well, if you did all the above and you can still use node on your machine. You might want to try using 'locate' and manually removing all the necessary npm and node files in your machine by using

locate node 
locate npm

after you remove anything from the above command, you should fire the following to update the latest locate database

sudo /usr/libexec/locate.updatedb

but you will have the fire the above command every time you successfully remove certain directory as 'locate' only update periodically at a specific time every day.