Roundcube error :: SERVICE CURRENTLY NOT AVAILABLE! Error No. [500] on cpanel server

I was having problem with cPanel roundCube webmailer on one of my shared hosting server. This might save some people troublesome when you tried the following. After you have login in your server using SSH and enter the following.

[root@server~]# /usr/local/cpanel/bin/update-roundcube-sqlite --force

This error occurred when roundcube database not update properly you can use following steps to resolve this issue. If this doesn't work, it might means that the database might not even exist. You will have to create it first by doing this

[root@server~]# /usr/local/cpanel/bin/update-roundcube --force
[root@server~]# /usr/local/cpanel/bin/update-roundcube-sqlite --force

It should resolve your issue if its error 500.

Boot Ubuntu USB Drive in Virtual Box on Windows Environment

Recently i got my hand on a Ubuntu USB installation drive from my friend. I was excited to get this Ubuntu into my Virtual Box but found out that the virtual box doesn't seems to like USB drive very much and only wants ISO or CD copies! I finally manage to get this thing work after some try and so i decided to write this down in case i want to do such stupid thing again.

Environment

Before is starts let's look at my environment.

  1. Windows 7
  2. Virtual Box v3.2.12
  3. Ubuntu 10.10

I think that's about it.

Physical Disk on Virtual Box

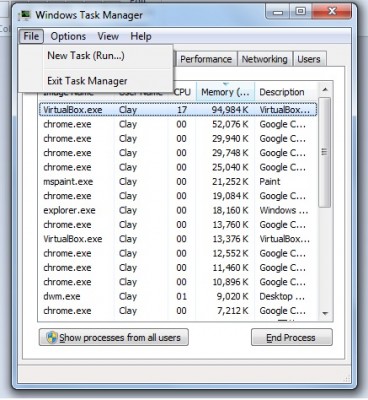
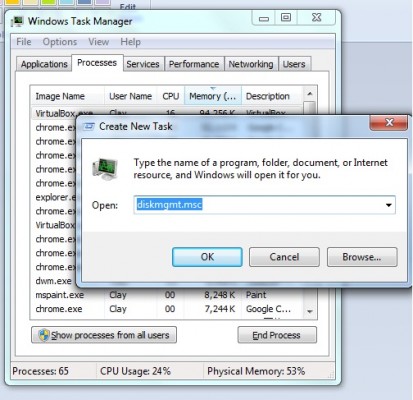
Since virtual box does not know where to look at we have to specifically tell it to look at our hard drive. In order to do this we have to first know where is our current hard drive located (which parking slot). In Windows 7 or any windows environment you can easily find this by typing 'diskmgmt.msc' on the run section when you press Ctrl+Shift+Esc. You should see this below,


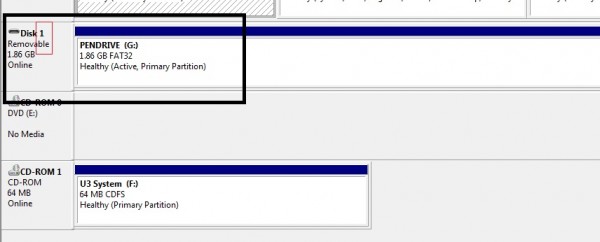
Once you clicked ok, the disk management tool box should appeared and you should take note of your disk location which is highlighted in red for my case.

Once you have done all these, you should have a clear idea where is your parking slot (drive location). Next we will need to create this physical location for our Virtual box to read.

You all might be aware that starting from Window Vista, most of our files are being protected. In order to create a physical drive, we will need to run our command prompt or terminal by pressing cmd.exe on run or through search (advisable since we want to run our command prompt on administration access).

The command prompt should pop out and you should now find the location of your virtualbox installation directory as shown below,

copy the location and paste it into the command prompt with cd infront which will give you this

cd C:\Program Files\Oracle\VirtualBox

Next, copy the following instruction into the command prompt as well

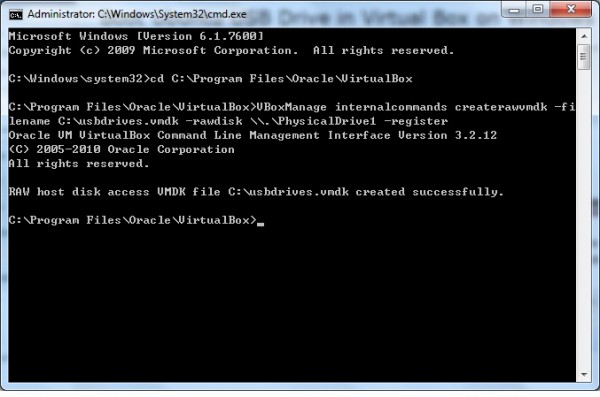
VBoxManage internalcommands createrawvmdk -filename C:\usbdrives.vmdk -rawdisk \\.\PhysicalDrive1 -register

In my case, my parking slot (drive location) was at 1. Hence, the above code writes \\.\PhysicalDrive# will be changed to \\.\PhysicalDrive1 instead of any other number. And "C:\usbdrives.vmdk" is the location i want to save my physical drive to. You should see something like this in your command prompt,

If you see any problem with creating a physical drive, it is most likely due to your permission of your command prompt.

Installation Of Ubuntu using USB Drive onto VirtualBox

Now we are ready to tell our VirtualBox our location of our USB drive. Firstly, you would have to open your virtualbox under Administrator access similarly to the way you open up the command prompt.

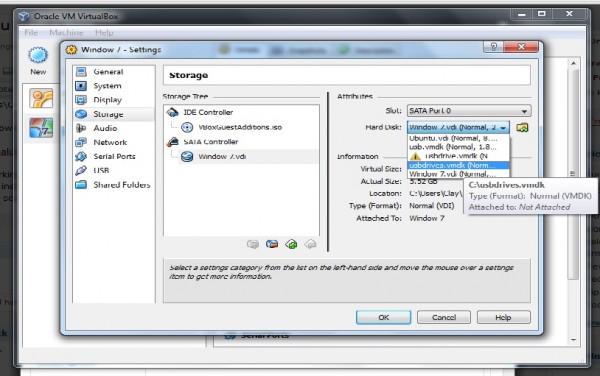
Next you would have to setup a new virtual machine and under its setting choose hard drive and select the newly created physical drive file as its IDE Controller.

Now start your virtual box and it should starts loading off your thumb drive!!

After installation complete

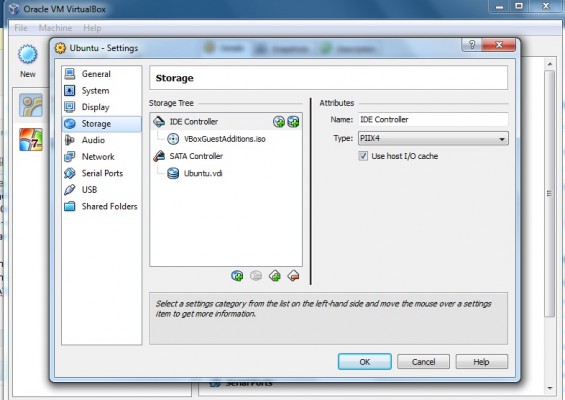
After your installation has complete, do remember to remove your physical drive under setting and select only the Ubuntu.vi on your SATA Controller since your IDE Controller will most likely installed with the VBoxGuestAdditional.iso as shown below,

WordPress 3.0 Plugin Activation Error – “Headers already sent”

Well, i have been customizing my WordPress a lot to produce something like the food directory or blogshopping tool which required a lot of hack on to WordPress to make everything work perfectly. Recently i have upgraded my WordPress to the latest version 3.0.1. Everything seems fine until one day i decided to enhance my site. Upon activting my WordPress plugin, an error message occurs stating "The plugin generated 3 characters of unexpected output during activation. If you notice “headers already sent” messages, problems with syndication feeds or other issues, try deactivating or removing this plugin.". Although the plugin successfully activated, it seems like there are some problem with the plugin that is causing this. I search high and low for it but couldn't seems to detect any header being sent explicitly without my knowledge.  To make matter worst, this caused all my timthumb (image of the fly) script to malfunction which caused ALL my images to break. Hence, none of the images generated by timthumb were generated on the website. This is disaster!!!  Why is my header being sent when there is NOTHING in my code that is sending it?!!! (panic)

I went to alert my hosting company (hostgator) about this and tried to resolved this on the server level as my test environment which is another host were functioning perfectly without causing me a single problem! However, they couldn't find any cause on their server side that may caused this problem and direct me back to the application problem and asked me to check my code. Puzzled by all the mystery that is happening on my test and live environment. I decided to look further into what could have happened. And here are some of the things that i found but doesn't happen to me.

Extra whitespace / Character

Extra whitespace or character before the tag will caused this to happen. This is a comment mistakes made by many new php developers. But in my case, this wasn't the problem.

My Situation

Soon, i found out my mistake. Apparently, my test environment server setting allows Unicode encoded file type to be read normally. However, the one on Hostgator only allows ANSCII to be read. Hence, all the Unicode encoded files were the culprits that is causing all this problems. It seems like the php setting made on the server can caused this to happen as the file type unknown to the php parser seems to bypassed the php output buffer and sent out the plaintext mime type before everything else which caused my timthumb to not work properly (since image sent in jpg mime instead of plaintext). This might be the reason why WordPress is giving you a message of "The plugin generated 3 characters of unexpected output during activation. If you notice “headers already sent” messages, problems with syndication feeds or other issues, try deactivating or removing this plugin." when you try to activate the plugin. It can also be caused by other plugins builder who are unaware that this might happen as their environment works perfectly and yours doesn't. Oh, the reason why anyone would want to change the encoding from ASCII to other form of encoding can be due to special character or other languages writing that ASCII doesn't support. Hence, changing the file encoding types allows php to display out the correct message. (WordPress is multilingual, this should happen more often than you think :)). Hope it helps 🙂

“You do not have sufficient permissions to access this page.” on plugin admin page after update to WordPress 3.0

Well, if you are having problem with your WordPress plugins after an upgrade to WordPress 3.0, this article might just help you. The error you will being seeing on your WordPress plugins will most likely be located on the admin side of WordPress. You will most likely see the message "You do not have sufficient permissions to access this page." and starts debugging and looking for clues on what is happened suddenly with the new upgrade of WordPress 3.0. (that what happens to me) You will most likely find yourself looking at the function user_can_access_admin_page() which return false and cause you debugging all these in the first place. Then, you will find yourself stuck at line 1407 of wp-admin/includes/plugins.php with the following code.

	if ( isset( $plugin_page ) ) {
		if ( isset( $_wp_submenu_nopriv[$parent][$plugin_page] ) )
			return false;

		$hookname = get_plugin_page_hookname($plugin_page, $parent);
		if ( !isset($_registered_pages[$hookname]) )
			return false;
	}

Now, the culprit is definitely caused by $_registered_pages[$hookname] array variable not being set. Hence, this keep you wonder, "why there wasn't any problem until now until WordPress 3.0?". How do we solve this?

Solutions for plugin "You do not have sufficient permissions to access this page." error

There is an obvious solution for this that is to set the global array varaible of $hookname into it so that it always return a true.

	GLOBAL $_registered_pages;
	$hookname = get_plugin_page_hookname( $plugin_file , '' );
	$_registered_pages[$hookname] = true;

This way, you will bypass the validation easily. This is easy but who want hack when there is a properly way of doing it?

My problem solution

Well, my plugins problems can be solved this way but i believe there is an easier way out. Hence, after some try and reading i suspect there is a stricter rules implemented on WordPress when creating your WordPress plugin. Finally, i get a hold on what is wrong with my plugins that is causing "You do not have sufficient permissions to access this page." on all my plugins admin page. Here's the culprit.

	#Before 3.0
	$plugin_page = add_options_page("Hungred Feature Post List", "Hungred Feature Post List", 10, "Hungred Feature Post List", "hfpl_admin");

	#After 3.0 onwards
	$plugin_page = add_options_page("Hungred Feature Post List", "Hungred Feature Post List", 10, "Hungred-Feature-Post-List", "hfpl_admin");

Take note that the slug parameter is being changed from spaces to dashes. WordPress get_plugin_page_hookname will remove all spaces on your slug parameter instead of leaving it which will give "Hungred Feature Post List" instead of "HungredFeaturePostList". Since there is only "Hungred Feature Post List" exist within the $_registered_pages global array and "HungredFeaturePostList" wasn't being registered. The validation fail and throw me an error page.

Java (J2SE) Universal Turing Machine And Multiplication/Factorial/Ackerman Simulator

This is an assignment questions to create a turing machine that perform a simple task, multiplication, factorial, n xn and ackerman function given an input. I am not going to give a lecture on what is universal turing machine and how my simulator work but this should gives people an idea on how you can build a simple universal turing machine and other simulator easily.

Universal Turing Machine

My universal turing machine is some how "cheap". It basically read a string and moves according to how the simulator has instructed it to do. Here is the code of my universal turing machine in Java(J2SE).

public String UTM(String input, String[][] simulator){
        int pointer = 0;
        int state = 0;
        boolean stop = false;
        while(true){
            String[] tmp = input.split("(?!^)");
            for(int i = 0; i < simulator.length;i++){
                if(simulator[i][1].equalsIgnoreCase(tmp[pointer]) && simulator[i][0].equalsIgnoreCase(String.valueOf(state))){
                    tmp[pointer] =  simulator[i][2];
                    if(simulator[i][3].equalsIgnoreCase("R"))
                        pointer++;
                    else if(simulator[i][3].equalsIgnoreCase("L"))
                        pointer--;
                    else if(simulator[i][3].equalsIgnoreCase("STOP"))
                        stop = true;
                    state = Integer.parseInt(simulator[i][4]);
                    break;
                }
            }
            if(stop){
                input = implode(tmp, "");
                break;
            }else{
                input = implode(tmp, "");
                System.out.println("Result = "+input + " AT state " + state + " looking at item = "+ pointer + " "+tmp[pointer]);
            }
        }
        
        return input;
    
    }
    public String implode(String[] ary, String delim) {
        String out = "";
        for(int i=0; i<ary.length; i++) {
            if(i!=0) { out += delim; }
            out += ary[i];
        }
        return out;
    }

The Universal turing machine takes in an input and a simulator in this case our simulator is an 2D array of instruction.

Simulator

My simulator is build in a 2D array of strings as mention previously. Here is an example of my simulator in an array.

 String[][] Q1 = {
            {"0", "_", "_","R", "0"},
}

And here is the explanation on what each column means.

  1. Current State
  2. Found Symbol
  3. Replace Symbol
  4. Move Direction (R - Right, L - Left)
  5. Move to State

Basically my simulator is that simple.

Multiplication Simulator

Now, i will provide you with my multiplication simulator with the following number of state required to calculate the multiplication of two numbers.

String[][] Q1 = {
            {"0", "_", "_","R", "0"},
            {"0", "1", "1","R", "0"},
            {"0", "0", "_","R", "1"},
            {"1", "0", "0","R", "1"},
            {"1", "1", "0","L", "2"},
            {"1", "_", "_","STOP", "2"},
            {"2", "0", "0","L", "2"},
            {"2", "_", "_","L", "3"},
            {"3", "0", "0","L", "3"},
            {"3", "_", "_","STOP", "3"},
            {"3", "1", "0","R", "4"},
            {"4", "0", "0","R", "4"},
            {"4", "_", "_","R", "5"},
            {"5", "0", "0","R", "5"},
            {"5", "1", "1","R", "5"},
            {"5", "_", "_1_","L", "6"},
            {"6", "1", "1","L", "6"},
            {"6", "0", "0","L", "6"},
            {"6", "_", "_","L", "7"},
            {"7", "0", "0","L", "7"},
            {"7", "1", "0","R", "8"},
            {"7", "_", "_","R", "10"},
            {"8", "0", "0","R", "8"},
            {"8", "_", "_","R", "9"},
            {"9", "1", "1","R", "9"},
            {"9", "0", "0","R", "9"},
            {"9", "_", "_1","L", "6"},
            {"10", "0", "1","R", "10"},
            {"10", "_", "_","R", "11"},
            {"11", "0", "0","R", "11"},
            {"11", "1", "0","L", "13"},
            {"11", "_", "_","STOP", "12"},
            {"13", "0", "0","L", "13"},
            {"13", "_", "_","L", "7"}
        };

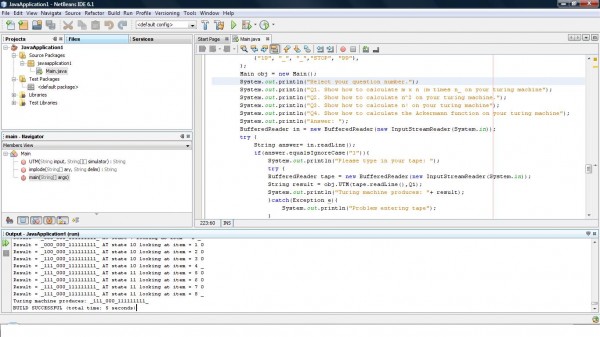
Well, you can see this takes 13 state to compute multiplication on a turing machine. The above doesn't make a sense to people who don't know what is a turing machine. It's like programming using your brain rather than a IDE editor when you are writing a simulator for a turing machine. Anyway, you can draw a diagram using the above instruction too. eg. input i placed in is "_1110111_". Calualte all the '1' on the right and stop when you see '_' to get your answer.
N x N Simulator

N x N simulator is fairly simple once you get multiplication to work. All you need to do is to clone the number into your input and perform a multiplication.

String[][] Q2 = {
            {"0", "_", "_","R", "1"},
            {"1", "0", "0","R", "1"},
            {"1", "1", "0","R", "2"},
            {"1", "_", "0","STOP", "99"},
            {"2", "1", "1","R", "2"},
            {"2", "_", "_","L", "3"},
            {"3", "1", "10","R", "4"},
            {"3", "0", "101","STOP", "99"},
            {"3", "_", "_","STOP", "99"},
            {"4", "0", "0","R", "4"},
            {"4", "_", "1_","L", "5"},
            {"5", "1", "1","L", "5"},
            {"5", "0", "_","L", "6"},
            {"6", "1", "1","L", "6"},
            {"6", "0", "0","L", "6"},
            {"6", "_", "_","R", "7"},
            {"7", "0", "0","R", "7"},
            {"7", "1", "0","R", "8"},
            {"7", "_", "_","L", "10"},
            {"8", "1", "1","R", "8"},
            {"8", "_", "_1","L", "9"},
            {"9", "1", "1","L", "9"},
            {"9", "0", "0","L", "9"},
            {"9", "_", "_","R", "7"},
            {"10", "0", "1","L", "10"},
            {"10", "_", "_","R", "11"},
            {"11", "1", "1","R", "11"},
            {"11", "0", "0","R", "11"},
            {"11", "_", "0","STOP", "12"}
        };

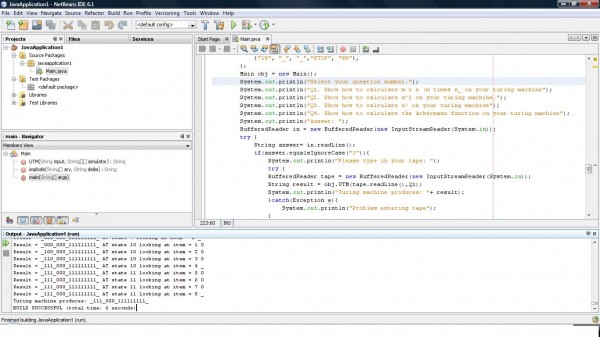
Above shows the simulator for duplicating your input from n to n x n. Once you have finish running this, run the multiplication simulator which will gives you a 24 state turing machine answer (11 + 13). eg. input i placed in is "_111_". Calualte all the '1' on the right and stop when you see '_' to get your answer.
Factorial Simulator

Factorial can be modified from n x n. All you need to do is to modify the graph a little to get factorial answer. Please take note that my answer has not been optimized (i'm simply lazy to optimize for an assignment).

String[][] Q3 = {
            {"0", "_", "_","R", "1"},
            {"1", "0", "0","R", "1"},
            {"1", "1", "0","R", "2"},
            {"1", "_", "_","STOP", "99"},
            {"2", "1", "1","R", "2"},
            {"2", "_", "_","L", "3"},
            {"3", "1", "10","R", "4"},
            {"3", "0", "1","STOP", "99"},
            {"3", "_", "_","STOP", "99"},
            {"4", "0", "0","R", "4"},
            {"4", "_", "1_","L", "5"},
            {"5", "1", "1","L", "5"},
            {"5", "0", "_","L", "6"},
            {"6", "1", "1","L", "6"},
            {"6", "0", "0","L", "6"},
            {"6", "_", "_","R", "7"},
            {"7", "0", "0","R", "7"},
            {"7", "1", "0","R", "8"},
            {"7", "_", "_","L", "10"},
            {"8", "1", "1","R", "8"},
            {"8", "_", "_1","L", "9"},
            {"9", "1", "1","L", "9"},
            {"9", "0", "0","L", "9"},
            {"9", "_", "_","R", "7"},
            {"10", "0", "1","L", "10"},
            {"10", "_", "_","R", "11"},
            {"11", "0", "0","R", "11"},
            {"11", "1", "1","R", "11"},
            {"11", "_", "0","R", "12"},
            {"12", "1", "1","R", "12"},
            {"12", "_", "_","L", "13"},
            {"13", "1", "_","L", "14"},
            {"14", "1", "1","L", "14"},
            {"14", "0", "0","L", "14"},
            {"14", "_", "_","R", "15"},
            {"15", "1", "1","R", "15"},
            {"15", "0", "_","R", "16"},
            {"16", "0", "0","R", "16"},
            {"16", "1", "0","L", "17"},
            {"17", "0", "0","L", "17"},
            {"17", "_", "_","L", "18"},
            {"18", "0", "0","L", "18"},
            {"18", "1", "0","R", "19"},
            {"19", "0", "0","R", "19"},
            {"19", "_", "_","R", "20"},
            {"20", "0", "0","R", "20"},
            {"20", "1", "1","R", "20"},
            {"20", "_", "_1_","L", "21"},
            {"21", "1", "1","L", "21"},
            {"21", "0", "0","L", "21"},
            {"21", "_", "_","L", "22"},
            {"22", "0", "0","L", "22"},
            {"22", "1", "0","R", "23"},
            {"22", "_", "_","R", "25"},
            {"23", "0", "0","R", "23"},
            {"23", "_", "_","R", "24"},
            {"24", "1", "1","R", "24"},
            {"24", "0", "0","R", "24"},
            {"24", "_", "_1","L", "21"},
            {"25", "0", "1","R", "25"},
            {"25", "_", "_","R", "26"},
            {"26", "0", "0","R", "26"},
            {"26", "1", "0","L", "27"},
            {"26", "_", "_","L", "28"},
            {"27", "0", "0","L", "27"},
            {"27", "_", "_","L", "22"},
            {"28", "0", "1", "R", "29"},
            {"28", "1", "1", "L", "28"},
            {"28", "_", "_", "R", "32"},
            {"29", "1", "1", "R", "29"},
            {"29", "_", "_", "R", "30"},
            {"30", "1", "1", "R", "30"},
            {"30", "_", "_1", "L", "31"},
            {"31", "1", "1", "L", "31"},
            {"31", "_", "_", "L", "28"},
            {"32", "1", "1", "R", "32"},
            {"32", "_", "_", "R", "33"},
            {"33", "1", "1", "R", "33"},
            {"33", "_", "_", "R", "34"},
            {"34", "1", "1", "R", "34"},
            {"34", "_", "_", "L", "35"},
            {"35", "1", "_", "L", "36"},
            {"36", "_", "_", "STOP", "36"},
            {"36", "1", "1", "L", "37"},
            {"35", "_", "_", "STOP", "35"},
            {"37", "1", "1", "L", "37"},
            {"37", "_", "0", "L", "38"},
            {"38", "1", "1", "L", "38"},
            {"38", "_", "_", "R", "15"},
        };

It takes 38 state to compute factorial in my case but this can obviously to optimized (i saw many redundancy when i was writing this but i need to save time as its quite a last minute work before exam). All of these shouldn't be a problem as the logic is fairly simple. The real problem comes when ackerman function required you to recursive multiple sections. eg. input i placed in is "_111_". Calualte all the '1' on the right and stop when you see '_' to get your answer.
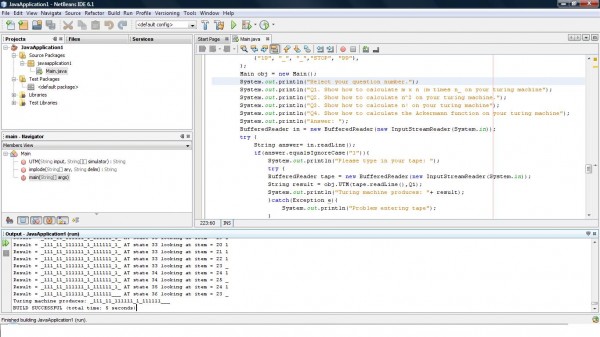
Ackerman Function Simulator

This is not fun but its rewarding if you manage to get the answer. Here is the simulator.

String[][] Q4 = {
            {"0", "_", "_","R", "1"},
            {"1", "0", "0","R", "2"},
            {"1", "1", "1","R", "1"},
            {"2", "1", "0","L", "3"},
            {"2", "_", "_","L", "9"},
            {"3", "0", "_","L", "4"},
            {"4", "0", "0","L", "4"},
            {"4", "1", "0","R", "5"},
            {"4", "_", "_","R", "18"},
            {"5", "0", "0","R", "5"},
            {"5", "_", "_1","L", "6"},
            {"6", "_", "_","R", "7"},
            {"6", "1", "0","R", "5"},
            {"6", "0", "0","L", "6"},
            {"7", "_", "_","L", "8"},
            {"7", "0", "1","R", "7"},
            {"8", "1", "0","R", "0"},
            {"9", "0", "1","L", "10"},
            {"10", "1", "0","L", "11"},
            {"10", "_", "_","STOP", "99"},
            {"11", "_", "1","R", "13"},
            {"11", "1", "1","L", "12"},
            {"12", "1", "1","L", "12"},
            {"12", "_", "_","R", "1"},
            {"13", "1", "1","R", "13"},
            {"13", "0", "1","R", "13"},
            {"13", "_", "_","L", "14"},
            {"14", "1", "_","L", "15"},
            {"15", "1", "1","L", "15"},
            {"15", "0", "0","L", "16"},
            {"16", "_", "1","R", "17"},
            {"16", "1", "1","L", "12"},
            {"17", "1", "1","R", "17"},
            {"17", "0", "1","R", "17"},
            {"17", "_", "_","L", "14"},
            {"18", "_", "1","R", "19"},
            {"19", "0", "1","R", "19"},
            {"19", "1", "1","R", "19"},
            {"19", "_", "_","STOP", "99"},
        };

I manage to create an ackerman function with a 19 state while you might need to create 50-100 state to perfect an ackerman function (my classman has 120+ state). Anyway, this ackerman function IS buggy but it should be good enough to give you some hints or an idea after you have drawn the diagram of this simulator. You will find that this ackerman function ends with a missing starting symbol! Short to say, the turing machine ends when it hits an empty string while replacing the starting symbol as a value. I will show you rather than explaining. eg. input i placed in is "_11011_". Calualte all the '1' to get your answer. Do take note of the highlighted answer. The total seems correct but it actually violated the term 'turing machine' as it didn't stop at the halt state but stop due to the exception of access an empty index on the string array (-1 in this case). Hehe, good luck.
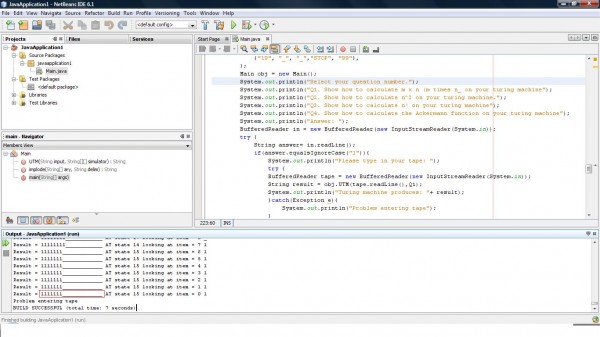
Input

Here is the explanation of my input.

  1. "_" - this is the start and end point
  2. "0" - this is the multiplication symbol (its not always the case when its IN the simulator, i'm talking about the input here 🙂
  3. "1" - this is the value

pretty simple and i keep the same rule for the whole 4 question. All the answer can be found on the right side or left with the number '1'.

Java Code

here is the source code of the whole thing.

Conclusion

The material above is use to serve as a reference for your work. It serves as a starting point on "how to do?" question.