Tutorial: How to access WordPress plugin Subversion repository

This article is dedicated for WordPress developers who has never used Subversion before and wanted to release their plugin to the public. Once you have submitted a form to WordPress. They will reply you with a email that contains your WordPress Subversion repository link. You do not have any knowledge of WordPress Subversion repository and don't know where to upload your new WordPress plugin to share with the public. You started searching for a solution around the internet for Solution without having any luck. Sad. Well, i go through that because i am those confuse people around the world who can't just read and read the whole article written with pure English. So here, some image picture for you to learn to access WordPress plugin Subversion repository. You can also read the whole Subversion book given by WordPress tutorial in command line.

Requirement to access WordPress Subversion

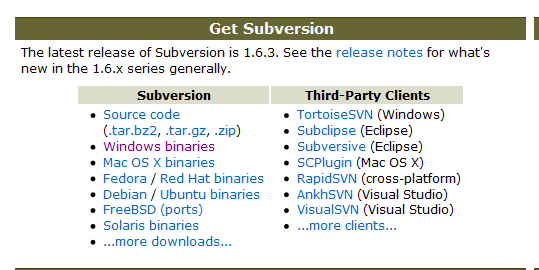
There are two ways of accessing WordPress plugin Subversion repository. The first one will be using pure command line instruction and the other way is to have a Subversion Client. I will show you the easy way to make life easier (the client is built for this purpose). Look at the picture below on Subversion website where all Subversion Client exist for different platform.
subversion-client-location Download one of them depending on your platform and installed it to your system.

Working with Subversion Client

For this article, i will use TortoiseSVN for Windows users. You will have to fire up the installed TortoiseSVN on your PC and it will show you something like that below,
tortoise-alert

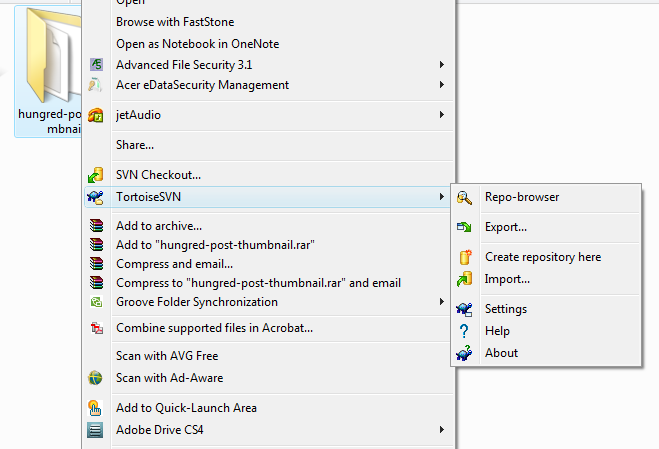
The application is informing you this is not the way to use Subversion repository. The correct way is to find the folder you wish to upload right-click it and select the application from the menu as shown below,

import-subversion

You can use the import function shown above to import straight to your Subversion repository or clicked on Repo-browser to upload them one by one. After you have done that just follow the instruction given by WordPress on where to upload the respective files to and you are done. Wait around 15--20min before it will show up on WordPress plugin search functionality. After this, use that particular folder to make your changes and work on your plugin in the future. After every changes you can just clicked on the same folder and pressed commit. If anything happen you can revert back your version from your previous committed version to see what you have changed. After you have all done with the new version do the same by copying to the Tag folder. Remember the to update the Stable tag in your readme.txt to reflect the changes.

P.S: you will only need to upload once in trunk and copy those files to tag/x.x.x.x to reflect the current version to your users. trunk is the version you will be working on and tag will be the one that inform others about your latest fixed/update on your plugin

Tutorial: How to create a simple file or image management system with jQuery

Let me guess. The topic looks like a huge application that should be placed into a plugin instead of a tutorial? My reason is placing a system into a plugin will confuse yourself and your future programmers. Maintenance and future enhancement will kill you. I like things being kept simple and nice. So i write a tutorial for you instead. The end product can be seen below,
Simple-File-Management-System-with-jQuery_1247670298442

Problem

As always, if there is no problem i won't really write a tutorial. My problem was "I wanted a simple image management system but all i found was FTP application in Google". The basic idea was to have a simple management system for the existing user that had already logged into the system. Therefore, a FTP which required a username and password will definitely be OUT. I think about it and find it quite simple which roll me out to write out the application itself using jQuery

Requirement

This tutorial will require a fair bit of the following languages

  1. PHP
  2. jQuery
  3. JavaScript
  4. XHTML
  5. CSS

Definitely you will have to read a bit more but i try not to write too long to confuse you.

Concept

Let's start witht he concept of this simple application. The objective is to reuse and simplify the whole system without making the whole code look complicated and confusing for anyone to modify the code (i used to write 1 straight line of jQuery without needing to stop and found that i can't maintain my own code after sometime). So like MVC architecture pattern (ignore the MVC part if you want), we will need to split the structure, design and operation apart which connect to the server for communication. Simple to say we are splitting them as follow,

  1. Structure = HTML
  2. Design = CSS
  3. Operation = JavaScript & jQuery
  4. Server = PHP

Although it may be difficult but try to remember that anything that required to display for the first time will be file under structure and etc.

Let's roll out

Since i have already done the coding on my WordPress plugin and tested with it, i will just show you the coding and explain the reason for doing so. This section will be split into four sub section as what i have wrote on the concept section.

Structure

We will need to display all the images or files out of the folder that our user is going to manage. The following code will do just nice. Straight to the point.

<div id="body">
	<div id='frame'>
		<div id='container'>
<?php
		$path = getcwd()."/../random/";
		$files = glob($path.'/*');
		$files = array_filter($files, 'is_file');
		foreach($files as $file)
		{
			$file_name = basename($file);
			$url = $_SERVER["SERVER_NAME"]."/wp-content/demo/jQuery-file-management-system-how-to/random/".$file_name;
			echo "<div class='box'><img title='".$file_name."' src='".$url."'/></div>";
		}
?>
		</div>
	</div>
</div>

Please take note that all of the files contain in the folder are image. So once we have taken out all the files to display, now we will have to structure those pop out box for our user to perform action with the following codes.

<div class="navbox" id="navbox">
	<input type="button" class="hpt_rename" onclick="renameBox()"/>
	<input type="button" class="hpt_remove" onclick="deleteBox()"/>
	<input type="button" class="hpt_cancel" onclick="cancel()"/>
</div>
<div class="navbox" id="renamebox">
	<input type="input" id="input_rename" />
	<input type="button" class="hpt_rename" onclick="rename_confirm()"/>
	<input type="button" class="hpt_cancel" onclick="confirm_cancel()"/>
</div>
<div class="navbox" id="deletebox">
	<p>Are you sure?</p>
	<input type="button" class="hpt_remove" onclick="delete_confirm()"/>
	<input type="button" class="hpt_cancel" onclick="confirm_cancel()"/>
</div>
<div class="navbox" id="messagebox">
	<p id="errormsg"></p>
	<input type="button" class="hpt_retry" onclick="retry()"/>
	<input type="button" class="hpt_cancel" onclick="confirm_cancel()"/>
</div>
<div class="navbox" id="okbox">
	<p id="okmsg"></p>
	<input type="button" class="hpt_ok" onclick="hideAllBox();appear();"/>
</div>

What we have here?

  1. Navigation pop out box structure
  2. Rename pop out box structure
  3. Delete pop out box structure
  4. Error message box pop out structure
  5. OK pop out box structure

So the structure is being placed here instead of dynamically writing them out using jQuery since it is not required to be dynamically we do not want to add in complexity into the always complex JavaScript. And that is all for the structure!

Design

Let's style the structure a bit to give them a little bit of effect for the end user. The very basic part will be to style the overall alignment of the display.

body
{
	margin: 0 auto;
	text-align: center;
}
#frame
{
	width: 90%;
	margin: 0 auto;
	text-align: center;
	padding: 2em;
}
.box
{
	float: left;
	border: #CCC solid 1px;
	padding: 1.5em;
}

.box:hover {
background: #CCC;
cursor: pointer;
}
  1. all element of the body to center
  2. set the frame width and align to center
  3. each element in the frame will float against another
  4. on hover effect for each box of image

This is all we need to style the basic structure! Next the pop out box!

.navbox
{
	background: #FFF;
	width: 220px;
	height: 110px;
	padding: 1em;
	border: #CCC solid 1px;
	position: absolute;
	z-index:2;
	cursor: pointer;
	text-align:center;
	margin: auto;
	left:50%; 
	top:50%; 
	margin-left:-110px;
	margin-top:-55px;
	display:none;
}
input
{
	width: 100px;
	height: 50px;
	border: 0;
	cursor: pointer;
	text-align:left;
}
.hpt_rename
{
	background: transparent url('../images/rename.png');
}
.hpt_remove
{
	background: transparent url('../images/remove.png');
}
.hpt_cancel
{
	background: transparent url('../images/cancel.png');
}
.hpt_retry
{
	background: transparent url('../images/retry.png');
}
.hpt_ok
{
	background: transparent url('../images/ok.png');
}
#input_rename
{
display: block;
width: 200px;
border: #CCC solid 1px;
}

Basically the above code just assign each image to the respective button and align the pop out box at the center. That's all the important thing to know!

Operation

JavaScript and jQuery code are next. There will be a lot of methods but each method will be quite short to promote reusability. Short and clean. Initially, we will have to assign an event handler for each element on the screen with the following code.

var currentObj = null;
var fail = '';
jQuery(document).ready(function() {
	attach_handler();
});
function attach_handler()
{
	$('.box').click(function(){
		currentObj = this;
		$('#body').css({"position":"absolute", "z-index": "1", "top":0,"left":0,"overflow":"hidden","background":"#000"}).animate({opacity: 0.3},500, function(){$('#navbox').css("display", "block");});
		window.scrollTo(0,0);
	});
}

The method attach_handler() is really easy to understand. In term of English, the statement is saying that each element in the image will have a handler that assign its object to 'currentObj' for future references, turn the screen to black and display the navigation box. Finally, scroll it up to the top of the screen. The fail variable if used to verify which action has fail.

Now, notice that each button has an event handler on the structural part which will be passed into the following methods

function cancel()
{
	hideAllBox();
	appear();
}
function appear()
{
	$('#body').css({"overflow":"visible", "position":"absolute", "z-index": "0", "background":"#FFF"}).animate({"opacity": 1},1000);
}
function renameBox()
{
	hideAllBox();
	$('#renamebox').css("display", "block");
}
function deleteBox()
{
	hideAllBox();
	$('#deletebox').css("display", "block");
}
function messagebox()
{
	hideAllBox();
	$('#messagebox').css("display", "block");
}
function okbox()
{
	hideAllBox();
	$('#okbox').css("display", "block");
}
function hideAllBox()
{
	$('#renamebox').css("display", "none");
	$('#deletebox').css("display", "none");
	$('#messagebox').css("display", "none");
	$('#navbox').css("display", "none");
	$('#okbox').css("display", "none");
}

What does the above small little methods do? Display and Hide the box accordingly! Short and sweet? But the main important part is actually the appear method that i would need to explain. It is doing the opposite of what the each element action handler does. It make the pop out box disappear instead of appearing. (appear as in appearance of the screen)

Next are the confirmation buttons and retry button.

function getSelectedFileName()
{
	oldname =  $(currentObj).children('img')[0];
	oldname = $(oldname).attr('title');
		return oldname;
}
function delete_confirm()
{
	filename = getSelectedFileName();
	ajaxCall('D', filename,'');
	
}
function rename_confirm()
{
	var available = true;
	var newname = $('#input_rename').attr("value");
	var rename = document.getElementById('input_rename');
	if(isAllowedName(rename,"Found Invalid Character! Rename Failed. Only symbol '-' or '_' allowed"))
	{
		$('#body').contents().find('img').each(function(){
		oldname = $(this).attr('title').split(".");

		if((oldname[0]).toLowerCase() == newname.toLowerCase())
		{
			available=false;
			return;
		}
		});
		if(available)
		{
			oldname = getSelectedFileName();
			ajaxCall('R', oldname,newname);
		}
		else
			alert("The name has been taken. Please choose another name");
	}
}
function retry()
{
	fail == 'D'?delete_confirm():rename_confirm();
}

First! Notice we used fail variable in retry()? This is the global variable we first declare on the top of the screen. The two other confirmation are delete and rename. delete is straight forward. Get the file name of the object ( which is why each event handler has to identify themselves to the global variable ) and send them through to the server request method. Rename will required more validation to be done since it is a textbox. But after validation checking we will also do the same as the delete function (send in the request).

Next. The Ajax function and validation methods. But let's start with validation method.

function isAllowedName(elem, helperMsg){
	var alphaExp = /^[-_0-9a-zA-Z]+$/;
	if(elem.value.toLowerCase().match(alphaExp)){
		return true;
	}else{
		alert(helperMsg);
		elem.focus();
		return false;
	}
}

regular expression to check for valid character and symbols allowed etc. and display a message if it fail. return true or false. Normal validation procedure (notice space is not allowed). Now we go to the longest codes in the whole script (47 line?), the ajax function.

function ajaxCall(caller, nameold, namenew)
{
	$.post("hpt_operate.php", { op: caller, oldname: nameold, newname: namenew }, function(data){
		if(caller=='D')
		{
			if(data == "1")
			{
				
				$("#okmsg").html("Delete Successful");
				$(currentObj).remove();
				okbox();
				
			}
			else
			{
				fail = 'D';
				$("#errormsg").html("Delete has fail, Please try again later or contact <a href='[email protected]'>Clay</a>");
				messagebox();
			}
		}
		else if(caller=='R')
		{
			data = data.split("||");
			if(data[1] == "1")
			{
				$("#okmsg").html("Rename Successful");
				var domain = 'http://' + window.location.hostname + '/wp-content/plugins/hungred-post-thumbnail/images/random/'+data[0];
				$(currentObj).parent().append("<div class='box'><img title='"+data[0]+"' src='"+domain+"'/></div>");
				$('#input_rename').attr('value','');
				$(currentObj).attr('title', namenew);
				$(currentObj).remove();
				$('.box').click(function(){
					currentObj = this;
					$('#body').css({"position":"absolute", "z-index": "1", "top":0,"left":0,"overflow":"hidden","background":"#000"}).animate({opacity: 0.3},500, function(){$('#navbox').css("display", "block");});
					window.scrollTo(0,0);
				});
				okbox();
				
			}
			else
			{
				fail = 'R';
				$("#errormsg").html(data);
				messagebox();
			}
		}
  });
}

This does look long. jQuery post method. Really easy to use and everything has been done for us in this quick and easy method provided by jQuery. We just pass the name of our server script and the data required and off the request goes. The troublesome thing is when the data came back. For delete, we do checking for success or failure and prompt the correct ok/message box respectively. Rename does the same thing but like delete it will have to remove the element and insert them back to the structure to ensure the changes really has done correctly by the server (we can just rename the src and title but it won't work on all browser). Finally, we will react the event handler since the new member do not have its own event yet. Look at the code written for rename, additional complexity appended into the script compare to structured them outside the script. (imagine if we add all the DOM manipulation in the script, the tutorial will become hell).

Anyway, notice that every single method mention above was used at least once and the number of instructed used for each method was only a few lines. This means that any new features should also reuse these methods to avoid whole chunk of codes and redundancy. Remember we write for human not for computer.

Server

Lastly, the instruction to handle the Ajax request are as follows,

$op = make_safe($_POST['op']);
$oldname = make_safe($_POST['oldname']);
$newname = make_safe(preg_replace("/[^a-zA-Z0-9\s-_ ]/", "",  $_POST['newname']));

$path = getcwd()."/random/";
$extension = explode(".", $oldname);
$extension = $extension[1];
if($op == "D")
{
	echo unlink($realpath);
}
else if($op == "R")
{
	echo $newname.".".$extension."||";
	if(file_exists($path.$newname.".".$extension) == false)
	{
		echo rename($path. $oldname, $path.$newname.".".$extension);
	}
	else
		echo "File Exist, Rename Fail. Please use a different file name";
}

function make_safe($variable) {
	$variable = htmlspecialchars(htmlentities(trim($variable)));
	return $variable;
}

Since we provide a text box basic filtering will be required. Thus, make_safe was created. The above code should also have speak for itself. Anything you don't understand shoot me a question.

Demo

Finally the demo. For most of the codes above i did not change the name which was used in my WordPress plugin. Therefore you will still see same bit and pieces of my plugin prefix. You can find the demo at simple image management system with jQuery but delete has been removed (we won't want the next visited to see nothing on the demo). The files for this demo can be found at jQuery-file-management-system-how-to (without images). Each method comment is written in the attached file (not in the tutorial) to avoid the number of words which make you bored.

Conclusion

Currently this is not a fully released of the system and many possibility can be implement or inserted into this code. But I find that this really isn't much of a tutorial but a way to show you that writing codes in another way do make a differences in term of maintenance, readability, usability and etc. etc. Especially when you are writing a Open Source code to share. Hope you enjoy this!
WordPress Plugin: Hungred Post Thumbnail

Finally, Hungred Post Thumbnail has been completed! This thumbnail is currently LIVE on Hungred.com and 1sitedaily.com. Originally, i wanted to showcase this plugin in a video but I really could not find a free and powerful one so you will have to bear with me until I find a suitable one. But in the meantime the plugin features can be seen below:

About the plugin

This plugin provides you with customization for your own WordPress theme without affecting your overall layout. There are options in the setting section that allows you to fully customize it for your needs. I understand that this plugin is for people who might not have any programming knowledge and would still like to customize thumbnails for their own needs without doing much of the work like resizing, CSS, HTML, WordPress codes, etc. ( i too do not wish to go through these each and every time!) and people who have already established a site with many posts but did not integrate such features in the beginning. Furthermore, the existing post thumbnails does not really suit my needs. Therefore, i created this plugin to help myself and distribute it out to you guys in the hope that it will be of good use.

This plugin is designed for hungred.com and for people who are facing the same problem. Basically it can be broken down into the following points:

  1. Sites that have many posts but do not have any thumbnail features available
  2. Sites that have just started and would like to have thumbnail capabilities
  3. People who are lazy to continously upload thumbnails with each post
  4. People who do not want to deal with codes and just the interface itself
  5. A Thumbnail Plugin that can satisfy at least a basic need of resizing the image size to fit their own needs
  6. Provides uploading capabilities without posting out to the public until the publish or update  button is clicked
  7. A Basic Image Management System that can keep track of the images that have been uploaded
  8. Provides random thumbnail features to their posts
  9. Global size for all thumbnails
  10. Updated and maintained
  11. Cross browser capability
  12. Powerful.

This plugin has been tested with the following browsers:

  • Mozilla Firefox 3.0.11
  • Internet Explorer 7.0.6001.18000
  • Opera 9.64
  • Chrome 2.0.172.33
  • Safari 4

Features of Hungred Post Thumbnail

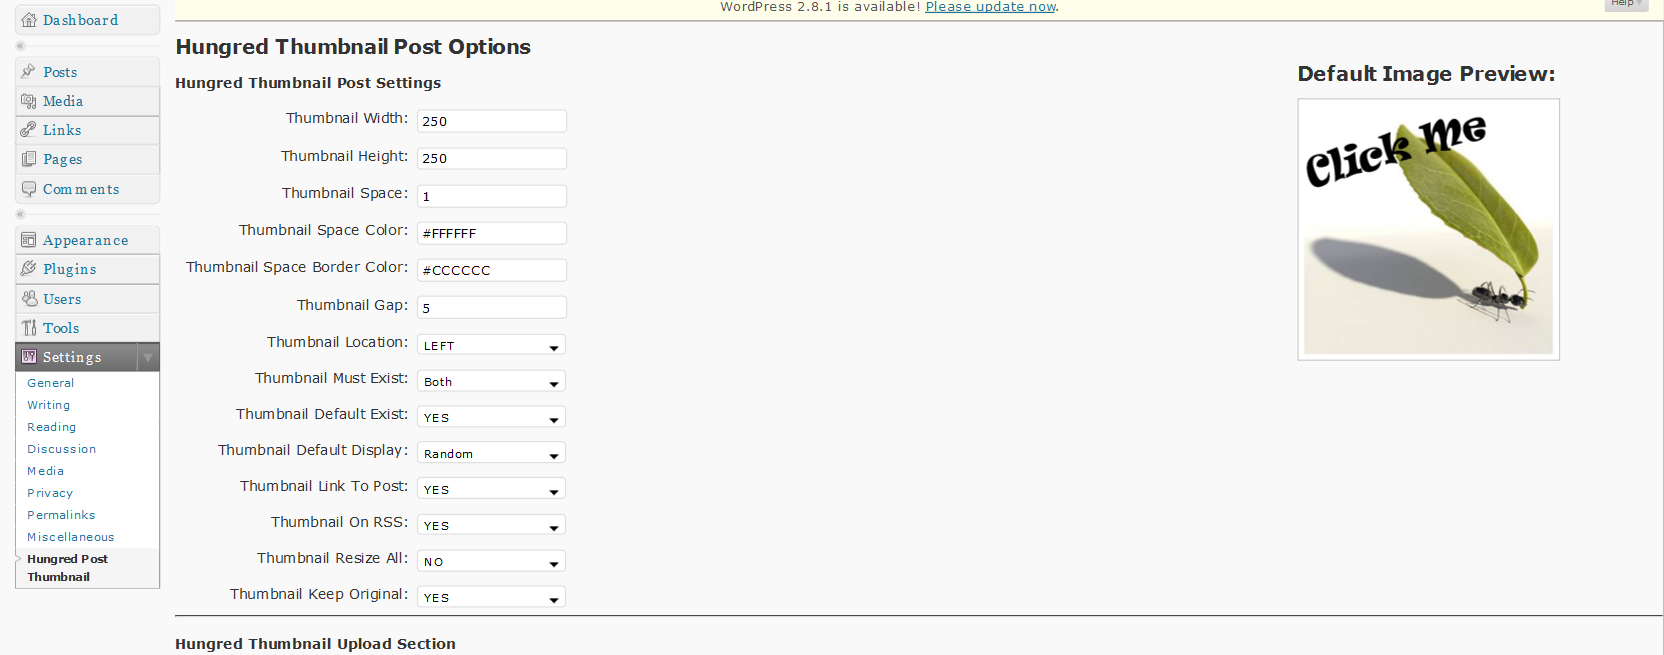
There are quite a number of features available in Hungred Post Thumbnail ever since my tester has been constantly giving me feedback on the plugin on both possible enhancements and bugs. You will see the following page on the setting section in the WordPress Administration panel.

There are three sections altogether in the admin page of Hungred Post Thumbnail; Post Setting, File management and Upload Section as shown below.

hungred-post-thumbnail-wordpress-plugin-admin-panel-settings

In the Post setting the options available are describe below:

  • Thumbnail Width: width of the image, changing this will resize your image
  • Thumbnail Height: height of the image, changing this will resize your image
  • Thumbnail Space: border size of the around image
  • Thumbnail Space Color: background color around the space visible to the user
  • Thumbnail Space Border Color: border color around the image
  • Thumbnail Gap: margin or distance between the image and the border
  • Thumbnail Location: location is the position of the thumbnail on the main page of your site. Available position are top,left and right. Now Random added on v1.2.4
  • Thumbnail Must Exist: this option specifies when a thumbnail must exist. The available options are excerpt only, more tag only, both and disabled. excerpt and more tag only display the thumbnail only when there is an excerpt and more tag provided respectively. Both will display the thumbnail whenever it sees excerpt or more tag. Lastly, disabled will disable the thumbnail from being displayed on the page.
  • Thumbnail Default Exist: this option specifies whether a default image can be used when a thumbnail is not uploaded. Options are YES or NO
  • Thumbnail Resize All: this option will resize all your uploaded images via Hungred Post Thumbnail into the newly assigned width and height. Options are YES or NO. If yes is clicked all image will be resized to the newly assigned width and height and resolution may be lost especially when a smaller image is resized to a larger one. (larger to smaller no effect) If a no is clicked, all existing image will remain as it is only the new uploaded images that will be resized to the new width and height. (old image remain the same size)
  • Thumbnail Link To Post: this option allows users to choose whether they wish to have an anchor or link to the original post via the image. Options are YES or NO
  • Thumbnail Keep Original: this option will help keep your original files so that upon resizing your image, the quality of your picture will remain good. Options are YES or NO
  • Thumbnail on RSS: this option allows you to have thumbnails on RSS! The options are YES or NO.
  • Thumbnail Default Display: This feature is the most interesting part which makes Hungred Post thumbnail powerful. There are three options altogether, single, random and smart. These are the methods available to display your thumbnail when theree are NO file uploaded. Once a file has uploaded it will use the uploaded images instead of the methods defined here. 'Single' method uses the default image display on the right side of the admin panel. 'Random' method will randomly display image when it doesn't see any upload file for the post uniquely. 'Smart' method will search for keywords in the file seperated by '-' symbol and compare against the category and topic of post to determine whether the image is suitable to display for that post. If nothing can be found it will look for images that has the prefix of 'hpt_' which are usually globally acceptable images. This is also displayed uniquely per post. 'advance' is being added on version 1.4.0 onwards. 'Advance' is an improvement of 'Smart' display type which uses score to try and display the most appropriate thumbnail. The differences between 'Advance' and 'Smart' is that 'Advance' will take up more resources than 'Smart' which simple just take 1 keyword into consideration while 'Advance' takes in all the keywords into consideration. Added first image mode upon 2.0
  • Thumbnail Use Inner Style added on version 2.0 which disable the inline style

The above setting will affect your overall image display which you can customize to fulfill your need. The more important one has been placed with JavaScript to double confirm with you. Please take note that if you turn off your backup original setting, the resizing will take the current size image which might affect your overall resolution! But if you would like to save space and keep your hosting plan usage space low, you may turn it off but try not to resize upwards as downwards seems alright. Example, 500x500 when resized to 300x300 is fine but when resizing from 300x300 to 500x500 you will see a drop in quality.

If the resize is set to 'YES', the process may take a 40-50sec to resize 500 images. Depending on how large your image base is in Hungred Thumbnail Post, it may take longer. However, 500 images have been tested with a 512kb connection which only takes around 40-50 sec. Please take note that your original image should, at best, have a smaller size than 1MB or 100kb to optimize the resizing process and prevent out of memory problems in PHP.

In the case when you want to refer back to the original setting,

  • Thumbnail Width: 250
  • Thumbnail Height: 250
  • Thumbnail Space: 1
  • Thumbnail Space Color: #FFFFFF
  • Thumbnail Space Border Color: #CCCCCC
  • Thumbnail Gap: 5
  • Thumbnail Default Image: default.png
  • Thumbnail Loading Image: loading.png
  • Thumbnail Location: LEFT
  • Thumbnail Must Exist: BOTH
  • Thumbnail Default Exist: YES
  • Thumbnail Default Display: Random
  • Thumbnail on RSS: YES
  • Thumbnail Link To Post: YES
  • Thumbnail Resize All: YES
  • Thumbnail Keep Original: YES

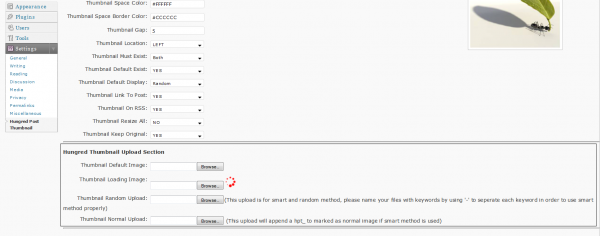
hungred-post-thumbnail-wordpress-plugin-admin-panel-upload

The upload section will look like this and contains 4 upload bars.

  • Thumbnail Default Image: upload function to change the default image if no image is attached. png, gif, jpg, jpeg are allowed only.preview is shown on the right hand side
  • Thumbnail Loading Image: loading image is the image shown when the user upload an image on the post page. preview is shown beside the upload box. only gif is allowed.
  • Thumbnail Random Image: this is the upload bar for random images when you select the random method as default image. Please name your files with keywords seperated with - symbols to use the smart method in the future.
  • Thumbnail Norma Random Image: this upload bar is also for random images but it will append 'hpt_'  on your upload image to define it as a normal image if smart algorithm cannot find unique good match for your post.

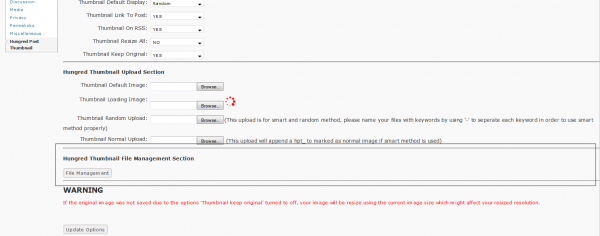
Finally, the file management system was created to help manage your random image files which can be seen below,

hungred-post-thumbnail-wordpress-plugin-admin-panel-file-management

It will provide you with the capability to rename and delete your random image files in order to fit your WordPress theme and category. For example, jQuery and JavaScript is not within your blog scope and you might wish to delete it. Images that are named default (with the 'hpt_' prefix) might be change to non default. You can view the name of each file by placing your mouse on top of the image and a small box will pop out with the name of the image. Below shows the simple image management in Hungred Post Thumbnail,

hungred-post-thumbnail-wordpress-plugin-admin-panel-file-management-2

After an image was clicked,

hungred-post-thumbnail-wordpress-plugin-admin-panel-file-management-3

v1.3.0 multiple upload bar added into file management system!
demo

The other new thing you should have see if you installed Hungred Post Thumbnail is the new upload section in the post page.

hungred-thumbnail-post-page

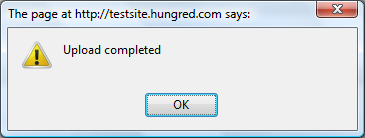
This is fairly simple to use, if you have uploaded an image, it will show below the draft word and an alert box will appear before to indicate it has been completed (the button will be disable when an upload is occurring and enable when it is ready).

upload-complete

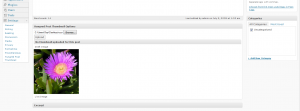
And you will see something like this when it is done.

after-upload-complete

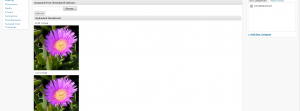
Please take note that unless you have published your post, the thumbnail will not be shown to the public. If a thumbnail has been published to the public, a new picture will be shown below the 'Live image' word as shown below. But if the post does not contains a more tag or there are no excerpt, you won't see any thumbnail but the whole article instead (default by WordPress)

published-image

Once the post has been published or updated, the image will be shown!

test-site-result

Notice that this is a test site for my plugin. So the words are a bit random. Nonetheless, you can visit the main page of hungred.com to see the result of this plugin! The above image are the default one for more tag. If neither more tag nor excerpt exist in your theme, no thumbnail will be shown.

Additional Information

Here are additional information you might like to know about the plugin.

  • Only Administrator are allowed to enter Hungred Post Thumbnail settings and file management.
  • Uploaded images from post page will be removed when new image is uploaded
  • Only post with thumbnail that are published will be seen by visitors
  • published thumbnail cannot be deleted but can be replace by uploading a new image ( will update this upon enhancement)
  • Image will only resize all when width or height changes in the admin panel
  • upon delete of a post, every image and data related to that post will be deleted
  • default image will not be resized when a group of image is resized since we don't keep backup for it
  • loading image will never be resized
  • if original image was not found/saved, the current image will be used for resizing
  • In order to use smart method, images must have '-' symbols with every keywords. This is also to promote your site for SEO purposes in order for search engine to understand your image
  • This plugin has been tuned for SEO purposes on version 1.31 onwards
  • Multiple Upload has been added to file management system
  • Please update to version 1.5.0 and above if you are using WordPress 2.8. Please refer to Prevent WordPress Plugin Update From Deleting Important Folder In Your Plugin on the changes of WordPress 2.8

How to Install Hungred Post Thumbnail

All WordPress Plugins install the same way.

  1. Download the latest version of the Hungred Post Thumbnail WordPress Plugin to your computer.
  2. With an FTP program, access your site’s server.
  3. Upload (copy) the Plugin file(s) or folder to the /wp-content/plugins folder.
  4. In your WordPress Administration Panels, click on Plugins from the menu.
  5. You should see your Hungred Post Thumbnal Plugin listed. If not, with your FTP program, check the folder to see if it is installed. If it isn’t, upload the file(s) again. If it is, delete the files and upload them again.
  6. To turn the WordPress Plugin on, click Activate which is located around the Hungred Post Thumbnail Plugin.
  7. Check your Administration Panels or WordPress blog to see if the Plugin is working.

The other way is to search for Hungred Post Thumbnail on WordPress Administration Panel

  1. Go to Plugin on the menu
  2. Click on 'Add New' (for WordPress v2.8) or look for something similar that allow you to search for Plugin using WordPress Administration Panel (its a link for older version). You should see something like this,
  3. Install-Plugin-In-Wordpress
  4. on the search bar type hungred post thumbnail and you should find it
  5. Click on install on the far right and a pop out box will appear.
  6. Click on install now with the red bar  and go to your WordPress Plugin section and click activate
  7. Check your Administration Panels or WordPress blog to see if the Plugin is working.

How to use Hungred Post Thumbnail

1. Activate the plugin
activate-hungred-post-thumbnail
2. Go to the File Management on Hungred Post Thumbnail Administration section
hungred-post-thumbnail-wordpress-plugin-admin-panel-file-management
3. Remove the default image files that you do not need
hungred-post-thumbnail-wordpress-plugin-admin-panel-file-management-3
4. Upload any images with keywords on via the upload panel

hungred-post-thumbnail-wordpress-plugin-admin-panel-upload
5. Change the setting according to your need
6. Done.

Demo

Look at Hungred.com (this site), go to the home page you will notice that each post image will change upon refreshing. Currently, only this post's thumbnail will not refresh because i have uploaded a specific image for this post only (currently). Other post do not have their own thumbnails and will generate according to the keywords that i provided in each image (i am using the smart method in the plugin). You can use the random method when you have a set of theme images. For example, a set of tables, chairs,glasses, etc. Or you can just use single image if you want.

Known Issues

Here are the known issues on the plugin,

  • NONE

Support and Bug Report

  1. Any bug report or enhancement please go to hungred.com contact me section  for better responsiveness. You may also comment below and hopefully it won't be covered away
  2. Please refer to the forum for question and answer section.
  3. new enhancements will be coming along
  4. maintenance will definitely be provided
  5. any question feel free to ask i will try my best to respond asap
  6. any other instruction you would like to know regarding the use of the plugin, please let me know.
  7. Please read the FAQ section of the readme.txt file in the plugin for any doubts. ( a lot of Q n A )
  8. The changelog can be viewed on the readme.txt file too.
  9. Stable version is v2.0.0

Version 2.0.0

This document is a mess right now but still provides you with certain information. However, upon version 2.0 there are quite a number of changes in this plugin and i will advice you to upgrade. Hence, you might want to visit the readme.txt for all your question before moving towards the forum. In this section i will just paste in some screen shot for you to view the changes that has been made for this plugin. Definitely, it will be much better than the previous version as there are a lot of changes in it that i won't mention it here. And some images might be outdated and it should appear better than the one shown on the screenshot.  Thanks tosoccermylife.com for sponsoring this plugin development!

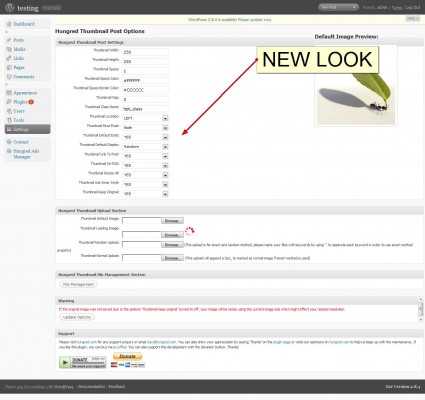
There should be another look than the one shown below

hungred-post-thumbnail-admin

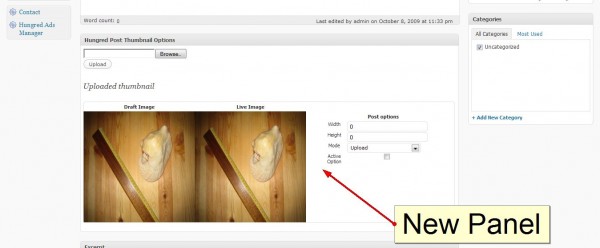
You can now customize each post thumbnail capability

hungred-post-thumbnail-new-panel

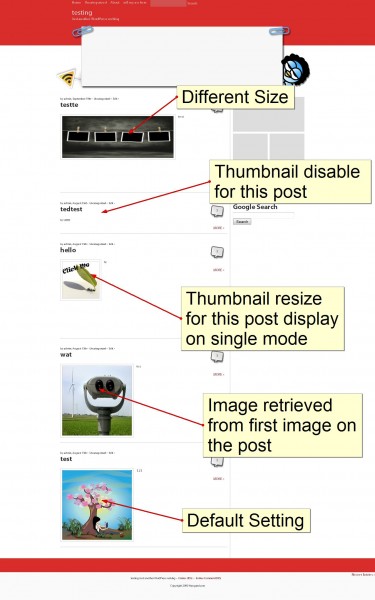
Demo of each post customization

hungred-post-thumbnail-result

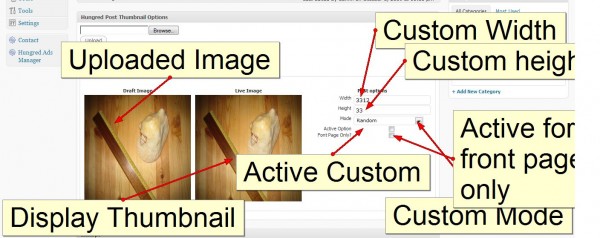
Explanation of what each button does

hungred-post-thumbnail-new-panel-explain

Demo of what plugin can do.

hungred-post-thumbnail-explanation

Please try to backup all your images before updating to this version since WordPress 2.8.0 onwards there is a slight changes on how WordPress update their plugin (delete folder and reinstall). If you face any problem updating to this version, you may want to reinstall this plugin by deleting the whole plugin and reinstall again as there is a major change on the structure of this plugin to cater the new features. Nonetheless, the update should work for everyone.

Files and Last Note

You can download the file at

  • please proceed to WordPress to download the latest version
  • Current version v2.0.0
  • Article Last update: 15 October 2009. Please refer to the change log on readme.txt (in the plugin) for more information

if my countless days and nights working on this plugin helps you, you can buy me a coffee! You can also support this plugin development by using the donate button below. Lastly, please share it with all the WordPress users if you find this useful to them. You can also show us your appreciation by linking us back or just say a thank you if you can 🙂


Click here to lend your support to: Support Hungred Post Thumbnail and make a donation at www.pledgie.com !

Tutorial: How to validate whether a user has logged into WordPress

Since i can't find this information anywhere on Google and WordPress search box, i will write a post out to save time for people who want to validate whether a person has logged into WordPress to access their external plugin page (another page that is not resist in WordPress Administrator panel).

Problem

My plugin has a file mangement page that help manage the site images from my plugin but the page was external and could be access by ANYONE as long as they have the URL, this is not secure at all. Thus, i wanted to know whether WordPress has any method or action hook that allow to validate a user upon entering that page. I tried Google and WordPress search box for any open question for this. Unfortunately, there isn't any.

Solution

In order to use methods exist in WordPress in an external page, we will have to include them into your page. The file i used to include in my page was 'wp-config.php' in WordPress. This will include all WordPress methods and dependency that these methods have so we won't have to worry that our plugin will just break suddenly.

The other important thing after the main page has been imported is the method. WordPress provides a method called 'is_user_logged_in()', with this method, we can validate whether that particular user has logged into WordPress to check whether they are the correct user. The following code illustrate the above explanation,

require_once '../../../../wp-config.php';
if ( is_user_logged_in() ) 
{
	echo "i am logged in";
}

This is jusst a demo so the real code of mine won't be here to confuse you. The require_once path used is just to navigate downwards. So any user of WordPress can access the page? Of course not! Using the following code we can validate which level of access the user has,

require_once '../../../../wp-config.php';
global $current_user;
get_currentuserinfo();
$level = $current_user->user_level;
if ( is_user_logged_in() && $level == "10") 
	echo "you have access";
else
	echo "you do not have access";

This way we will have to validate what access level this particular user has with the global variable $userdata, WordPress doc has demonstrate this pretty nicely and by checking its access level, you can restrict what level of user is allowed to access your page.

Tutorial: How to align center on the screen when using position absolute with CSS

As a developer, i always have the chance to come across position: absolute when doing layout and dynamic animation such as pop out box and etc. But for many years it seems like until today then i realize how to correctly align an absolute position container on the center of the screen. Many tutorial uses many trick in order to position their container on the center of the screen for either alert or selective option but it is really REALLY easy to align your container on the center when using position absolute. I will try to show you some simple and easy way to do this with little complication (The reason why it is difficult are mostly because there are so much words written on some tutorial that make it hell confusing).

Align center of the screen

In order to align your container to the center of the screen, what you need is only the following code.

margin: auto;
left:0; right:0;
top:0; bottom:0;

That's all! Simple and easy to use. We usually use the following to align to center

margin: 0 auto;

This is when we are not using position absolute but this is actually the correct way to align horizontally when using position absolute too! But there is a criteria when we try to align it horizontally using the above code, left and right. We have to reset the right and left in order for the browser to render it to horizontal center with the above code. For vertical center alignment, we will have to reset the top and bottom part. And use the below code to render vertically but not horizontally.

margin: auto 0;

Sound logical right? To sum it up to align horizontally and vertically, we will use the first code that was presented in this article which reset four side and set auto for margin (so that it automatic align for the four side)

Demo

Simple and quick demo to show you that the above code work. Below is the CSS used in the demo

body
{
	text-align: center;
	margin: 0 auto;
}
#box
{
	margin: auto;
	left:0; right:0;
	top:0; bottom:0;
	position: absolute;
	width: 200px;
	height: 200px;
	border: #000 solid 1px;
	background: #82713F;
	text-align: center;

}

The HTML is just a div box

<div id="box"></div>

You can visit the demo at align center of the screen when using position absolute

P.S: This work in all browser except IE

Method that work for all browser

There is a simpler method that will work in ALL browser. But it will required you to know your own block size (the container width and height). It's really just maths, for example, you have a container with a width of 60% and height of 40%, you will want to move your container 20% from its position to the right (assuming it is at coordinate 0,0) and 30% from top to bottom. Why 20%? Because we must balance between the left and right side of your 60% width container, so 100-60=40/2=20%! Same thing goes for your height. With these condition applied, i can show you the demo with the following code.

body
{
	text-align: center;
	margin: 0 auto;
}
#box
{
	position: absolute;
	width: 60%;
	height: 40%;
	left: 20%;
	top: 30%;
	border: #000 solid 1px;
	background: #82713F;
}

And the HTML part will be the same as our previous demo, you can view the result with different browser at align center of the screen when using position absolute with all browser

Another method also similar to the above but it uses another concept. Instead of calculating the right and left side of the width required in percentage, we use the known width and height which usually locate at coordinate (0,0) and push it opposite direction after we request the CSS to move to center by left and top to 50%. Talk won't help explain as much as example, with the following code it will illustrate better,

body
{
	text-align: center;
	margin: 0 auto;
}
#box
{
	position: absolute;
	width: 500px;
	height: 500px;
	left: 50%;
	top: 50%;
	margin-left: -250px;
	margin-top: -250px;

	border: #000 solid 1px;
	background: #82713F;
}

What the above does is giving it a fixed width and height (500px), push it to 50% from left to right and top to bottom. It will not align on the center with just this, we will have to use margin to push in the opposite direction(-250px) by half in order for it to align to center. You can look at the result at align center of the screen when using position absolute with all browser compatibility