Tutorial: How to check whether a particular field exist on SQL table

I was doing some plugin enhancement when i needed to find out whether a field exist on the SQL table. Hence, i went Google and search for a good answer. I found two method to solve this problem but i prefer the one using pure SQL query. Hence, i decide to write them down for future use and also make it as a discussion regarding the pros and cons.

PHP Solution

The first solution i found was a method that used PHP and perform a calculation in order to conclude whether the field exist on the SQL table. Here's the snippets:

$fields = mysql_list_fields("databasename", "tablename");
$columns = mysql_num_fields($fields);
for ($i = 0; $i < $columns; $i++) {
    $field_array[] = mysql_field_name($fields, $i);
}
       
if (!in_array(‘list_id’, $field_array)) {
    mysql_query("ALTER TABLE `tablename` ADD `fieldname` INT(11) NOT NULL DEFAULT ‘1′;");
}

From the above snippet provided by Antonie Potgieter, the concept is good but it is still not optimum. A better alternative can be written as follow.

$result = mysql_query("SELECT COLUMN_NAME FROM INFORMATION_SCHEMA.Columns WHERE TABLE_NAME ='tablename'");
$field_array = mysql_fetch_array($result);      
if (!in_array(‘list_id’, $field_array)) {
    mysql_query("ALTER TABLE `tablename` ADD `fieldname` INT(11) NOT NULL DEFAULT ‘1′;");
}

The code above have not been tested but the query, yes. Nonetheless, a loop can be removed anyhow by retrieving the set of array resist within the return value of mysql_fetch_array. The objective is to avoid loop and shorten the code as much as possible.

SQL Solution

I found a better alternative on DZone! I find that it is a much effective way to check the existence of a field. Here's the snippets:

IF NOT EXISTS (SELECT * FROM INFORMATION_SCHEMA.COLUMNS
WHERE TABLE_NAME = ‘TEST’ AND COLUMN_NAME = ‘TEST_DATE’)
BEGIN
   ALTER TABLE TEST ADD TEST_DATE DATETIME
END

Since we have taken away all the necessary code, only a direct query is needed in this case.

Summary

Which method would you prefer in this case? Why? Any better method than the one present above? I bet these two are the best we have for checking up a field existence unless you are talking about other languages than PHP. I would love to know your thoughts 🙂

Tutorial: How to change plugin table structure in WordPress

Some of us will have problem updating or changing your table structure in your WordPress plugin after it has been released to the public. Many people will come up with different ideas to change their existing plugin structure to a new one. Idea such as checking for that particular column existence either through pure SQL or mixture of SQL and PHP. However, the approach here may be a bit overkill. There is a much simpler way.

Mistakes Made By WordPress Developers

In most plugin tutorial on Google, we will see the normal declaration that everyone is familiar.

$table = $wpdb->prefix."hungred_post_thumbnail";
$structure = "CREATE TABLE  `".$table."` (
	hpt_post varchar(255) NOT NULL,
	hpt_name longtext NOT NULL,
	hpt_url longtext NOT NULL,
	hpt_loc longtext NOT NULL,
	UNIQUE KEY id (hpt_post)
);";
$wpdb->query($structure);

This is the usual code instruction during a plugin tutorial. However, the problem with this is that it makes maintenance of plugin difficult. Assuming you are trying to update the table structure with the above statement. You will find difficulty and resort to different means of getting your plugin table structure updated while keeping the same declaration in WordPress. This is not the right way to create a WordPress table!

Powerful way of creating plugin table in WordPress

We need something more powerful to take the job. In WordPress, there is a function dbDelta which will compare the structure between the existing table and the one in the WordPress database. It will automatic update the missing or extra field and alter the table for you. However, this method doesn't exist in WordPress default setup. You will have to import update.php to get this function. Furthermore, dbDelta will required a few criteria to be met before it is usable.

  • You have to put each field on its own line in your SQL statement.
  • You have to have two spaces between the words PRIMARY KEY and the definition of your primary key.
  • You must use the key word KEY rather than its synonym INDEX

Hence, you will have the following declaration.

$table = $wpdb->prefix."hungred_post_thumbnail";
$structure = "CREATE TABLE `".$table."` (
	hpt_post varchar(255) NOT NULL,
	hpt_name longtext NOT NULL,
	hpt_url longtext NOT NULL,
	hpt_loc longtext NOT NULL,
	UNIQUE KEY id (hpt_post)
);";
require_once(ABSPATH . 'wp-admin/includes/upgrade.php');
dbDelta($structure);

Just that simple. Once you utilized this, changing the structure of your WordPress plugin table will be an ease.

WordPress Plugin: Hungred Image Fit

This plugin is something i build a few months ago but just published out to the public and share with you. This plugin basically do nothing unless there is a need to. Therefore, maintain the current efficiency rate of the website. This plugin helps you guys with large image that are so big when placed on your post that it went over shot your existing layout design. This is not desirable. Hence, a simple plugin is made to solve this problem (again this is a plugin for lazy or precautions people). I implement this plugin on Hungred.com and 1sitedaily.com.

Description

This is a very small and lightweight plugin that automatically adjust your images on your post with a maximum width. This is to eliminate the problem where your images are too large and overlap other parts of your website layout.
Any image that are greater than the maximum width is being adjust according to its ratio aspect. Those images that are smaller than the maximum width is being ignored
On the other hand, resized images also have its tag enhanced to have 'title' and 'alt' attributes for better SEO.

A control panel for adjusting the maximum width size is provided.

For version 0.7 onwards, there is a few new features.

  1. User now can resize post images with specific tag
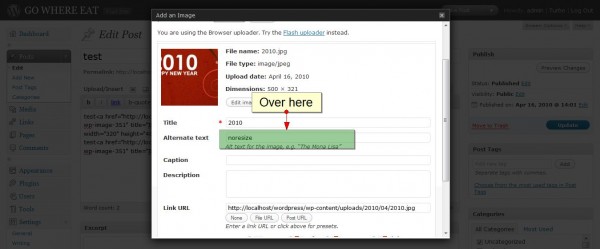
  2. User can remove resize capability of a particular post by placing "noresize" on the alt attribute of the img tag
  3. User can resize a particular post by placing "resize" on the alt attribute of the img tag for user to have absolute control over resizing of image.
  4. Resize method has changed to an optimum one where resizing will not delay your website due to the waiting time for image detail using PHP getimagesize function.

Screen shot of the plugin

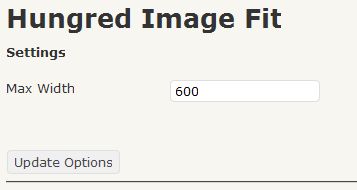
Here are the control panel of Hungred Image fit. Simple and clear.

hungred-image-fit

How to use this plugin

This plugin is a straight forward type of plugin. Do the following and you can ignore it for the rest of your life!

  1. Install it into your wordpress site
  2. Activate Hungred Image Fit
  3. On setting, go to the control panel of Hungred Image Fit and set the maximum width
  4. DONE!

That's it!

On version 0.7, there are more control over the resizing plugin. Here are some information.

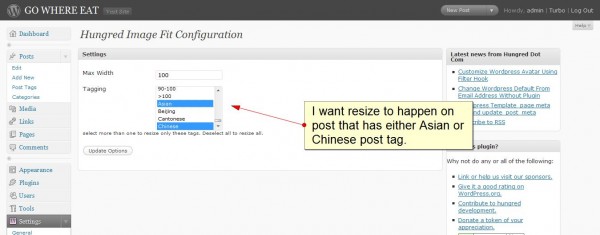
  1. You can now resize post that associate with a particular tag. This is done on the admin page.
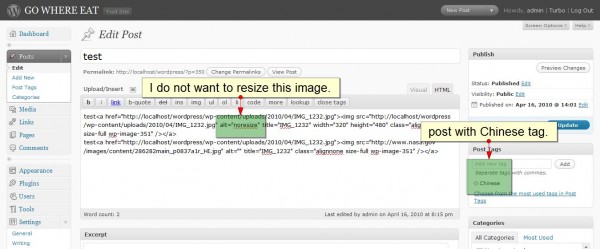
  2. You can manually disable resizing on certain image by placing "noresize" on the img tag alt attribute
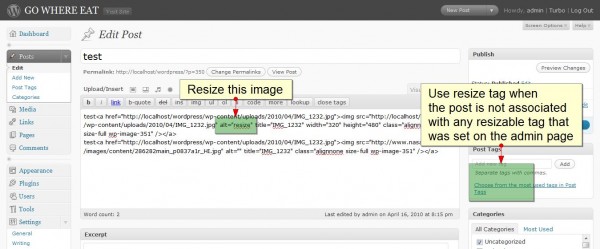
  3. You can manually enable resizing for a particular tag that is not associate with any allowed tag by placing "resize" on the img tag alt attribute.
  4. You can place the key "resize" or "noresize" by using wordpress uploader too.

Plugin

You can search for this plugin on WordPress repository by typing 'hungred' as search criteria. If you want to manually install this, the link is here

Example

I guess its really hard to tell what does this plugin do. Since i used this on 1sitedaily.com, i will show you their example.

hungred-image-fit-example

hungred-image-fit-example-2

Various Ways To Fix Container Height To Float Element In CSS

Float in CSS is something every web designer or font-end developer will come across very frequently in a normal web development process. Especially when web designers are trying to layout a particular element into a CSS design. But laying out float element might not always be smooth sailing. Nonetheless, solutions can be easily spotted. Personally, I was having a few problems with my floating element being floated out of the container as shown below,

problem

After some research it seems like there are various ways we can fix this problem so that the container will takes the floating element height instead of having the floating element getting 'out of bound' situation. Applying these solutions will gives us something we desire as shown below,

solution

Block The Float

One of the way is to block the float from going 'out of bound'. The float element went out of the container because there wasn't anything that stopped it from moving out. Therefore, we can use clear:both; on the element below the container to prevent the element from floating out.

<div id='container'>
<div id='float'></div>
</div>

<div id='next-container' style='clear:both;'>
</div>

With the declaration above, you will see something like this as shown on the image.

float-clear-both

Notice that it still goes over the line but the element did not went under it this time. You can also block it nicely where the block container is placed before the end of line of the container.

<div id='container'>
<div id='float'></div>
<div style='clear:both;'></div>
</div>

<div id='next-container'>
</div>

In return, it will give you the same result as

solution

however, this will cost you another tag needed to block the floating element from overlapping other elements. If you use many div block in your design until it is completely difficult to manage. Try helping yourself by avoiding such method.

Block it with efficient

This method still does the blocking of element. However, in a much better way. We can do this by introducing :after pseudo code!

<style type='text/css'>
#container:after{
clear:both;
}
</style>
<div id='container'>
<div id='float'></div>
</div>

This substitutes the required div block needed to block the floating element from getting out of bound! However, this does have its own fault. We all know that :after is not supported in every version of a browser. Hence, using this might means additional hacks required to perform the same task for other browsers. You can read more on fixing container height with floating element on this article which describe much more detail regarding this method. The result can be seen as

solution

well, its still the same desired result we want. The previous one will be much easier to achieve 🙂

Common CSS approach

The common CSS approach that many will practice is to make use of the declaration 'overflow'. From the image we saw above, the image appeared to be overflowing the container height. Hence, we can prevent such overflow by declaring overflow: auto; which automatically extend the height of the container when the element went overflow.

<div id='container' style='overflow:hidden'>
<div id='float'></div>
</div>

Automatically, it will gives us the result we want.

solution

Simple and efficient! A detail explanation can be seen here.

Summary

I believe these are some of the ways people used to fixed their container height according to float elements in CSS. If you have different methods of doing this. Please feel free to share! I will love to know!

Web File And Folder Permission – Security

I believe majority of us will have their website host on a shared environment as it is cheaper and more cost effective. Even if you have a dedicated server plan, the network administrator will not be 'automatic' enough to educate you about file and folder permission on your web environment. Your best bet is to approach them and discuss this topic hoping for a more secure environment through some dedication from your side (since all file and folder permission are managed by you instead of network administrator). But often we get standard answers from these network administrator who might not be very knowledgeable on this topic and you might ended up getting 'standard' answer from a predefined QnA text on their side. I believe everyone have certain knowledge on file and folder permission but in details what are the security risk we are facing if we ignore them? In this article, we will discuss them and hopefully get some idea and understanding on the security impact of file and folder permission in our web environment.

File and folder permission

Although many already know this, it is still a good practice to explain to those that are still new to file and folder permission. Personally, i think the best way to illustrate a file and folder permission is through a diagram. So i wrote out a sort of diagram like representative below,

  7       7     7
user   group  anyone
r+w+x  r+x    r+x
4+2+1  4+0+1  4+0+1  = 755

The permission mode is computed by adding up the following values for the user, the file group, and anyone.

  • Read 4 - Allowed to read files
  • Write 2 - Allowed to write/modify files
  • execute 1 - Read/write/delete/modify/directory

This will pretty much explain everything the diagram shows. So if we have chmod 777

  7       7     7
user   group  anyone
r+w+x  r+x+x  r+x+x
4+2+1  4+2+1  4+2+1  = 777

It is quite easy to understand what does the number means but how about each type of users?

  • User: it refers to the permission given to the owner of the file/folder.
  • Groups: it refers to the permission given to the group that was allocated to the file/folder
  • Anyone: basically refers to the permission given to outsider like normal visitors of a site

This should sum up the permission access you should give to a particular file or folder in a web environment.

What File and folder permission protect?

It is necessary to understand that file and folder permission protects only your file and folder (obvious). This means that other than files and folders, other stuff is unprotected such as databases.

Permission 777

Most likely majority of your file and folder will be set to permission 777 unless it is told otherwise. It is indeed dangerous to have everything set to permission 777 and might become a security risk. However, it is largely depends on whether your web server is being configure correctly. The main problem is that many server are not being configured correctly which is why users have to protect themselves through file and folder permission. (although permission also can act as another layer of protection for your file and folder). Is it safe for some directory to have permission 777? Yes, if you have a proper configure server. But you should be cautious and only give each folder or file with sufficient permission.

Why we need to set different permission

We will have to be cautious on the different level of permission permit for each type of user if we do not trust our network administrator on the configuration done to the server. The reason is that a hacker might hack into your system through a vulnerable web service on the server. However, the type of user the hacker get hold might not be the owner and having different permission level might just save yourself.

Type of damage

There are many types of damage a hacker might caused to your web environment. Assuming the same scenario happen which the hacker managed to get hold certain access which allows him to execute code as the user of the service. If a user neglect permission level (777 for all file and folder) and its server configuration is done poorly, an attacker can caused the sever damage to your system. Below listed some damage that could happen.

  • add/delete/modify any file or folder
  • implant virus or Trojan that will infect your visitors
  • Steal important information
  • Legal action might be make against you for poor security
  • implant bot
  • Etc.

Confusion on inherit of permission

Files do not inherit the permissions of the containing directory. This means that even though the uploads directory is executable, the files uploaded into it are not. (You should be explicitly setting the permissions for uploaded files in your upload script.) If the files are supposed to be read-only, don't hesitate to set them as 444.

Remove Execute permission

PHP files only have to have the execute bit set if you are running PHP in CGI mode. If you have PHP as an Apache module (mod_php), then it doesn't matter whether the files are executable or not.