This article is dedicated for WordPress developers who has never used Subversion before and wanted to release their plugin to the public. Once you have submitted a form to WordPress. They will reply you with a email that contains your WordPress Subversion repository link. You do not have any knowledge of WordPress Subversion repository and don't know where to upload your new WordPress plugin to share with the public. You started searching for a solution around the internet for Solution without having any luck. Sad. Well, i go through that because i am those confuse people around the world who can't just read and read the whole article written with pure English. So here, some image picture for you to learn to access WordPress plugin Subversion repository. You can also read the whole Subversion book given by WordPress tutorial in command line.
Requirement to access WordPress Subversion
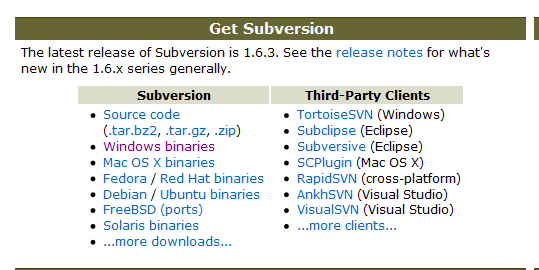
There are two ways of accessing WordPress plugin Subversion repository. The first one will be using pure command line instruction and the other way is to have a Subversion Client. I will show you the easy way to make life easier (the client is built for this purpose). Look at the picture below on Subversion website where all Subversion Client exist for different platform.
 Download one of them depending on your platform and installed it to your system.
Working with Subversion Client
For this article, i will use TortoiseSVN for Windows users. You will have to fire up the installed TortoiseSVN on your PC and it will show you something like that below,

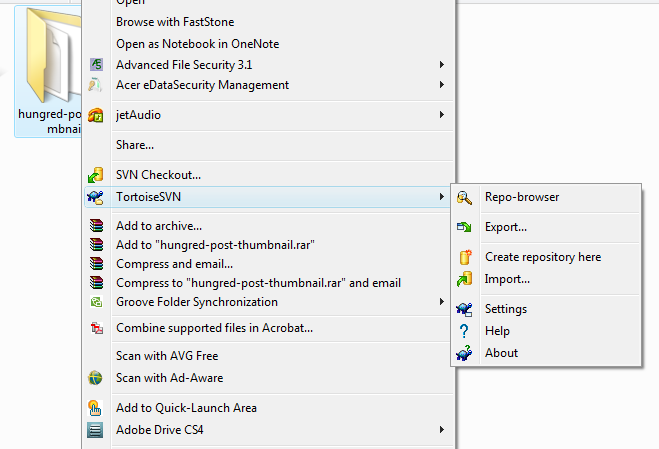
The application is informing you this is not the way to use Subversion repository. The correct way is to find the folder you wish to upload right-click it and select the application from the menu as shown below,
You can use the import function shown above to import straight to your Subversion repository or clicked on Repo-browser to upload them one by one. After you have done that just follow the instruction given by WordPress on where to upload the respective files to and you are done. Wait around 15--20min before it will show up on WordPress plugin search functionality. After this, use that particular folder to make your changes and work on your plugin in the future. After every changes you can just clicked on the same folder and pressed commit. If anything happen you can revert back your version from your previous committed version to see what you have changed. After you have all done with the new version do the same by copying to the Tag folder. Remember the to update the Stable tag in your readme.txt to reflect the changes.
P.S: you will only need to upload once in trunk and copy those files to tag/x.x.x.x to reflect the current version to your users. trunk is the version you will be working on and tag will be the one that inform others about your latest fixed/update on your plugin


Hi
I would like to develop an blogging site using the wordpress and with SVN . So that what ever i do in the local server it gets updated in the main server with out any hassel .
CAn u plz suggest how can i set up the thing?
Evertime i need to do the same work like installing plugin or wordpress as the svn updated the local machine config file in the server
Hey Sanjib,
Well, version control work this way. You will edit anything at your local drive and once you have complete updated your codes, you click commit to update the server. This way you won't overload the server with many edited files in the process. It will just update the one that you have decided to release. Thus, each version can be compared against another version and you won't get a million version due testing which makes it hard to track the version again.
Clay
But the problem is not the way it work . The plugin installation that was done in the local drive will again need to install in the server. Is it ok u think i need to work twice for the same . Cn it be avoided?
Thanks for the early reply
just a note to say thanks for an easy tutorial. its surprisingly difficult to do if you're not used to this stuff. the wordpress instructions are brain-bendingly hard.
exactly! it was surprising that WordPress expect everyone to know these stuff!
thanks, this is definitely what I need for my new website
It was a great script sir. I learn a new function here, that is trigger_error() function. This script would help me much if i forgot which wordpress function i’ve ever modified using add_filter().
Thank you so much sir..