Mac Fix for Java 8+ & iDRAC 6 Connection Failed

If you are using iDrac6 with your Mac. Good luck to you my friend as you will mostly keep getting connection failed on your Java application and this is VERY scary since you can't talk to your machine anymore! But there is a solution! (at least i figure one) so let's get started

Java Setup

Firstly, you need to go to your Java Control Panel and do a few things and here are what you need to do on your Mac Java Control Panel as show below,

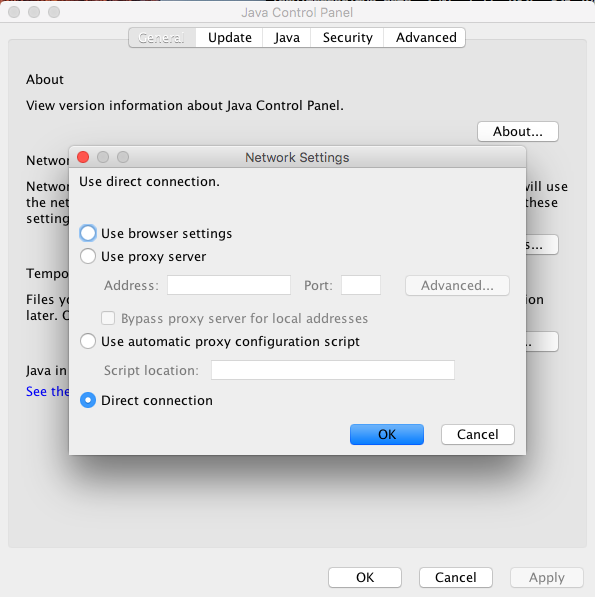
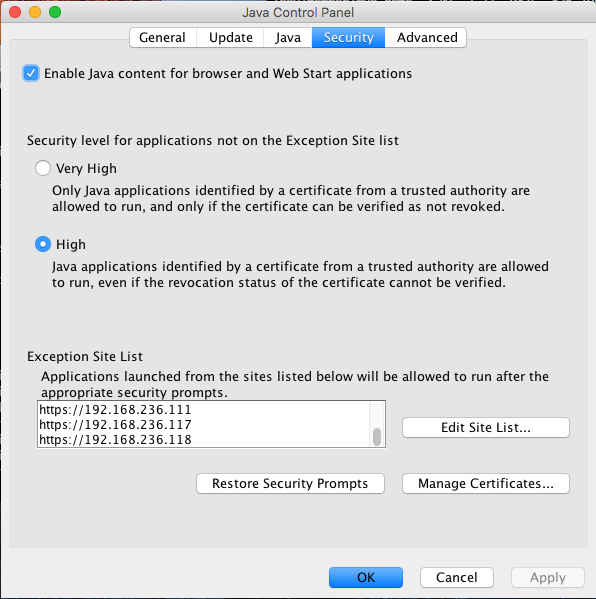
Once you've added to the exception site list and set your connection to direct. You'll need to go to your terminal to edit Java Security located at

sudo vi /Library/Internet Plug-Ins/JavaAppletPlugin.plugin/Contents/Home/lib/security/java.security

open it up with vim and look for SSLv3 and comment it out

#jdk.tls.disabledAlgorithms=SSLv3, RC4, MD5withRSA, DH keySize < 1024, \
#    EC keySize < 224, DES40_CBC, RC4_40, 3DES_EDE_CBC

i need to remove both lines in this case. Once you're done. save it and we are done with Java security tweak!

iDrac Changes

Firstly you need to head over to Console/Media and disable Video Encryption

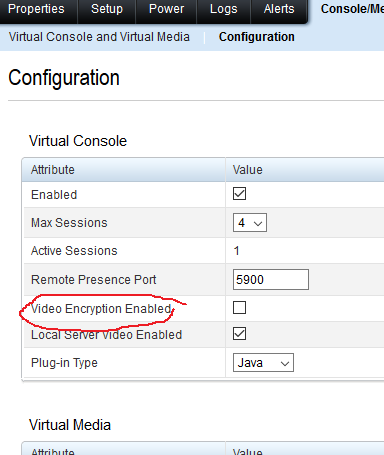
and change 'Plug-in Type' to 'Native'

Click on apply and you are done. Now try again.

Docker link expose MySQL/MariaDB root password on phpinfo() via MYSQLIP_ENV_MYSQL_ROOT_PASSWORD

alright. today I'm on a verbal puking spree! This is another scary security risk with the official docker MariaDB container if you are using a docker link. And if you are wondering what the heck is a docker link, it's basically the command you use to link one docker container to another. for example,

docker run -it --restart=always --name phpfpm \
--link mariadb:ip \
-v /root/www:/home \
-w /home claylua/phpfpm:7.0.29-fpm-alpine3.4

where I am linking MariaDB to my PHP-fpm container.

This is practically what everyone does without noticing that your PHP application actually exposes MariaDB root password for everyone to see with the variable "MYSQLIP_ENV_MYSQL_ROOT_PASSWORD".

As you can see, my root password is visible for all to see. And this is NOT good at all.

Solution

In order to resolve this issue, we need to wrap all our containers into their own private network. We can create a private network in docker with the following command,

docker network create hungred

Now, we have a new network called 'hungred'. And in order for every container to talk in secret, we need them to all use this network. Anyone outside of this network will not be able to communicate with other dockerscontainer. Thus, throwing a 502 error or Nginx error or anything that you'll not expect.

Now, for our example, we will join the hungred network with the following command,

docker run -it --restart=always --name phpfpm \
--net=hungred \
--link mariadb:ip \
-v /root/www:/home \
-w /home claylua/phpfpm:7.0.29-fpm-alpine3.4

where our phpfpm container now runs in the hungred network.

And if you try to run phpinfo() on your application, you won't be able to find the variable "MYSQLIP_ENV_MYSQL_ROOT_PASSWORD" anymore!

P.S: Do take note that ALL your dockers will have to join the same network or else you'll get a lot of unnecessary hiccups.

Setting correct permission for Docker PHP-FPM on mounted folder

Now, if you have followed my guide on setting up Docker with PHP-FPM then you'll most likely face this issue where your files and directories permission will have to set to 777 in order for docker to write files to your mounted folder.

In order to resolve this, you'll need to reset your 777 mistakes using the command given in my reset files/directories permission article.

Once you've done that, you'll be back to your square one where your application can't write to your mounted folder.

Now, in your mounted folder assuming its in /root/www you'll need to look for the user that exec your php script in your php-fpm docker. By default its www-data (dahhh). So let's find out what this user id is on the parent machine by firing the following docker command

docker exec phpfpm id www-data

where phpfpm is the docker name of your PHP-FPM container. If you are not using PHP-FPM on a separate container, you can easily just replace phpfpm to your LEMP/LAMP docker container name.

and the above will show you something like this

root@php:~# docker exec phpfpm id www-data
uid=82(www-data) gid=82(www-data) groups=82(www-data),82(www-data)

the above means that on the parent machine, the user id for www-data is 82. Now, go ahead and change the user permission on your mounted folder to 82 with the following command

chown 82:82 -r /root/www

where /root/www is the example mounted folder used in this article.

Now, with the correct user permission, your application should be able to write correctly without the need to set your directories permissions to 777 which is pretty insecure.

Hope this helps.

Set Default Secure Files / Directories Permission on cPanel / Linux

In cPanel, if you accidentally alter the wrong files or directories' permission, you'll most likely get a 500 error. This is mainly due to the usage of SuPHP in your cPanel setup. Now, the below, snippets are pretty useful to reset or secure the permissions needed for both files and directories.

In order to reset your directories' permission. You'll need to fire the below command.

find . -type d -exec chmod 755 {} \;

where the above find all the directory on your current directory and exec permission 755 on it

In order to reset your files' permission. You'll need to fire the below command.

find . -type f -exec chmod 755 {} \;

where the above find all the files on your current directory and exec permission 755 on it.

In order to fix your cPanel account file permission issue. All you need to do is to fire the above 2 commands on the directory on your user account lets say hungred as shown below,

cd /home/hungred/public_html/

where hungred is your user account. Hope this helps.

easy resize kvm without lvm

Basically i have a chance to resize a kvm without lvm / lvm2. Adding size to a kvm is pretty straight forward, all you need to do is the following,

qemu-img resize vmdisk.img +40G

and if you boot up your machine, you'll see 10G if you hit the following command,

fdisk -l

now, we need to increase this partition so that our existing partition will increase from 60GB to 100GB.

[root@test ~]# fdisk /dev/sda

WARNING: DOS-compatible mode is deprecated. It's strongly recommended to
         switch off the mode (command 'c') and change display units to
         sectors (command 'u').

Command (m for help): n
Command action
   e   extended
   p   primary partition (1-4)
p
Partition number (1-4): 1
First sector (2048-2097151, default 2048): 
Using default value 2048
Last sector, +sectors or +size{K,M,G} (2048-2097151, default 2097151): 
Using default value 2097151

Command (m for help): p

Disk /dev/sdb: 1073 MB, 1073741824 bytes
255 heads, 63 sectors/track, 130 cylinders, total 2097152 sectors
Units = sectors of 1 * 512 = 512 bytes
Sector size (logical/physical): 512 bytes / 512 bytes
I/O size (minimum/optimal): 512 bytes / 512 bytes
Disk identifier: 0x2dbb9f13

   Device Boot      Start         End      Blocks   Id  System
/dev/sdb1            2048     2097151     1047552   83  Linux

Command (m for help): w
The partition table has been altered!

Once you've done that you should have a bigger partition of 100GB

Resize your filesystem with resize2fs

now just do the following and your size should increase to 100GB

root@test:~# resize2fs /dev/sda1
resize2fs 1.43.5 (04-Aug-2017)
Filesystem at /dev/sda1 is mounted on /; on-line resizing required
old_desc_blocks = 8, new_desc_blocks = 13
The filesystem on /dev/sda1 is now 26214144 (4k) blocks long.

pretty straight forward i must say!